
Instruction manual


3
USING THE BLANKET
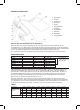
(1)
(5)
(6)
(7)
(8)
(9)
(10)
(11)
(2)
(3)
(4)
1. Controller
2. Switch
3. Label
4. Blanket
5. Display window
6. Temperature key
7. Timer key
8. Cancel key
9. Power wire
10. Plug
11. Output wire
Plug in the mains supply and ensure the mains switch is in the “ON” position.
Switch the controller to the “ON” position and the power indicator should come on. Push the temperature key
until 5 LEDs are lit (maximum heat). It takes at least 30 minutes to get to maximum heat. Once it has reached
maximum heat you can change the heat level by pushing the temperature key. The guide below gives you an
indication of the heat levels and what the number of lit LEDs mean in terms of the level of heat. To prevent
the blanket from getting too hot, the heat level will automatically reduce to a lower heat level after being on
maximum heat for one hour.
FUNCTION MODES
Press times Temperature LEDs Power Heating state
One One Pe25% Weaker
After one
hour changes
automatically
Two Two Pe40% Weak
Three Three Pe55% Middle
Four Four Pe70% Strong
Five Five Pe100% Stronger
Six One Pe25% Weak
...... ...... ...... ......
The controller has a timer function (center button), which allows you to control how long you want the blanket
to be left on. You can program it for max. 8 hours in 1-hour steps. The amount of time in “time mode” will be
accumulated by the number of times you push the timer key on the controller. For example, when you push
the timer key 3 times the blanket will remain on for 3 hours. If you want to cancel the timer, push the cancel
key (bottom key) and all settings will be deleted. To resume, you will have to input the settings using the
timer key again.
If the indicator LEDs start ashing, please press the cancel key to reset the blanket. Change the settings
again to the desired ones. If you can not stop the ashing of the LEDs please unplug the blanket from the
wall outlet and check for damages. If you do not nd any damage reconnect the blanket, if the LEDs are still
ashing stop using the blanket and have it checked by a qualied repairer.
TIMER MODES
Press times one two three four ve six seven eight nine ...
Corresponding
time set light
illuminates
1h
¤ ¤ ¤ ¤ ¤
2h
¤ ¤ ¤ ¤
...
4h
¤ ¤ ¤ ¤
8h
¤
Switch on time (h) 1 2 3 4 5 6 7 8 1 ...
When you are no longer using the blanket or when it is not in use, unplug it from the mains supply.