
User's Manual


-11
-
Chapter 3 Configuring the ODU
The 802.11g WALN outdoor bridge is shipped with default parameters, which will be
suitable for the typical infrastructure/ad-hoc wireless LAN. Just simply install the
802.11g WLAN outdoor hotspot, power it on, and it is now ready to work.
Nevertheless, you can still switch the configuration settings depending on how you
would like to manage your wireless network. You are allowed to configure the
802.11g WLAN outdoor hotspot with a web browser (Web Management), or the smart
configuration utility, known as an Access Point Manager.
3-1 Using the Web Management
The built-in Web Management provides you with a user-friendly graphical user
interface (web pages) to manage your 802.11g WLAN outdoor hotspot.
3-1-1 How to access the web-browser configuration utility?
1. Connect your computer to the wireless adapter either through wireless or wired
connection. Please set a fixed IP address (refer to Chapter 6), within the range of
192.168.0.X (X can’ t be 2), to your computer.
2. Activate your browser, then type this 802.11g WLAN outdoor hotspot’s address (e.g.
http://192.168.0.2), in the Location (for IE) or Address field and press Enter.
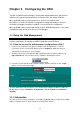
3. Key in the system password (the default setting is “default”) and click on the “Login”
button. You will see the main page.
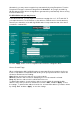
The main window provides 5 items for you to monitor and configure the Wireless 802.11g
WLAN outdoor hotspot: Information, Configuration, TCP/IP, Statistics and Firmware
Upgrade.
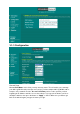
3-1-2 Information
This item shows the current information on the 802.11g WLAN outdoor hotspot such as MAC
Address, Firmware Version, Web UI Version as well as Boot Version.