Caller ID Speaker Phone with Emergency Remote Control Instruction Manual JT-P551 Please read this manual carefully before operating and save it for future reference. Have a question? Please visit http://www.jWIN.
Caller ID Speaker Phone w/SOS Remote Control V11M11_IM_EN_04222008 USER SAFETY GUIDE INSTRUCTIONS ON ENVIRONMENT PROTECTION Do not dispose of this product in the usual household garbage at the end of its life cycle; bring it to a collection point for the recycling of electrical and electronic appliances. This symbol on the product means the instructions for use or the packaging will inform about the methods of disposal. The materials are recyclable as mentioned in its marking.
Caller ID Speaker Phone w/SOS Remote Control V11M11_IM_EN_04222008 USER SAFETY GUIDE Compliance (USA and Canada) This product complies with the standards in Part 68 of the FCC Rules in the USA and CS-03 in Canada. 1. This product must be connected to the public switched telephone network through a modular telephone outlet or jack. 2.
Caller ID Speaker Phone w/SOS Remote Control V11M11_IM_EN_04222008 TABLE OF CONTENTS Getting Started General Features ……………………………………………………………………... What’s Included …..…………………………………………………………………... Location of Controls ………………………………………………………………..… Getting the Telephone Ready for Use ……………………………………………... Mounting the Phone on the Wall ……………………………………………………. Connecting the Stand for Wall Mounting ………………………………................. Installing the Batteries ………………………………………………………………..
Caller ID Speaker Phone w/SOS Remote Control V11M11_IM_EN_04222008 GETTING STARTED Thank you for purchasing the JT-P551 Caller ID Speaker Phone with emergency pendant remote control. Please read and follow the instructions in this manual carefully to ensure that your product operates correctly. General Features • • • • • • • • • • • • • • • • Supports both FSK and DTMF systems Emergency call (SOS) function with 2.
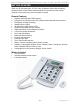
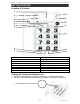
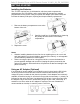
Caller ID Speaker Phone w/SOS Remote Control V11M11_IM_EN_04222008 GETTING STARTED Location of Controls 1 10 2 11 3 4 5 6 7 12 13 14 8 9 15 16 1. LCD Screen 2. DEL Button 3. OK DIAL Button 4. Handset 5. SOS Emergency Dial Button 6. M2 (Memory 2) 7. M1 (Memory 1) 8. MENU Button 9. CID/ESC Button 10. SEARCH ▲ Button 11. SEARCH ▼ Button 12. ONE CALL Button with light 13. Receiver Volume Button 14. Number Keypad 15. REDIAL/P Button 16. FLASH Button Getting the Telephone Ready for Use 1.
Caller ID Speaker Phone w/SOS Remote Control V11M11_IM_EN_04222008 GETTING STARTED Getting the Telephone Ready for Use- continued • For wall mounted units, the side of the tab with the lip must be situated toward the top of the base to allow the handset to hang on the base without falling. The lip fits into the opening under the earpiece on the handset.
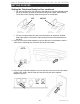
Caller ID Speaker Phone w/SOS Remote Control V11M11_IM_EN_04222008 GETTING STARTED Mounting the Phone on the Wall 1. Choose a desired wall location for the phone. Wall mount hanger 2. Align nails or picture hooks with the wallmount hanger located on the bottom surface of the base. 3. Hammer nails or hangers into the wall so the phone can hang flush with the wall. 4. Set the removable receiver tab with lip toward the top of the base. 5.
Caller ID Speaker Phone w/SOS Remote Control V11M11_IM_EN_04222008 GETTING STARTED Connecting the Stand for Flat Surfaces-continued 5. Line up the bottom three (3) lips on the stand with the bottom three (3) slots on the bottom of the unit and place the lips into the slots. 6. Using your thumbs, gently press the stand just above the bottom three (3) lips until the stand clicks into position. Click! 7. Return the phone to the upright position. The phone is now ready to be mounted on the wall.
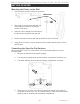
Caller ID Speaker Phone w/SOS Remote Control V11M11_IM_EN_04222008 GETTING STARTED Installing the Batteries The JT-P551 requires four (4) AA batteries, which are used to operate the speakerphone, the LCD display, and to retain Caller ID data and any settings programmed into the phone. Using an optional AC adapter (see Notes below) will increase the battery’s life span, requiring less frequent battery replacement. 1. Remove the battery compartment cover at the bottom of the unit. 2. 3.
Caller ID Speaker Phone w/SOS Remote Control V11M11_IM_EN_04222008 GETTING STARTED Notes: • If neither the batteries nor an AC adapter are connected, the JT-P551 will still be able to place and receive calls, but the speakerphone, the ability to store Caller ID data, and the LCD display functions will not operate. • When batteries are used without an AC adapter, they should be replaced when the display dims.
Caller ID Speaker Phone w/SOS Remote Control V11M11_IM_EN_04222008 OPERATIONAL INSTRUCTIONS Description of the Display The JT-P551 features a three-line LCD. The top line displays basic information; the middle line shows the telephone number of the incoming call; and the bottom line displays the name of the caller. Also included on the display is helpful information such as: • The word, “NEW” appears on the screen when there are new incoming calls.
Caller ID Speaker Phone w/SOS Remote Control V11M11_IM_EN_04222008 OPERATIONAL INSTRUCTIONS Basic Setup-Continued 2. SET DATE / TIME • When the LCD displays “ENTER TIME / DATE”, press [OK/DIAL] to enter this function. • When the LCD displays “ENTER TIME”, press [▲] or [▼] to set the hour. • Press [▲] or [▼] to set the minute. • Press [OK/DIAL] to confirm. • Use the same procedure to set the month and day. 3.
Caller ID Speaker Phone w/SOS Remote Control V11M11_IM_EN_04222008 OPERATIONAL INSTRUCTIONS Basic Setup-Continued 7. SET LOCAL AREA CODE • When the LCD displays “LOCAL AREA CODE”, press [OK/DIAL] to enter this function. • Press [▲] or [▼] to select the first digit of area code. • Press [OK/DIAL] to confirm the first digit. • Use the same procedure to set the rest of the digits. 8. PHONE BOOK ENTRY WITHOUT EMERGENCY NUMBER SETTING • When the LCD displays “STORE NUMBER”, press [OK/DIAL] to enter.
Caller ID Speaker Phone w/SOS Remote Control V11M11_IM_EN_04222008 OPERATIONAL INSTRUCTIONS Basic Setup-Continued 9. PHONE BOOK ENTRY WITH EMERGENCY NUMBER SETTING • When the LCD displays “STORE NUMBER”, press [OK/DIAL] to enter. • Flashing prompt will appear in the middle of the display. • Use the keypad to enter the desired number. • Press [OK/DIAL] to confirm. • A flashing prompt will now appear on the bottom line of the display. • Use the keypad to enter the name (16 letters max.).
Caller ID Speaker Phone w/SOS Remote Control V11M11_IM_EN_04222008 OPERATIONAL INSTRUCTIONS Basic Setup-Continued 11. REMOTE SETTING • Press [MENU] to enter this mode. • Press [▲] until “PAIR NEW PENDANT” is shown on the LCD screen. • Press [OK/DIAL] twice. • The word, “PAIRING” will flash on LCD screen. • Press the SOS button on the pendant and the word “DONE” will display on the LCD screen. • Press [DEL] to exit the setting 12.
Caller ID Speaker Phone w/SOS Remote Control V11M11_IM_EN_04222008 OPERATIONAL INSTRUCTIONS Emergency Call Function 1. EMERGENCY MESSAGE It is important you record the personalized message with all the important information as below (part B). A. This unit includes a back-up pre-recorded message. “THIS IS AN EMERGENCY CALL, TO ACCEPT THIS CALL PRESS ZERO.” B. Your own message must be recorded to properly use the Emergency Help System (max. recording time is 20 seconds).
Caller ID Speaker Phone w/SOS Remote Control V11M11_IM_EN_04222008 OPERATIONAL INSTRUCTIONS Emergency Call Function-Continued 5. B. Then press the [OK/DIAL] to play back the message. C. During the playback, press [DEL] button. Your own message will be deleted and you will be using the pre-recorded greeting. ACTIVATING THE EMERGENCY HELP SYSTEM A. Press and hold the [SOS] button on the telephone for 3 seconds, then the telephone local alarm will sound for 15 seconds.
Caller ID Speaker Phone w/SOS Remote Control V11M11_IM_EN_04222008 OPERATIONAL INSTRUCTIONS Receiving a call Using the Pendant Remote Telephone will ring to alert the user of an incoming call. 1. When there is an incoming call, pick up the handset or press [SPEAKER] to receive the call. 2. You may also use pendant remote to pick up the call. When there is an incoming call, just press the button of the pendant remote and the telephone will be put in speakerphone operation. 3.
Caller ID Speaker Phone w/SOS Remote Control V11M11_IM_EN_04222008 OPERATIONAL INSTRUCTIONS Calling a Number from the Caller ID List-Continued 4. If the record is 10 digits but the first 3 digits of the record is different from the set area code, press [OK/DIAL] once to show 11 digits with adding ‘1’ as the first digits. Press [OK/DIAL] again to return back to 10 digits. Press [OK/DIAL] once again to show 7 digits and first three digits will be erased.
Caller ID Speaker Phone w/SOS Remote Control V11M11_IM_EN_04222008 OPERATIONAL INSTRUCTIONS Phonebook Search, Delete and Dial Back 1. In the on-hook state, press [▲] and [▼] to check incoming call records, press [CID/ESC] to enter phone book record. 2. Use [▲] or [▼] to search the desire record or press the first letter of record name to search the desired record directly. 3. Press [OK/DIAL] to dial back the displaying record. 4.
Caller ID Speaker Phone w/SOS Remote Control V11M11_IM_EN_04222008 OPERATIONAL INSTRUCTIONS Last Number Redial The last outgoing number can be redialed automatically just by pressing the [REDIAL/P] key under off-hook state. This is useful especially if the line is busy. Flash Function 1. When in an office equipped with PABX, this telephone makes it easy to transfer calls. Ask caller to wait and press [FLASH] key once. 2. Dial the extension number which caller intended. 3.
Caller ID Speaker Phone w/SOS Remote Control V11M11_IM_EN_04222008 TROUBLESHOOTING & SPECIFICATIONS Troubleshooting • No Display on LCD Screen o Brightness on display may be turned down. Increase brightness level. o No batteries or batteries are improperly installed. If no batteries, install 2 AA batteries as directed or Install optional AC Adapter (not included). Make sure batteries observe to polarities (+/-) as indicated inside the battery compartment.
TEL: 516-626-7188 FAX: 516-626-7105 website: www.jWIN.com © 2007 jWIN Electronics Corp. All rights reserved. No portion of this printed material or product enclosed herewith including design, shape and graphics, may be reproduced or transmitted in any form without the expressed written consent of jWIN Electronics Corp. by any means, electronic or mechanical, including photocopying, recording, or by use of an information storage and retrieval system.