
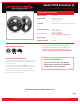
User Guide


B
A
Low OR High/Low Beam
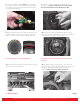
Headlight Aiming Instructions
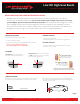
6. When you first turn on your vehicle after installing your
headlights, the Alignment Points of the LOW BEAM may be
positioned differently than shown and will likely be aimed differently
from each other.
7. Using the alignment mechanisms in your vehicle, adjust one
headlight vertically until the Alignment Point is even with the X axis.
7.62 M (25 feet)
5. Reverse your vehicle in a straight line so that the front of the
headlights are 7.62 meters (25 feet) back from the wall.
Y Y
X
Y
X
8. On the same headlight, adjust horizontally until the Alignment
Point is even with the Y axis.
Y
9. Repeat this process on the other headlight. Both headlights
should match the diagram below, where the Alignment Point is
even with the point where the X and Y axis crosses.
Y Y
X
The goal of this sheet is to aim BOTH of your headlights so that
the Alignment Point is at the crossection of the horizontal X
and vertical Y lines you have drawn. The following directions
illustrate the process and proper aiming of headlights.
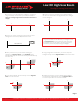
C
3. Connect the center points between headlights in a straight line,
using chalk or tape. This will create your X axis (horizontal) line.
NOTE: Use a straight edge and a level to make sure this line is
straight.
4. Extend your vertical, Y (vertical) axis lines up approximately 3
feet. Your lines should match the diagram below, when looking at
the lines straight on.
Y Y
X
Y Y
X
Page 5
J.W. Speaker Corporation • Germantown, WI U.S.A. • www.jwspeaker.com • speaker@jwspeaker.com • 262.251.6660
Rev: 11/15/2017