
User Guide
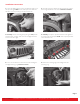

7. Unplug the existing headlight. NOTE: On newer models
there is (1) a red button on the plug that must be pushed
up, and (2) a green button that must be pressed and held
to unplug the existing lamp.
8. Plug in the new LED headlight and install it into the
mounting ring. NOTE: On ECE versions, connect the RED
wire for Front Position and the BLUE wire for DRL.
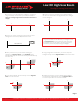
9. Align the alignment lugs on the lamp with the slots in the
ring. The lamp will only fit in one orientation, and from the
front the “Evolution J” text should be readable at the top.
10. Re-attach the retaining ring. Align all 4 tabs on the ring
with the screw holes. It will only fit in one orientation. Install 4
screws from step 5 using the T15 Torx driver.
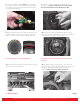
13. Re-attach the front grill by carefully pressing on the grill
until the clips lock back into place.
14. Re-install the 6 fasteners from step 2. The screw in the
fastener must be fully extended as the fasteners are pressed
into place. Tighten the 6 Phillips head screws into the
fasteners. Note: Do not over tighten the screws.
16. AIM THE LIGHTS
11. Repeat steps 5 - 10 on the second lamp. 12. Attach the ground to the battery and test the lamp
function.
Page 3
1
2
J.W. Speaker Corporation • Germantown, WI U.S.A. • www.jwspeaker.com • speaker@jwspeaker.com • 262.251.6660
Rev: 11/15/2017