
User Manual
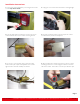

7. Plug in the new tail light connector, then tuck the wiring
back into the vehicle’s cavity.
8. With the resistor facing the inside of the cavity, attach the
bracket and resistor assembly to the interior sheet metal
frame. Apply force until the Tinnerman S-clips fully engage.
9. Starting with the bottom inside screw, attach the new tail
light using the vehicle’s existing screws.
10. Repeat steps 1-9 on the other tail light.
NOTE: The placement of the interior sheet metal frame may
differ on fender cavity between sides of the vehicle and
between model years.
Page 3
J.W. Speaker Corporation • Germantown, WI U.S.A. • www.jwspeaker.com • speaker@jwspeaker.com • 262.251.6660
6544230bRev: 05/19/2016
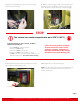
• Resistor MUST be clipped to the Jeep
• Resistor must NOT dangle
• Resistor must NOT touch any wires
• Resistor must NOT touch any plastic or foam
• Do NOT touch the resistor if the vehicle has been in use
within the last six hours. Use caution when handling.
To prevent damage to user or vehicle, you MUST
follow these instructions:
STOP
The resistor can reach temperatures up to 330°F (165°C) .
Failure to install product according
to these instructions will void the
product’s warranty. Symptoms of
improper installation of the resistor
include the turn signal flashing fast.