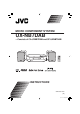
MICRO COMPONENT SYSTEM UX-NB7DAB —Consists of CA-UXNB7DAB and SP-UXNB7DAB INSTRUCTIONS GNT0065-025A [B] UX-NB7DAB[B]ff.indb 1 06.7.
Warnings, Cautions and Others CAUTION — button! Disconnect the mains plug to shut the power off completely. When installing the apparatus, ensure that the plug is easily accessible. The button in any position does not disconnect the mains line. The power can be remote controlled. • When the unit is on standby, the STANDBY lamp lights red. • When the unit is turned on, the STANDBY lamp goes off. CAUTION To reduce the risk of electrical shocks, fire, etc.: 1. Do not remove screws, covers or cabinet. 2.
CAUTION: Proper Ventilation To avoid risk of electric shock and fire, and to prevent damage, locate the apparatus as follows: 1. Front: No obstructions and open spacing. 2. Sides/ Top/ Back: No obstructions should be placed in the areas shown by the dimensions below. 3. Bottom: Place on the level surface. Maintain an adequate air path for ventilation by placing on a stand with a height of 10 cm or more.
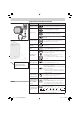
Contents Precautions ...........................................................2 Getting Started .....................................................2 Supplied Accessories ...............................................................2 Prepare the Remote Control .................................................2 Connections ................................................................................3 Basic and Common Operations ...........................5 Operating on the System ...................
Precautions Notes on the power cord • When you are away on travel or otherwise for an extended period of time, remove the plug from the wall outlet. A small amount of power (2.5 W) is always consumed while the power cord is connected to the wall outlet. • When unplugging the System from the wall outlet, always pull the plug, not the power cord. • Do not handle the power cord with wet hands. • Disconnect the power cord before cleaning the System or moving the System.
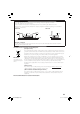
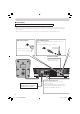
Connections Do not connect the AC power cord until all other connections have been made. NOTES • Make sure the antenna conductors do not touch any other terminals, connecting cords and power cord. Also, keep the antennas away from metallic parts of the System, connecting cords, and the AC power cord. This could cause poor reception. • If the cords are covered with vinyl, remove the vinyl to expose the tip of the cord by twisting the vinyl.
To connect the AM loop antenna 1 Hold 2 Insert 3 Release AM loop antenna (supplied) Turn it until the best reception is obtained. To assemble the AM loop antenna For better FM/AM reception Outdoor FM antenna (not supplied) Disconnect the supplied FM antenna, and connect to an outdoor FM antenna using a 75 W wire with coaxial type connector (IEC or DIN45325). Vinyl-covered wire (not supplied) Extend it horizontally. AM loop antenna Keep it connected.
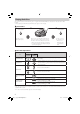
Basic and Common Operations Operating on the System To Press Turn on or off (standby) the power The standby lamp on the System turns off/on. See “Playing Back Discs” on page 7. Select a source* Using Headphones Be sure to turn down the volume before connecting or wearing the headphones. • Connecting the headphones will deactivate the speakers. See “Listening to the Radio” on page 9. See “Connecting a Portable Audio Device” on page 13.
Operating on the Remote Control To Press Turn on or off (standby) the power The standby lamp on the System turns off/on. See “Playing Back Discs” on page 7. Select a source See “Listening to the Radio” on page 9. See “Connecting a Portable Audio Device” on page 13. Point to the remote sensor on the front panel. (The operating range is approx. 7 m.) Adjust the volume You can adjust the volume level from level 0 (VOL MIN) to level 31 (VOL MAX).
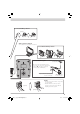
Playing Back Discs This System can play back the following discs—regular CD and CD-R/CD-RW (recorded either in the audio CD or MP3 format). • When playing back the MP3 track, MP3 indicator appears on the display. To Set a Disc 1 2 On the System The disc cover on the System opens. 3 Place a disc correctly with its label side up, then press down on the portions around the disc’s center hole until you hear a click.
Playing at Random—Random Play 1 Press until the RND (random) indicator appears on the display before you start playback. 2 Playback starts in random order. Random Play ends when all tracks are played. Programming the Playing Order— Program Play (except for MP3) Press repeatedly until the PRGM (program) indicator appears on the display before you start playback. 1 2 or Select the track number to program. Operations on the Random Play Mode To Press To skip a track • 4 does not work.
Listening to the Radio Basic Tuner Operations To Press On the System On the remote Each time you press the button, the band changes as follows: DAB AM FM The selected band and frequency appear on the main display. Select a band • When an FM stereo broadcast with sufficient signal strength is tuned in, the ST (stereo) indicator lights on the display. When you change the source to DAB for the first time after plugging in the AC power cord, the System automatically scans the DAB bands for available ensembles.
What is DAB system? DAB (Digital Audio Broadcasting) is one of the digital radio broadcasting systems available today. It can deliver digital quality sound without any annoying interference or signal distortion. Furthermore, it can carry text, pictures and data. In contrast to FM broadcast, where each program is transmitted on its own frequency, DAB combines several programs (called “services”) to form one “ensemble.
Receiving FM Stations with Radio Data System Radio Data System allows FM stations to send an additional signal along with their regular program signals. With the System, you can receive the following types of Radio Data System signals. PS (Program Service): Shows commonly known station names. PTY (Program Type): Shows types of broadcast programs. RT (Radio Text): Shows text messages the station sends.
Switching Temporarily to a Program of Your Choice Automatically Presetting Stations and Services You can preset 30 FM stations, 15 AM stations and 30 DAB services manually. The Enhanced Other Networks function allows the System to switch temporarily to a preset FM station broadcasting a program of your choice (TA, NEWS, or INFO). • This function works while listening to an FM program providing the required signals.
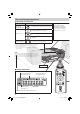
Connecting a Portable Audio Device This System has LINE IN/OUT jacks to connect a portable audio device. Connect between the device and the System by using the stereo mini plug cord (not supplied). IMPORTANT: It should be noted that it may be unlawful to re-record pre-recorded tapes, records, or discs without the consent of the owner of copyright in the sound or video recording, broadcast or cable programme and in any literary, dramatic, musical, or artistic embodied therein.
NOTE If an external device is not equipped with a stereo mini plug audio output, use a plug adaptor to convert the stereo mini plug to the corresponding plug of the audio output. Recording to a portable audio device Portable audio device equipped with the audio input (Digital Audio Player, etc.) 1 To audio input Start recording or standby recording on the device. 2 or Start playing the CD or tune into the station you want to recording.
Setting the Clock and Daily Timer Setting the Clock Without setting the built-in clock, you cannot use Daily Timer and Sleep Timer. Press to activate the clock setting mode. • If you have already adjusted the clock before, press the button repeatedly until the clock setting mode is selected. 1 2 Adjust the hour, then the minute. or • To exit from the clock setting, press CLOCK/TIMER as required. • To go back to the previous step, press CANCEL.
Learning More about This System Basic and Common Operations (see page 5) • Sound adjustments also affect the sound through the headphones. • Sound adjustments do not affect recording to the external device. • You can set the clock and daily timer while the Save mode is turned on. While setting the clock or daily timer, the display is turning on. Playing Back Discs (see pages 7) • This System cannot play “packet write” discs. • For MP3 playback...
Troubleshooting If you are having a problem with your System, check this list for a possible solution before calling for service. General Power does not come on. \ Power plug is not inserted securely. Plug in securely. Adjustments or settings are suddenly canceled before you finish. \ There is a time limit. Repeat the procedure again. Operations are disabled. \ The built-in microprocessor may malfunction due to external electrical interference. Unplug the AC power cord and then plug it back in.
Maintenance To get the best performance of the System, keep your discs and mechanism clean. Handling discs • Remove the disc from its case by holding it at the edge while pressing the center hole lightly. • Do not touch the shiny surface of the disc, or bend the disc. • Put the disc back in its case after use. • Be careful not to scratch the surface of the disc when placing it back in its case. • Avoid exposure to direct sunlight, temperature extremes, and moisture.
Description of the PTY codes for Radio Data System and DAB NEWS: AFFAIRS: News. Topical program expanding or enlarging upon the news—debate, or analysis. INFO: Programs the purpose of which is to impart advice in the widest sense. SPORT: Programs concerned with any aspect of sports. EDUCATE: Educational programs. DRAMA: All radio plays and serials. CULTURE/ARTS*1: Programs concerning any aspect of national or regional culture, including language, theater, etc.
SAFETY INSTRUCTIONS “SOME DOS AND DON’TS ON THE SAFE USE OF EQUIPMENT” This equipment has been designed and manufactured to meet international safety standards but, like any electrical equipment, care must be taken if you are to obtain the best results and safety is to be assured. Do read the operating instructions before you attempt to use the equipment.
UX-NB7DAB MICRO COMPONENT SYSTEM EN © 2006 Victor Company of Japan, Limited UX-NB7DAB[B]ff.indb 2 0706KTCMDWJSC 06.7.