
Computer Monitor User Manual


8
1 3 6 72 4 5
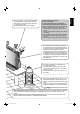
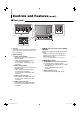
Controls and Features
7 Front panel
1 Speaker (Monaural)
Outputs the audio signal of the selected input.
2 CHROMA/PHASE button*
1
Activates the Chroma (picture color density)
adjustment mode or the Phase (picture hue)
adjustment mode.
• Press the button to select the mode, then adjust
the value (–25 - 00 - +25) by pushing the menu
control button (4) left or right.
NOTE:
• Chroma is not adjustable when the B/W (50 Hz/60 Hz)
signal is input. In this case, “NO EFFECT” is displayed
for about 5 seconds.
• Phase is not adjustable when the PAL signal or the B/W
(50 Hz/60 Hz) signal is input. In this case, “NO EFFECT”
is displayed for about 5 seconds.
3 CONTRAST/BRIGHT button*
1
Activates the picture contrast adjustment mode or
picture brightness adjustment mode.
• Press the button to select the mode, then adjust
the value (–25 - 00 - +25) by pushing the menu
control button (4) left or right.
4 Menu control button
Operates the menu by pushing or pressing the
button to the indicated direction.
☞ pages 14 and 15
Pushing the button up or down:
Selects a menu item.
Pushing the button left or right:
Adjusts the selected menu item.
Pressing the center of the button:
• Goes to the next step.
• Performs the selected function.
5 Volume control button*
2
While the menu is not displayed,
adjust the volume level (00 to 50) by
pushing the button left or right.
6 MENU button
Displays the MAIN MENU.
☞ page 13
To display the SET-UP MENU:
Press the CHROMA/PHASE button (2) while
pressing the MENU button. (☞ page 15)
7 SCAN SIZE button/lamp
Selects the screen size.
• When “100%,” “1:1,” or “USER” is selected, the
lamp lights up.
OVER = 100% = 1:1 = USER = (back to the
beginning)
To adjust picture size/position:
Select “USER” and adjust “SIZE/POSI. ADJ. (USER)”
in the SET-UP MENU. (☞ page 16)
NOTE:
• Memorized for each input.
• When displaying the picture in the 1:1 mode, the aspect
ratio of the picture may change depending on the input
signal.
• For some input signals, the picture may be displayed in a
wrong position. In this case, select “OVER.”
*
1
During picture adjustment:
• The adjustment bar will disappear in about 10
seconds after the last operation.
• Pressing MENU will also make the adjustment bar
disappeared.
• The position of the adjustment bar can be
changed. (☞ “ADJ. BAR POSI.” on page 14)
*
2
During volume adjustment:
• The adjustment bar will disappear in about 5
seconds after the last operation.
• Pressing MENU will also make the adjustment bar
disappeared.
• The position of the adjustment bar can be
changed. (☞ “ADJ. BAR POSI.” on page 14)
Tally lamp
Controlled by the MAKE/TRIGGER terminal. (☞ “TALLY SELECT”
on page 17, “How to Use the External Control” on page 18)
03_TM-15L1D-EN2.indd 803_TM-15L1D-EN2.indd 8 06.11.15 2:41:52 PM06.11.15 2:41:52 PM