
User's Manual


38
Setting Up the Camera Using an RM-P2580
AUTO PATROL Setup
Use the AUTO PATROL screen to set the configuration of the auto patrol function, which moves the camera between several positions
at a high speed.
Patrol positions 1-100 can be set in each of three modes (MODES 1 to 3). It is recommended that these three modes be set the
according to the day of the week or the time of day. For example: MODE 1 for nighttime and MODE 2 for daytime.
1.
Select the camera. (
☞
RM-P2580 Instruction manual)
CAMERA button → Numeric key (camera number) → ENTER button.
The picture of the selected camera is output.
2.
Display the SETUP menu on the camera.
(
☞
P. 20, steps
1
to
4
)
MENU button (3 sec.) → Select “CAMERA” with the PAN/TILT lever
→ SET button.
3.
Tilt the PAN/TILT lever up or down to move the cur-
sor (>) to “AUTO PAN/PATROL TRACE” and press
the SET button.
The AUTO PAN/PATROL/TRACE menu is displayed.
4.
Move the cursor (>) to “AUTO PATROL SET” and
press the SET button.
The AUTO PATROL MODE 1 screen is displayed.
5.
Tilt the PAN/TILT lever to move the cursor (>) to the
PATROL position to be set.
•To display the next page (PATROL positions 9 to 19), press the
TELE button.
•To display the previous page, press the WIDE button.
6.
Set a patrolled position.
POSITION button → Numeric key (position number) → ENTER button.
•
At the factory settings, positions PATROL 1 to 100 are set to HOME
to 99 in that order.
7.
Set the length of time a camera will stay in each
position.
• Use the PAN/TILT lever to the left or right to set the time period.
•Available setting values: SKIP, 5s, 10s, 20s, 30s, 45s, 1min, 2min.
(Selecting “SKIP” skips that position and moves to the next position.)
• The factory setting is “10s” for all positions.
8.
Repeat steps
5
to
7
for each patrolled position.
• Set the patrolled positions and time periods of all patrol numbers
in this way.
9.
Change the auto patrol mode.
• Press the FAR or NEAR buttons to change the mode.
• After changing to a new mode, repeat steps
5
to
8
.
10.
Press the MENU button.
• The screen returns to the previous menu.
• After the above setup, auto patrol of the camera can be started by
pressing the AUTO PATROL button on the RM-P2580.
•To change the auto patrol mode after the above setup, display the
AUTO PATROL MODE screen and press the FAR or NEAR but-
tons.
• The auto patrol function can only be set from an RM-P2580. Note
that it differs to auto sequence operations available with other re-
mote control units.
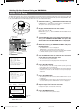
AUTO PAN/PATROL/TRACE menu
AUTO PAN MODE RETURN
–––AUTO PAN/PATRO L / TRACE–––
AUTO PAN SPEED NORMAL
A.PAN START POS . SET . .
A.PAN RETURN POS.SET. .
AUTO PATROL SET . .
AUTO TRACE SET . .
RM A . P AN K EY A.PAN
RM A . P A TROL KEY A.PATROL
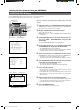
AUTO PATROL MODE 1 screen
(Example showing PATROL Nos. 9 to 16)
PATROL 9 POS8 10 s
–––A
UTO PATROLMODE1
–––
PATROL 1 0 POS9 1 0 s
PATROL 1 1 POS10 10 s
PATROL 1 2 POS11 10 s
PATROL 1 3 POS12 10 s
PATROL 1 4 POS13 10 s
PATROL 1 5 POS14 10 s
PATROL 1 6 POS15 10 s
FWD / BWD
/
ZOOM MODE
/
FOCUS
AUTO PATROL MODE 1 screen
(Example showing PATROL Nos.1 to 8)
PATROL 1 HOME 10 s
–––A
UTO PATROL MOD
E1
–––
PATROL 2 POS1 10 s
PATROL 3 POS2 10 s
PATROL 4 POS3 10 s
PATROL 5 POS4 10 s
PATROL 6 POS5 10 s
PATROL 7 POS6 10 s
PATROL 8 POS7 10 s
FWD / BWD
/
ZOOM MODE
/
FOCUS
SETUP
MENU SET
SPEED
IRIS
AF
FOCUS
ZOOM
OPEN
FAR
TELE CLEAR
/HOME
7
4
1
8
0
5
2
9
6
3
ENTER
AUTO
PAN
OPTION
1
OPTION
2
CAMERA
POSI-
TION
AUTO
PATROL
CLOSE
NEAR
WIDE
AUTO F-1 F-2 F-3
PAN/TILTLENS
CAMERA/POSITION
CAMERA POSITION
REMOTE CONTROL UNIT
RM-P2580
ALARM
POWER
KEY LOCK
PAN/TILT
lever
CAMERA
buttons
WIDE button
FAR button
TELE button
NEAR button
ENTER
button
SET button
MENU button
High
speed
High speed High speed
High
speed
POSITION
1
POSITION
3
POSITION
2
POSITION
4
TK-C676-C655 in_LWT0200-001A-H 04.6.22, 10:02 AM38