POWERED WOOFER CD SYSTEM CD CON ALTAVOZ DE GRAVES Y AMPLIFICADOR INCORPORADO LETTORE CD CON WOOFER A COMANDO INDIPENDENTE RV-B90/B70 CLOCK TIMER ON/OFF TIMER SLEEP DOWN UP SET PROGRAM RANDOM AUX CD REVERSE MODE REW AUTO PRESET REPEAT TAPE TUNER BAND FM MODE FF MULTI CONTROL DISPLAY ACS SOUND SUPER WOOFER VOLUME VOLUME RM-RXVB90 REMOTE CONTROL RV-B90 CLOCK TIMER TIMER ON/OFF CD TUNER SLEEP DOWN UP SET PROGRAM RANDOM AUTO PRESET REPEAT TUNER BAND/ CD FM MODE DOWN TUNIN
ENGLISH ESPAÑOL Thank you for purchasing this JVC product. Please read these instructions carefully before starting operation to be sure to obtain optimum performance and a longer service life from the unit. Le agradecemos la adquisición de este producto de JVC. Por favor lea detenidamente las instrucciones antes de comenzar la operación para obtener de esta unidad un rendimiento óptimo y una vida de servicio más larga. Grazie per avere acquistato questo prodotto JVC.
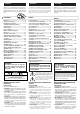
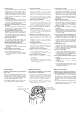
REPRODUCTION OF LABELS AND THEIR LOCATION REPRODUCCION DE ETIQUETAS Y SU UBICACION ETICHETTE E LORO POSIZIONE PHONES 12V DC IN ~AC IN CAUTION Name/Rating plate Placa de nombre/especificaciones Piastrina nome/caratteristiche DANGER: Invisible laser radiation when open and interlock failed ordefeated. AVOID DIRECT EXPOSURE TO BEAM. (e) VARNING:Osynliglaserstrålning när denna del är öppnadoch spärren är urkopplad. Betrakta ej strålen.
SAFETY PRECAUTIONS PRECAUCIONES DE SEGURIDAD PRECAUZIONI PER LA SICUREZZA Prevention of Electric Shocks, Fire Hazards and Damage 1. Even when the button is set to STANDBY, a very small current will flow. To save power and for safety when not using the unit for an extended period of time, disconnect the power cord from the household AC outlet. 2. Do not handle the power cord with wet hands. 3. When unplugging from the wall outlet, always grasp and pull the plug, not the power cord. 4.
Caution: Proper Ventilation To avoid risk of electric shock and fire, and to prevent damage, locate the apparatus as follows: 1. Front: No obstructions and open spacing. 2. Sides/Top/Back: No obstructions should be placed in the areas shown by the dimensions below. 3. Bottom: Place on a level surface. Maintain an adequate air path for ventilation by placing on a table with a height of 10 cm or more.
4. Volume setting CDs produce very little noise compared with analog sources. If the volume level is adjusted for these sources, the speakers may be damaged by the sudden increase of output level. Therefore, lower the volume before operation and adjust it as required during play. 5. Safety mechanism This unit incorporates a safety interlock mechanism which switches the laser beam on and off, so that when the CD door is open, the laser beam stops automatically. 6. Do not place cassette tapes, etc.
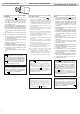
SHOULDER STRAP ATTACHMENT/ DETACHMENT COLOCACION/EXTRACCION DE LA CORREA PARA EL HOMBRO MONTAGGIO E DISTACCO DELLA TRACOLLA ÷ ATTACHMENT As shown in the illustration below, press in the metal fitting at 1 and hook over 2. ÷ COLOCACION Presione el accesorio de metal en 1 y enganche en 2 como se muestra en la ilustración de abajo. ÷ MONTAGGIO Spingere la fibbia di metallo 1 in dentro ed agganciarla alla barretta 2, come indicato nella figura seguente.
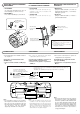
ALIMENTACION ALIMENTAZIONE A. Operation on house hold AC A. Operación con tomacorriente de CA ÷ Connect the AC power cord after all other connections have been made. ÷ Conecte el cordón de CA después de haber terminado todas las conexiones. A. Fuzionamento con alimentazione di rete CA POWER SUPPLY ÷ Collegare il cavo di alimentazione CA dopo aver eseguito tutti gli altri collegamenti. ~AC IN Power cord Cordón de alimentación Cavo alimentazione CAUTIONS: 1.
C. Operation on batteries C. Operación con pilas C. Funzionamento a batterie ÷ Loading batteries 1. Open the battery cover by pulling it toward you while pressing the sections marked by the arrows. 2. Insert 10 “R20/D (13F)” size batteries as shown in the diagram. * Be careful to insert the batteries with the ª and · terminals positioned correctly. 3. Replace the cover. ÷ Colocación de las pilas 1.
CAUTIONS WHEN USING BATTERIES When batteries are used incorrectly, it may result in the leakage of chemicals from the batteries or they may explode. The following care should be taken: ÷ Check that the positive ª and negative · terminals of the batteries are positioned correctly and load them as shown in the diagram. ÷ Do not mix new and old batteries together, or mix different types of batteries. ÷ Do not try to recharge non-rechargeable batteries.
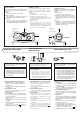
NAMES OF PARTS AND THEIR FUNCTIONS NOMBRES DE LAS PARTES Y SUS FUNCIONES NOMI E FUNZIONI DELLE PARTI CD player/General section Sección del reproductor de CD/ Generalidades Sezione del lettore CD e generale 1 2 3 456 7 8 1 5 2 1 TRACK ALL PROGRAM RANDOM 3 1 2 3 9 p qw e 4 56 7 8 CD 4 5 RV-B90 1 TUNER 1 Barretta per l’aggancio della tracolla 2 Tasto di attivazione e disattivazione ( ) 3 Manopola di comando del volume del woofer (SUPER WOOFER VOLUME) 4 Tasto della sonorità (SOUND) 5 Quad
Tuner/Deck (RV-B90 only) section Sección sintonizador/platina (RV-B90 exclusivamente) 12 3 Sezione sintonizzatore/registratore (solo per l’RV-B90) 4 5 3 1 2 3 STEREO MONO MHz 4 5 6 7 RV-B90 6 78 1 9 REC 5 3 CD 9 (RV-B90 only) (RV-B90 exclusivamente) (solo per l’RV-B90) TUNER RV-B70 1 PRESET TUNING/BEAT CUT button (RV-B90) 1 Botón PRESET TUNING/BEAT CUT (RV-B90) PRESET TUNING button (RV-B70) AUX button Display window 1 Band display 2 Radio frequency display 3 Mode display during FM b
9 MULTI CONTROL button (RV-B90) (When the mode is set to TAPE) 4 REW : Press to rewind the tape. 7 STOP : Press to stop the tape. ¢ FF : Press to fast-forward the tape. (When the mode is set to TUNER) 4/¢ : Auto tuning/Manual tuning TUNING (DOWN/UP) button (RV-B70) 4DOWN/UP¢ : Auto tuning/Manual tuning 9 Tasto di comando polivalente (MULTI 9 Botón MULTI CONTROL (RV-B90) CONTROL) (per l’RV-B90) In caso di modalità disposta su TAPE per la lettura di un nastro: 4 REW: Premerlo per riavvolgere il nastro.
÷ Battery replacement When the remote control operation becomes unstable or the distance from which remote control is possible decreases, replace the batteries. ÷ Reemplazo de las pilas Cuando el funcionamiento del controlador remoto se vuelve inestable o la distancia dentro de la cual actúa se reduce, reemplace las pilas. ÷ Sostituzione batterie Quando il funzionamento dell’unità di telecomando è intermittente oppure quando la distanza utile diminuisce, sostituire le batterie.
7 TIMER ON /OFF button 8 9 p q w e r 7 Botón TIMER ON/OFF Press to cancel or reset the TIMER. button When the main unit power is supplied from batteries, pressing this button will not turn on the main unit power. (In this case, press the button on the main unit.) SLEEP button PROGRAM button Press to select the program play mode. RANDOM button REPEAT button AUTO PRESET button VOLUME buttons (+/–) ÷ Buttons not mentioned here have the same 8 9 p q w e r Presione para cancelar o reposicionar TIMER.
One touch operation (COMPU PLAY) (only when AC power is used) Even when the power is set to STANDBY, pressing the button shown below switches on the power and selects the source. Operación de un solo toque (COMPU PLAY) (sólo cuando se usa alimentación de CA) Funzionamento ad un solo tocco (COMPU PLAY) (solo quando si usa corrente alternata) Cuando la alimentación está colocada en STANDBY, el presionar el botón mostrado abajo conecta la alimentación y selecciona la fuente.
Note: Because it is rotary, the VOLUME control knob and the SUPER WOOFER VOLUME control knob do not have a volume stopper. Check the volume level in the display window when adjusting. Nota: Como la perilla de control VOLUME y la de control SUPER WOOFER VOLUME son giratorias, no hay tope de volumen. Compruebe el nivel de volumen en la ventanilla de indicación durante el ajuste.
HANDLING CDs MANIPULACION DE CD MANEGGIO DEI CD Since dirty, damaged and warped CDs may damage the unit, take care regarding the following: Como los CD sucios, dañados o alabeados pueden dañar la unidad, tome precauciones en relación a lo siguiente: Dato che CD sporchi, danneggiati o deformati possono danneggiare l'unità, fare attenzione a quanto segue: 1. Usable CDs Use CDs with the mark shown. 1. CD utilizables Utilice CD con la marca indicada. 1.
PLAYING CDs REPRODUCCION DE CD RIPRODUZIONE DI CD Playing an entire CD The following example of playing an entire CD assumes a CD with 12 tracks and a total playing time of 48 minutes 57 seconds. Reproducción de un CD completo El siguiente ejemplo de reproducción de un CD completo supone que se ha colocado un CD con 12 pistas y un tiempo total de reproducción de 48 minutos y 57 segundos.
÷ To stop in the middle of a CD During play, press the 7 button to stop play. ÷ Para detener un CD en la mitad del mismo Presione el botón 7 para detener la reproducción. ÷ Per l'interruzione nel mezzo di un CD Durante la riproduzione, premere il tasto 7 per interrompere la riproduzione stessa. ÷ The total number of tracks and total playback time are displayed. ÷ La unidad indica el número total de pistas y el tiempo total de reproducción.
Search play (to locate the required position on the CD) Reproducción con búsqueda (para localizar la posición deseada en el CD) Riproduzione con ricerca (per localizzare una determinata posizione sul CD) ÷ The required position can be located using fast-forward or reverse search while playing a CD. ÷ La posición deseada puede ser ubicada utilizando la búsqueda de avance rápido o invertida mientras reproduce un CD.
Programmed play (using the remote control unit) Reproducción programada (utilizando la unidad de control remoto) Riproduzione programmata (utilizzando l'unità di telecomando) ÷ Up to 20 tracks can be programmed to be played in any required order. The total playing time of programmed tracks is displayed (up to 99 minutes, 59 seconds). ÷ Es posible programar un máximo de 20 pistas para reproducción en el orden deseado.
÷ When programming tracks to be recorded, the previous step 5 is not needed. Press the ONE TOUCH REC button instead of the CD 3/8 button (RV-B90 only). ÷ If the wrong track number is accidentally pressed, press the 7 (stop) button to cancel it and perform the same operation from step 3. ÷ If the power is set to STANDBY, the program is erased. ÷ Al programar pistas para grabar, no es necesario el paso 5 anterior. Presione el botón ONE TOUCH REC en lugar del botón CD 3/8 (RV-B90 exclusivamente).
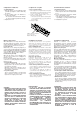
Side “A” Lado “A” Lato "A" Turn the pencil to tighten the tape. Gire el lápiz para ajustar la cinta. Ruotare la matita per stringere il nastro. Tab “B” Lengüeta “B” Linguetta "B" Note: If the power is switched off while tape is running, it may be impossible to remove the cassette. If this happens, switch the power on again before attempting to remove the cassette.
÷ After loading a cassette tape, simply press the TAPE 23 button. The power is switched on and the tape starts playback. (To select the playback direction, press the TAPE 2 3 button. The change in direction can be checked in the tape direction indicator (2 or 3).) ÷ When the tape plays back with the reverse mode set to (single side play) or (both side play) mode, the tape stops automatically at the end of the tape after playing one or both sides.
RADIO RECEPTION RADIORRECEPCION RICEZIONE CON LA RADIO Operate in the order shown Opere en el orden mostrado Eseguire le operazioni nell’ordine indicato ÷ When AC power is used. (When battery power button first, then is used, switch on the perform operation.) ÷ Cuando emplea alimentación de CA (Si la pila está agotada, conecte primero el . botón de alimentación y luego ejecute la operación). ÷ Se si usa corrente alternata.
Manual tuning Sintonización manual Sintonizzazione manuale Each time the 4 or ¢ button is pressed, the unit steps through the current frequency band. Tuning is done in steps of 50 kHz for FM and 9 kHz for AM (MW/LW). In AM operation, the tuned frequency moves continuously from the MW (522-1,629 kHz) to the LW (144-288 kHz) band and vice versa. Cada vez que se presiona el botón 4 o ¢, la unidad pasa a través de la banda de frecuencia actual.
÷ Repeat the previous procedure for each of the other stations, using a different preset button each time. ÷ Repeat the previous procedure for the other band. ÷ To change preset stations Perform step 4 after tuning to the required station. Notes: ÷ The previously stored station is erased when a new station is stored, because the new station’s frequency replaces the previous frequency in memory. ÷ When listening to an AM (MW/LW) broadcast, noise may be heard if the remote control unit is used.
RECORDING (RV-B90 only) GRABACION (RV-B90 exclusivamente) REGISTRAZIONE (solo per l’RV-B90) ÷ During recording, the ALC (Automatic Level Control) circuit automatically optimizes the recording level, so manual recording level adjustment is unnecessary. ÷ Check that the safety tab on the cassette tape is not broken off. ÷ Durante la grabación, el circuito ALC (control automático de nivel), optimiza automáticamente el nivel de grabación, haciendo innecesario el ajuste manual del nivel de grabación.
Note: ÷ During CD synchro recording, the CD 3/8 and (4, ¢) buttons do not function. ÷ If a recording is completed in the reverse direction (2), it is possible to continue recording without changing the direction to forward (3), until the tape ends. ÷ If continuous play is selected, a recording in the reverse direction (2) automatically stops at the end of the tape. The indicator appears in the display window during recording.
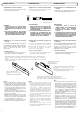
Recording from the radio or an external source connected to the AUX IN terminals Grabación desde la radio o desde una fuente externa conectada a los terminales AUX IN Registrazione della radio o del componente collegato ai terminali AUX IN Operate in the order shown Opere en el orden mostrado Eseguire le operazioni nell'ordine indicato 4 2 1 SLEEP DOWN UP SET PROGRAM RANDOM AUX CD AUTO PRESET REPEAT TAPE TUNER BAND FM MODE REVERSE MODE REW MULTI CONTROL FF 3 DISPLAY SOUND ACS 1 Loa
CLOCK ADJUSTMENT (USING THE REMOTE CONTROL AJUSTE DEL RELOJ REGOLAZIONE OROLOGIO (TRAMITE TELECOMANDO) UNIT) (UTILIZANDO LA UNIDAD DE CONTROL REMOTO) Names of parts in the clock/timer section, and their functions: Nombre de las parte de la sección del reloj/ temporizador y sus funciones: 1 23 4 5 6 Nome e funzioni delle varie parti dell’orologio e del timer: 7 8 9p q ON OFF CLOCK TIMER ON/OFF TIMER SLEEP DOWN UP SET PROGRAM 1 2 3 4 5 6 7 8 9 p q 1 2 3 4 5 6 7 8 9 p q Timer mode indicato
TIMER OPERATIONS (USING THE REMOTE CONTROL UNIT) OPERACIONES POR TEMPORIZADOR (UTILIZANDO LA UNIDAD DE CONTROL REMOTO) FUNZIONAMENTO COL TIMER (TRAMITE TELECOMANDO) Setting the timer Ajuste del temporizador Impostazione del timer ÷ The current time must be set before the timer can be used. ÷ Antes de utilizar el temporizador es necesario ajustar la hora actual. ÷ Prima di poter utilizzare il timer deve essere impostata l’ora esatta.
6 Set the volume. DOWN 6 Ajuste el volumen. 6 Regolare del volume. UP This shows when volume level 1 is selected. Esto aparece cuando se selecciona el nivel de volumen 1. Indica se il livello di volume 1 è stato scelto. SET ÷ The unit enters the previously engaged mode when timer setting has been completed. (The indicator lights.) ÷ La unidad ingresa en el modo previamente activado cuando el ajuste del temporizador queda completado. (Se .
÷ Timer recording will start at timer start time and the power will be switched off at timer stop time. (The timer mode is then released.) ÷ To repeat timer recording every day Press the TIMER ON/OFF button to display the timer mode indicator in the display window. ÷ To cancel timer operation Press the TIMER ON/OFF button so that the timer mode indicator (REC ) goes out. If you do this, timer recording will not start at the timer start time. Notes: Once the timer has been set, the start and stop times, etc.
÷ Timer playback will start at the timer start time and the power will be switched off at the timer stop time. The unit remains in the same timer mode even after the power is switched off. The same timer function will repeat at the same time on the following day. ÷ When the timer mode is activated, the “ ” indicator blinks. ÷ When the power is switched on, it is possible to fade in the sound from volume level 0 (zero) to the preset volume.
B. To fall asleep while listening to a tape (RV-B90 only), broadcast or CD and to perform timer playback the following morning 1 Set the timer. (Refer to “Setting the timer” on page 33.) 2 Set to the required source (tape (RV-B90 only), broadcast or CD). 3 Press the SLEEP button to set the sleep time. B. Para dormir mientras escucha una cinta (RV-B90 exclusivamente), radiodifusión o CD y para efectuar la reproducción por temporizador la mañana siguiente B.
Cautions: 1. Keep magnets and metallic objects away from the head. If the head becomes magnetized, noise will increase and the sound will deteriorate. Demagnetize the head every 20-30 hours of use with a head eraser (available from an audio store). (When demagnetizing the head, the button should be set to STANDBY.) 2. Do not use anything other than alcohol for cleaning. Thinner and benzine will damage the rubber pinch roller. Precauciones: 1. Mantenga los imanes y los objetos metálicos lejos de la cabeza.
(Sezione sintonizzatore) ÷ La ricezione è disturbata. * Provare ad orientare l'antenna. * Probabile presenza di un televisore o di un computer nelle vicinanze dell’apparecchio. (Tuner Section) ÷ Reception is noisy. * Try adjusting the antenna. * Is there a TV set or computer device near the unit? (Sección del sintonizador) ÷ La recepción es ruidosa. * Intente ajustar la antena. * ¿Hay un TV o computador cerca de la unidad? (Timer Section) ÷ Timer operation does not start.
General Speakers (Impedance) Terminales de entrada : AUX IN (300 mV/47 kΩ) (sólo RV-B90 exclusivamente) Terminales de salida : PHONES (nivel de salida: 0 12 mW/ch, 32 Ω, Impedancia de adaptación: 16 Ω - 1 kΩ) Requisitos de alimentación : 230 V CA, 50 Hz Pilas de 15V CC (“R20/D (13F)” x 10) Ex. CC 12V (batería del automóvil vía adaptador opcional para automóvil CAR120E) SW en ON) Consumo de energía : 43 W (con (RV-B90) 37W (con SW en ON) (RV-B70) 1,4 W (con SW en STANDBY) Dimensiones : 690 (A)x 239 (Alt.