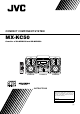
COMPACT COMPONENT SYSTEM MX-KC50 Consists of CA-MXKC50 and SP-MXKC50 SP-MXKC50 CA-MXKC50 SP-MXKC50 INSTRUCTIONS For Customer Use: Enter below the Model No. and Serial No. which are located either on the rear, bottom or side of the cabinet. Retain this information for future reference. Model No. Serial No.
Warnings, Cautions and Others / Mises en garde, précautions et indications diverses (For U.S.A) WARNING: TO REDUCE THE RISK OF FIRE OR ELECTRIC SHOCK, DO NOT EXPOSE THIS APPLIANCE TO RAIN OR MOISTURE. CAUTION Changes or modifications not approved by JVC could void the user’s authority to operate the equipment.
IMPORTANT FOR LASER PRODUCTS / IMPORTANT POUR PRODUITS LASER 1. CLASS 1 LASER PRODUCT 2. CAUTION: Do not open the top cover or the cabinet. There are no user serviceable parts inside the unit; leave all servicing to qualified service personnel. 3. CAUTION: (For U.S.A.) Visible and/or invisible class II laser radiation when open. Do not stare into beam. (For Canada) Visible and/or invisible class 1M laser radiation when open. Do not view directly with optical instruments. 4.
Introduction Thank you for purchasing the JVC Compact Component System. We hope it will be a valued addition to your home, giving you years of enjoyment. Be sure to read this instruction manual carefully before operating your new stereo system. In it you will find all the information you need to set up and use the system. If you have a query that is not answered by the manual, please contact your dealer. Features Here are some of the things that make your System both powerful and simple to use.
Table of Contents Introduction ...................................................................................................................1 Features.................................................................................................................................................... 1 How This Manual Is Organized............................................................................................................... 1 IMPORTANT CAUTIONS.............................................
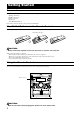
Getting Started Accessories Make sure that you have all of the following items, which are supplied with the System. AM Loop Antenna (1) FM Wire Antenna (1) Remote Control (1) Batteries (2) Stereo Mini Plug Cable (1) If any of these items are missing, contact your dealer immediately. How To Put Batteries In the Remote Control Match the polarity (+ and –) on the batteries with the + and – markings in the battery compartment.
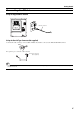
Getting Started Connecting the FM Antenna Using the Supplied Wire Antenna FM wire antenna Using the Coaxial Type Connector (Not supplied) A 75Ω antenna with coaxial type connector (IEC or DIN45 325) should be connected to the FM 75Ω COAXIAL terminal. If reception is poor, connect the outdoor antenna. FM outdoor antenna (Not supplied) Coaxial cable • Before attaching a 75 ohm coaxial lead (the kind with a round wire going to an outdoor antenna), disconnect the supplied FM Wire Antenna.
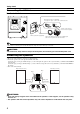
Getting Started Connecting the AM Antenna Rear Panel of the Unit AM antenna wire (not supplied) If reception is poor, connect the outside antenna. Turn the loop until you have the best reception. AM loop antenna (Supplied) Attach the AM loop to its base by snapping the tabs on the loop into the slot in the base. • Even when connecting an outside AM antenna, keep the indoor AM loop connected. CAUTION: • To avoid noise, keep antennas away from the System, the connecting cord and the AC power cord.
Getting Started Connecting External Equipment Connect a signal cord with stereo mini plugs (not supplied) between the System’s AUX jack on the front panel and the audio output jack or output terminals of the external portable CD, MD player, STB, etc. You can then listen to the external source through the System. To audio output of external equipment. Stereo mini plug cable (supplied) Connecting to the Wall Outlet Plug the AC power cord into the wall outlet.
Basic Operations ) STANDBY/ON Numeric keys Display STANDBY indicator (STANDBY/ON) ECO SOUND TURBO PHONES DISPLAY SOUND TURBO VOLUME +, – SOUND MODE FADE MUTING SOUND MODE VOLUME Various information Sound Turbo indicator Sound Mode indicator Level bar Status bar (Indicates various statuses.) * When the System is in use, the display shows other items as well. For simplicity, we show here only the items described in this section.
Basic Operations Adjusting the Volume Turn the VOLUME control on the Unit clockwise to increase the volume or turn it counterclockwise to decrease the volume. Press the VOLUME + button on the Remote Control to increase the volume or press the VOLUME – button on the Remote Control to decrease the volume. You can set the volume level to MIN, 1-30, or MAX. Selecting the Sound (SOUND MODE) Mode You can select one of 3 SEA (Sound Effect Amplifier) modes. You can use this effect only for playback.
Using the Tuner Numeric keys SET FM/AM FM/AM FM MODE 1 Á 1 ¢ Á 4 Band display, Frequency display, Preset channel FM mode indicators * When the System is in use, the display shows other items as well. For simplicity, we show here only the items described in this section. You can listen to FM and AM stations. Stations can be tuned in manually, automatically, or from preset memory storage. ❏ Before listening to the radio: • Make sure that both the FM and AM antennas are correctly connected.
Using the Tuner CAUTION: • In AM broadcast, reception sensitivity will be changed by turning the AM loop antenna. Turn the AM loop antenna for best reception. • Even if the System is unplugged or if the power failure occurs, the preset stations will be stored for a few days. However, in case the preset stations are erased, you will need to preset the stations again. Presetting Stations You can preset up to 30 FM stations and up to 15 AM stations.
Using the CD Player CD Open/ Close 0 DISC SKIP CANCEL CD1-CD3 Numeric keys 4 CD1-CD3 SET/RESUME CD 6 ¢ REPEAT PROGRAM RANDOM ¢ 1 7 Á 7 4 CD 6 REPEAT RANDOM PROGRAM MP3/WMA MODE Track number, Playing time, Program number, etc. WMA indicator MP3 indicator Program indicator Disc indicators Random Repeat indicator indicator * When the System is in use, the display shows other items as well. For simplicity, we show here only the items described in this section.
Using the CD Player About Disc Indicator: Disc Rotation indicator Disc Number indicator Selected Disc indicator The Disc indicator consists of the following three kinds of indicators: Disc Number indicator: Lights all the time. Selected Disc indicator:Lights for the currently selected disc number. Disc Rotation indicator:Runs when the selected CD is playing or paused. This indicator goes out if a CD is not loaded for the selected disc number.
Using the CD Player Basics of Using the CD PlayerNormal Play To Play CDs 1 2 GROUP mode Total group number Load CDs. Press one of the Disc button (CD1-CD3) you want to play. The selected disc number (e.g. “CD DISC 1”) appears on the display. The first track of the selected CD begins playing. When the first CD finishes playing, the next and the third CDs are continuously played back. When the last CD has finished playing, it will return to the first CD and the CD Player automatically stops.
Using the CD Player Resume Play for Audio CD and MP3/WMA Disc You can store the point of the track where you stopped playback. By pressing CD 6 button, you can start playback again from the point where you stopped it. 4 Select the track you want to program. On the Unit While the display is blinking, press the 4 or ¢ button on the Unit to select the track, then press the SET button within 5 seconds. The program order number will be assigned from P-1.
Using the CD Player To Exit and Re-enter Program Play The program you have made is stored in memory. So, you can exit Program Play temporarily or re-enter Program Play unless you delete the program. To exit the program mode once, press the 7 button to stop playing. The “PRGM” indicator goes off and the Program mode will be canceled. The program is stored in the memory. To re-enter Program Play mode, press the PROGRAM button until the “PRGM” indicator lights up again.
Using the Cassette Deck (Listening to a Tape) 4 22 ¢ 7 TAPE B 3 TAPE A 3 7 Á 0 PUSH OPEN (Deck A) 0 PUSH OPEN (Deck B) TAPE B TAPE A Deck indicators 3: Tape indicator * When the System is in use, the display shows other items as well. For simplicity, we show here only the items described in this section. The Cassette Deck allows you to play, record, and dub audio tapes. ❏ Listening to type I tape is suitable for this Cassette Deck.
Using the Cassette Deck (Recording) 7 TAPE B 3 TAPE A 3 7 PROGRAM REC START/STOP CD REC START DUBBING 0 PUSH OPEN (Deck A) 0 PUSH OPEN (Deck B) TAPE B TAPE A 3: Tape indicator Deck indicators REC indicator * When the System is in use, the display shows other items as well. For simplicity, we show here only the items described in this section. Recording onto a cassette from any of the sound sources is simple.
Using the Cassette Deck (Recording) Standard Recording 3 To Record Any Sound Source to Tape Follow these steps to record from any sound source onto a tape in Deck B. 1 Insert a blank or erasable tape into the Deck B and wind past the tape leader. Press the CD REC START button on the Unit. “CD REC” appears on the display and the “REC” indicator lights up. Then, the System begins CD Synchro Recording and the tracks on the CD are recorded on the tape.
Using an External Equipment AUX AUX AUX jack Listening to the External Equipment You can listen to the external equipment such as portable CD, MD player, STB, or other auxiliary. ❏ First, make sure that the external equipment is properly connected to the System. (See page 6.) 1 Set the volume level to the minimum position. 2 Press the AUX button. “AUX IN” appears on the display. 3 4 Start playing the external equipment. 5 Apply the following sound effects, if you wish.
Using the Timers SLEEP SET CLOCK/TIMER ¢ 4 DAILY Timer indicator SLEEP indicator REC (Recording) Timer indicator Timer indicator * When the System is in use, the display shows other items as well. For simplicity, we show here only the items described in this section. Three types of timers are available: DAILY Timer Use this timer to set wake up everyday to music from any source, instead of an alarm clock. REC (Recording) Timer Unattended recording of radio broadcasts.
Using the Timers 2. Press the ¢ or 4 button to set the minute, then press the SET button. Setting the Daily Timer Once you have set the Daily Timer, it is stored in memory. So, the Daily Timer will be activated at the same time every day until it is canceled. The Timer indicator ( ) and “DAILY” indicator on the display shows that the Daily Timer you have set is in effect. You can set the Daily Timer whether the System is turned on or off. • You can set the Daily Timer whether the System is on or off.
Using the Timers When selecting TAPE: Insert a cassette tape you want to play into Deck A. When selecting AUX: Prepare the external equipment so that it will turn on at the ON time set by the System. To allow this, the equipment should have the timer function. 5 Setting the volume level. To cancel the Daily Timer temporarily: 1 Press the CLOCK/TIMER button on the Unit repeatedly until the “DAILY” appears on the display. 2 Press the CANCEL button on the Unit.
Using the Timers On the Unit You can set the time in the same way as for setting the Daily Timer. 1 2 Insert a blank or erasable tape into the Deck B and wind past the tape leader. Press the CLOCK/TIMER button until “ON TIME” immediately after “REC” appears on the display. Each time you press the button, the display changes as follows: DAILY = ON TIME = REC = ON TIME* = Clock setting display = Canceled = (back to the beginning) *: This item should be selected for the REC Timer setting.
Using the Timers Setting the SLEEP Timer Timer Priority Use the Sleep Timer to turn the System off after a certain number of minutes when it is playing. By setting the Sleep Timer, you can fall asleep to music and know that your System will turn off by itself rather than play all night. • You can only set the Sleep Timer when the System is on. Since REC Timer and DAILY Timer can be set independently, you may wonder what happens if the settings overlap.
Care And Maintenance Handle your CDs and tapes carefully, and they will last a long time. Cassette Tapes • If the tape is loose in its cassette, take up the slack by inserting a pencil in one of the reels and rotating. • If the tape is loose, it may get stretched, cut, or caught in the cassette. Compact Discs • Remove the CD from its case by holding it at the edges while pressing the case’s center hole lightly. • Do not touch the shiny surface of the CD, or bend the CD. • Do not touch the tape surface.
Troubleshooting • If you are having a problem with your System, check this list for a possible solution before calling for service. • If you cannot solve the problem from the hints given here, or the System has been physically damaged, call a qualified person, such as your dealer, for service. Symptom No sound is heard. Possible Cause • Connections are incorrect, or loose. Action • Headphones are connected. • Check all connections and make corrections. (See pages 4 to 6.) • Disconnect the headphones.
TO OUR VALUED CUSTOMER THANK YOU FOR PURCHASING THIS JVC PRODUCT. WE WANT TO HELP YOU ACHIEVE A PERFECT EXPERIENCE. NEED HELP ON HOW TO HOOK UP? NEED ASSISTANCE ON HOW TO OPERATE? NEED TO LOCATE A JVC SERVICE CENTER? LIKE TO PURCHASE ACCESSORIES? IS HERE TO HELP! TOLL FREE: 1(800)252-5722 http://www.jvc.com Remember to retain your Bill of Sale for Warranty Service. Do not attempt to service the product yourself Caution To prevent electrical shock, do not open the cabinet.
LIMITED WARRANTY 1-1 USA ONLY ONLY FOR PRODUCT PURCHASED IN U.S.A. JVC Americas Corp. (JVC) warrants this product and all parts thereof, except as set forth below ONLY TO THE ORIGINAL RETAIL PURCHASER to be FREE FROM DEFECTIVE MATERIALS AND WORKMANSHIP from the date of original purchase for the period shown below. ("The Warranty Period") PARTS 1 LABOR YR 1 YR THIS LIMITED WARRANTY IS VALID ONLY IN THE FIFTY (50) UNITED STATES, THE DISTRICT OF COLUMBIA AND IN THE COMMONWEALTH OF PUERTO RICO.
Specifications COMPACT COMPONENT SYSTEM Input Sensitivity/Impedance (1 kHz) AUX IN 400 mV/50 kΩ Speaker terminals 6 - 16 Ω Phones 32 Ω - 1 kΩ 17 mW/ch output into 32 Ω Cassette Deck Section Frequency Response Type I (NORMAL) 63 Hz - 12 500 Hz Wow And Flutter 0.15% (WRMS) CD Player CD Capacity Dynamic Range Signal-To-Noise Ratio Wow And Flutter 3 CDs 85 dB 85 dB Unmeasurable Tuner FM Tuner Tuning Range 87.5 MHz - 108.