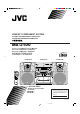
COMPACT COMPONENT SYSTEM SISTEMAS DE COMPONENTES COMPACTOS SISTEMA DE COMPONENTE COMPACTO MX-J100 Consists of CA-MXJ100 and SP-MXJ100 Consta del CA-MXJ100 el SP-MXJ100 Consta do CA-MXJ100 e SP-MXJ100 CA-MXJ100 SP-MXJ100 COMPACT DIGITAL AUDIO SP-MXJ100 CA-MXJ100 SP-MXJ100 STANDBY OPEN / CLOSE CD1 CD2 CD3 DISC CHANGE COMPACT DIGITAL AUDIO PLAY & EXCHANGER VOLUME COUNTER RESET + CLOCK/TIMER DEMO ACTIVE BASS EX.
Warnings, Cautions and Others Avisos, precauciones y otras notas Advertências, precauções e outras notas Caution –– switch! Disconnect the mains plug to shut the power off comswitch in any position does not disconpletely. The nect the mains line. The power can be remote controlled. ! Precaución –– Interruptor Desconectar el cable de alimentación para desactivar la alimentación totalmente. Cualquier que sea la posición de , la alimentación no es cortada ajuste del interruptor completamente.
CAUTION To reduce the risk of electrical shocks, fire, etc.: 1. Do not remove screws, covers or cabinet. 2. Do not expose this appliance to rain or moisture. PRECAUCIÓN Para reducir riesgos de choques eléctricos, incendio, etc.: 1. No extraiga los tornillos, los cubiertas ni la caja. 2. No exponga este aparato a la lluvia o a la humedad. PRECAUÇÃO Para reduzir riscos de choques elétricos, incêndio, etc.: 1. Não remova parafusos e tampas ou desmonte a caixa. 2.
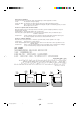
Caution: Proper Ventilation To avoid risk of electric shock and fire, and to prevent damage, locate the apparatus as follows: 1 Front: No obstructions and open spacing. 2 Sides/ Top/ Back: No obstructions should be placed in the areas shown by the dimensions below. 3 Bottom: Place on the level surface. Maintain an adequate air path for ventilation by placing on a stand with a height of 10 cm or more.
IMPORTANT FOR LASER PRODUCTS / IMPORTANTE PARA PRODUCTOS LÁSER / IMPOTANTE PARA PRODUTOS LASER / / REPRODUCTION OF LABELS / REPRODUCCIÓN DE ETIQUETAS / REPRODUÇÃO DE ETIQUETAS / 1 CLASSIFICATION LABEL, PLACED ON REAR ENCLOSURE 2 WARNING LABEL, PLACED INSIDE THE UNIT 1 ETIQUETA DE CLASIFICACIÓN, PEGADA EN LA PARTE POSTERIOR DE LA CAJA 2 ETIQUETA DE ADVERTENCIA, PEGADA EN EL INTERIOR DE LA UNIDAD 1 ETIQUETA DE CLASSIFICAÇÃO LOCALIZADA NA PARTE POSTERIOR DA CAIXA DO APARELHO.
English Introduction We would like to thank you for purchasing one of our JVC products. Before operating this unit, read this manual carefully and thoroughly to obtain the best possible performance from your unit, and retain this manual for future reference. About This Manual Power sources This manual is organized as follows: • When unplugging from the wall outlet, always pull the plug, not the AC power cord. • The manual mainly explains operations using the buttons and controls on the unit.
English Contents Location of the Buttons and Controls ....................... 3 Front Panel ................................................................. 4 Remote Control .......................................................... 5 Getting Started ............................................................ 6 Unpacking .................................................................. 6 Putting the Batteries into the Remote Control ........... 6 Connecting Antennas ....................................
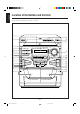
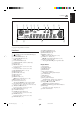
English Location of the Buttons and Controls Become familiar with the buttons and controls on your unit. 1 o STANDBY OPEN / CLOSE 2 CD1 CD2 CD3 DISC CHANGE ; a COMPACT PLAY & EXCHANGER DIGITAL AUDIO 3 4 5 6 7 8 9 p q VOLUME COUNTER RESET + CLOCK/TIMER DEMO ACTIVE BASS EX.
Display Window 1 2 4 5 TAPE A B SLEEP 2 1 3 CD-SYNC 6 7 REC ST PRESET REPEAT ALL 1 CD q p SOUND PRGM 3 9 8 w kHz MHz VOL r e See pages in the parentheses for details. Front Panel 1 2 3 4 5 6 7 8 9 p q w e r t y u i o ; a s d f g Carousel (standby/on) button and STANDBY lamp (9) Display window CLOCK/TIMER button (9, 16) COUNTER RESET button (15) DEMO button (8) SOUND MODE button (10) ACTIVE BASS EX.
English Remote Control Remote Control TIMER ON/OFF SLEEP w e 1 ACTIVE SOUND BASS EX. MODE PROGRAM REPEAT /SET 2 3 4 5 6 7 8 r t y u i o ; V.MASKING TAPE A/B TUNING MODE FM MODE AUX FM/AM TAPE CD DISC SKIP VOL. 9 + FADE MUTING p q VOL. a s – 1 2 3 4 5 6 7 8 9 p q w e r t y u i o ; a s (standby/on) button (9) PROGRAM/SET button (9) REPEAT button (12) V.MASKING button (16) TAPE A/ B button (14) CD 38 button (12) Pressing this button also turns on the unit.
Continued Unpacking Connecting Antennas After unpacking, check to be sure that you have all the following items. The number in the parentheses indicates the quantity of the pieces supplied. FM antenna FM antenna (supplied) IAL • • • • • 5 FM 7 AM loop antenna (1) FM antenna (1) Remote control (1) Batteries (2) AC plug adaptor (1) X COA If any is missing, consult your dealer immediately.
English Connecting Speakers AM antenna You can connect a pair of the front speakers. 2, 3 1 AM ANT SPEAKERS IMPEDANCE 6-16 OHMS. + L Black Red – – AM loop antenna (supplied) Speaker cord Speaker cord R + 1 Connect the AM loop antenna to the AM ANT terminal as illustrated. 2 Turn the AM loop antenna until you have the best reception. Right speaker For better reception of both FM and AM • Make sure the antenna conductors do not touch any other terminals and connecting cords.
English Connecting Other Equipment You can connect an audio equipment — used only as a playback device. When you connect and use this equipment, refer also to its manual. FM 75 COAXIAL AM ANT Be sure that the plugs of the audio cords are color coded: White plugs and jacks are for left audio signals, and red ones for right audio signals. AUX IN R L SPEAKERS IMPEDANCE 6-16 OHMS. 110V127V • DO NOT connect any equipment while the power is on.
English Common Operations Setting the Clock To adjust the clock again Before operating the unit any further, first set the clock built in this unit. • There is a time limit in doing the following steps. If the setting is canceled before you finish, start from step 1 again. • If you want to stop clock setting, press CLOCK/TIMER once or wait until the time limit of 15 seconds comes. 1 Press CLOCK/TIMER twice.
English Setting the AM Tuner Interval Spacing Reinforcing the Bass Sound Some countries space AM stations 9 kHz apart, and some countries use 10 kHz spacing. The richness and fullness of the bass sound is maintained regardless of how low you set the volume. You can use this effect only for playback. On the unit ONLY: When shipped , the unit is set to 9 kHz spacing. To get the effect, press ACTIVE BASS EX. so that the BASS indicator appears on the display.
English Listening to FM and AM Broadcasts Tuning in a Station 1 Tune in the station you want to preset. • See “Tuning in a Station” to the left. 1 Press FM/AM. FM/AM The unit automatically turns on and tunes in the previously tuned station (either FM or AM). • Each time you press the button, the band alternates between FM and AM. MHz 2 Press PROGRAM/SET. PROGRAM/SET 2 Select a station. PRGM On the unit: Press and hold TUNING – or TUNING + for more than 1 second.
Playing Back CDs Loading CDs English Continued Playing Back CDs You can play CDs continuously. 1 Press OPEN/CLOSE 0 on the OPEN / CLOSE 1 Load CDs. 2 Press REPEAT on the remote unit. The unit automatically turns on and the carousel comes out. control to select a play mode you want. 2 Place one or two discs correctly on the front slots of the carousel, with its label side up.
English 4 Press 4 or ¢ Basic CD Operations (or 4 / 1 or ¢ / ¡ on the remote control) to select the track number, then press PROGRAM/SET. While playing a CD, you can do the following operations. To exchange CDs during playback of another Press DISC CHANGE to eject and exchange the CD. PROGRAM/SET To locate a particular point in a track During play, press and hold 1 or ¡. • 1 : Fast reverses the disc. • ¡ : Fast forwards the disc. When using the remote control, press and hold 4 / 1 or ¢ / ¡.
English Playing Back Tapes To stop during play, press 7. Playing Back a Tape To operate the other deck, press TAPE A/B, then TAPE 3. 1 Press EJECT (0) for the deck you want to To fast-forward the tape, press ¡ (or ¢ / ¡ on the remote control). use. To rewind the tape, press 1 (or 4 / 1 on the remote control). To remove the cassette, press 0 EJECT for deck A or EJECT 0 for deck B. T EC 0EJ For Deck B For Deck A 2 Put a cassette in, with the exposed part of the tape down.
English Recording Resetting the Tape Counter IMPORTANT: • It may be unlawful to record or play back copyrighted material without the consent of the copyrighted owner. • The recording level is automatically set correctly, so it is not affected by the VOLUME control. Thus, during recording you can adjust the sound you are actually listening to without affecting the recording level.
English Using the Microphone You can enjoy singing along and microphone mixing. • The MIC LEVEL control adjustment is valid for microphone connected to the MIC jack. If howling or squealing (feedback) occurs while using the microphone Take the following actions to prevent these noises. • Adjust the MIC LEVEL and VOLUME controls • Avoid pointing the microphone towards the speakers. IMPORTANT: • Always set MIC LEVEL to MIN when connecting or disconnecting the microphone.
English Using the Timers 3 Set the on-time you want the unit to turn on. There are three timers available — Recording Timer, Daily Timer, and Sleep Timer. 1) Press 4 or ¢ to set the hour, then press PROGRAM/SET. 2) Press 4 or ¢ to set the minute, then press PROGRAM/ SET. “OFF TIME” appears for 2 seconds, then the unit enters off-time setting mode. Before using the timers, you need to set the clock built in the unit. (See page 9.
7 When selecting “FM” or “AM.” Press 4 or ¢ to select the preset station number, then press PROGRAM/SET. The unit enters recording timer setting mode. If you want to continue the Recording Timer setting, go to step 3 of the Recording Timer setting procedure. 3 Press PROGRAM/SET. “ON TIME” appears for 2 seconds, then the unit enters on-time setting mode. PROGRAM/SET 8 Press CLOCK/TIMER. CLOCK/TIMER The indicator stops flashing and remains lit.
English 7 Select the preset station. Using Sleep Timer 1) Press 4 or ¢ to select the band (“FM” or “AM”), then press PROGRAM/SET. 2) Press 4 or ¢ to select a preset channel number. With Sleep Timer, you can fall asleep to music. You can set Sleep Timer when the unit is operating. How Sleep Timer actually works The unit automatically turns off after the specified time length passes by. PROGRAM/SET On the remote control ONLY: 1 Press SLEEP. 8 Press PROGRAM/SET.
English Maintenance To get the best performance of the unit, keep your discs, tapes, and mechanism clean. Handling discs • Remove the disc from its case by holding it at the edge while pressing the center hole lightly. • Do not touch the shiny surface of the disc, or bend the disc. • Put the disc back in its case after use to prevent warping. • Be careful not to scratch the surface of the disc when placing it back in its case. • Avoid exposure to direct sunlight, temperature extremes, and moisture.
English Troubleshooting If you are having a problem with your unit, check this list for a possible solution before calling for service. If you cannot solve the problem from the hints given here, or the unit has been physically damaged, call a qualified person, such as your dealer, for service. Symptom Cause Action No sound is heard. Connections are incorrect or loose. Check all connections and make corrections. (See pages 6 to 8.) Hard to listen to broadcasts because of noise.
Design and specifications are subject to change without notice. Amplifier — CA-MXJ100 Output Power: 40 W per channel, min. RMS, both channels driven into 6 Ω at 1 kHz with no more than 10 % total harmonic distortion Audio input sensitivity/Impedance (at 1 kHz) AUX: 400 mV/50 kΩ MIC: 2.5 mV/5 kΩ Speakers/Impedance: 6 Ω – 16 Ω Tuner FM tuning range: 87.50 MHz – 108.
Mains (AC) Line Instruction (not applicable for Europe, U.S.A., Canada, Australia, and U.K.) Instrucción sobre la línea de la red (CA) (no aplicable para Europa, EE.UU., Canadá, Australia, ni el Grã-Bretanha) Instrução sobre a tensão da rede eléctrica (CA) (não aplicável para a Europa, os E.U.A.