LCD TV LT-26HG22J LT-32HG22J INSTRUCTIONS 3BR2301A_EN.
Features • 16:9 LCD screen • LED-Backlight-Technology - It realize thin profile, low power consumption, eco-friendly Hg-less design and high contrast picture. • On-Screen Language Display in 15 languages (English, Spanish, German, French, Italian, Swedish, Dutch, Russian, Portuguese, Turkish, Greek, Finnish, Polish, Danish or Norwegian) • Clock function • Hyperband cable DVB-T Combi-Tuner, MPEG 2 / MPEG 4 compatible • Electronic Progr.
Contents ENGLISH Information for Users on Disposal of Old Equipment and Batteries [European Union] These symbols indicate that the electrical and electronic equipment and the battery with this symbol should not be disposed of as general household waste at its end-of-life.
Important safety information This unit has been produced according to all current safety regulations. The following safety tips should safeguard users against careless use and the dangers connected with such use. • Although this appliance has been carefully manufactured and rigorously checked prior to leaving the factory, as with all electrical appliances it is possible for problems to develop.
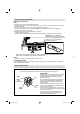
Important safety information How to attach the stand NOTE: • Unplug the AC cord from the AC INPUT terminal. • Before beginning this process, assure that TV is laid on a clean, safe, and cushioned space to avoid any damage to the unit. • Do not touch or press the TV-screen, glass might break under pressure. • Be sure to follow the instructions. Incorrect installation of the stand may result in the TV falling over. 1) Place the TV on its front onto a table.
Important safety information WARNING • To prevent fire, never place any type of candle or open flame on the top or near the TV set. Moving the unit or carrying by hand When the unit is moved a long way, unplug the power cord and disconnect the antenna, connecting cables and any fall-prevention apparatus. • Moving without doing so could result in damage to the power cord, a fire, electric shocks or injuries from dropping the unit.
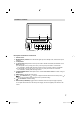
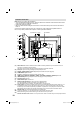
Location of controls 2 1 3 9 (LT-32HG22J) 8 7 6 5 4 Description of Indicators and Controls 1. Remote sensor (Standby/On) indicator: The LED indicator lights up red in standby mode, and blue in the power 2. ON mode. 3. Loudspeakers (Power)-button: Preparation: Connect power-cable to AC220~240V/50Hz. (LT-32HG22J: turn on 4. mains switch (9).) a) If standby-LED is red, you may power-off. To power-off, press power-button 1x and release. For confirmation, standby-LED will change to dark.
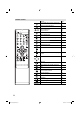
Remote Control Function Enter standby mode or turn on the power Page 11 Display program information 13 Select channel Select Teletext page Enter password Select an input source 13 14 16 12 Select picture format 18 Display the EPG (Electronic Progr.
Remote Control Install the batteries Use batteries type UM3 (AA-Size). Do not use old or weak batteries. The remote control may not work properly with a weak voltage from such batteries. Replace exhausted batteries with new ones. Never try to recharge normal batteries - this could cause an explosion. Note: • Exhausted batteries can leak corrosive electrolyte, which may cause damage to the remote control - therefore remove exhausted batteries immediately.
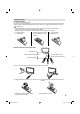
Antenna connection Note: Before you connect other appliances: • To avoid potentially damaging your set, make sure all items are switched off and disconnected from the mains power when you make the connections. • Arrange the desired connection. • When you have finished making the connections, reconnect the mains power to the unit and switch it back on. Connect your antenna as shown below (A). Connections to other equipment is explained further on P.24, 25.
Note: • If you do not wish to carry out the autotuning for Analogue TV-channels, press RETURN to exit the menu. Auto setup Your television has an Automatic Tuning System which makes tuning in your television easy. This Automatic tuning System scans the entire reception range in your area and automatically stores all available analogue and digital channels of suitable signal strength in the correct order e.g. BBC1 will tune into channel 1, BBC2 will tune into channel 2, etc.
Selecting the input source Press INPUT SELECT to view a signal from another device connected to your TV, such as a VCR or DVD player. You can select each input source depending on which input jacks you used to connect your devices. all DVB-T programs have been stored 5 When (100%), you will be asked if you want to proceed to autotuning Analogue TV-channels. If you wish to start the tuning Analogue cableTV channels. connect your Analogue cable-TV antenna and press ENTER.
Auto Synchronization This feature can display the time based on the DVB signal information. If you wish to set the time manually, select “Off” as follows and then perform the Date and Time options. 1 Select /Time Setup/Time/Auto Synchronization. 2 Then press or to select Off. Press to select Date, then enter the date 3 with 0-9 buttons. Auto Synchronization Off Date 2010/10/21 Time 01:01:39 Timer Off 00:00:00 Power On Timer 4 Then press . Enter the Time same as above.
Switch on / off Teletext Teletext is not transmitted by all channels. Select a channel that shows teletext. Press . You will now see a teletext page. (If “100” is shown without any text information, it may mean that the channel you have selected does not support teletext.) Press again. The TV-screen will be split into two and both Teletext information and actual broadcast will be displayed at the same time. Press again in order to switch off teletext. Press again in order to switch on teletext again.
Remarks on DVB-T system DVB-T is at present still being developed. You can get information regarding the current stage of development from your specialist retailer. As a digital service DVB-T basically works differently to previous analogue TV reception. Reception Possibilities: In contrast to cable TV, DVB-T is received via room or roof antennas. A room antenna is sufficient for reception within the reception area of a DVB-T transmitter.
Password Setup (Parental lock) Parental lock is a function of the channel provider. If it is not supported by the channel, parental lock is without function. Currently there are no channels supporting parental lock. 1 Press MENU. Select then press . ‘Password’ will appear. Press ‘0 0 0 0’ using 2 the Number buttons (0-9). (This is the default EPG (Electronic Program Guide) The Guide menu shows the available programme listings for the next 8 days only, including today.
Picture size and resolution Resolution and picture quality Broadcast wide screen films in different resolutions. The following table shows the resolution options for wide screen film broadcast media.
Picture format Picture Size The required picture format can be set by pressing the PICTURE SIZE button. Press PICTURE SIZE until the required format is displayed. You move through the following formats when you press the button: Auto, 4:3, 16:9, 14:9, Cinema, Real (HDMI only). Other formats Auto The picture is automatically only then shown in a format-filling display when a WSS-TV signal is received. 16:9 The width of the picture will be zoomed evenly.
Other convenience functions You can change the default settings to convenience use.
Other convenience functions Setup hint Selected Items Country Audio Language Set the country where you use this product. Select preferred audio language, if the current watching DTV channel has more than one audio language. • This option is not available for ATV channel. Select second preferred audio language, if the current watching DTV channel does not have the language set in Audio Language option above.
Other convenience functions Subtitle Selected Items Analog Subtitle On / Off Digital Subtitle Language Digital Subtitle Language 2nd Teletext Hearing Impaired On / Off Digital Teletext Language Analog Teletext Language Common Interface Reset TV Setting Setup hint If the receiving analogue signal has the Teletext subtitle page, it displays the Teletext subtitle. Select preferred subtitle language, if the current watching DTV channel has more than one subtitle language.
PC connection Follow these steps: On your PC monitor choose a resolution of 1360 × 768 at 60Hz and save this configuration. Shut down your PC and connect the shut off LCD TV. Use a screensaver to avoid burning-in of static picture content. Select PC input Switch on the LCD-TV. Select the PC input mode (see page 12).
Connecting an HDMI or a DVI device to the HDMI input The HDMI input receives digital audio and uncompressed video from a HDMI equipped device or uncompressed digital video from a DVI equipped device. When you connect to a DVI device with a HDMI-to-DVI adapter cable, it only transfers the video signal, so it is necessary to use separate analogue leads to transfer the audio signals. Select the HDMI input mode (see P.12).
Connection to other equipment 1. Connecting to other equipment Attention: Preparation: • Disconnect all equipment from the AC-supply, to prevent any possible damage. • Make the necessary connections. • Make sure all connections are safe & secure before reconnecting your equipment the AC-supply. Please connect your satellite-receiver or DVD player via SCART (AV1). Make sure your SCART cable’s crosssection is at least 1 cm or more. SCART cables with less thickness may cause visible noise.
Connection to other equipment 3. Connecting an audio system You can supply the TV sound to the stereo equipment (A) with the SCART socket. Use a special SCART cable for the connection which sold at the accessory shop. (please consult your hi-fi instructions for details). If you have a surround sound amplifier/decoder (B) with a coaxial digital input, you can connect the Coaxial Digital Audio Output to it, using a suitable coaxial digital lead. Note: • The Balance/Bass/Treble adjustments (see P.
Troubleshooting table Please check the following list before requesting service. Symptom No picture, no sound No reception The TV switches off with missing antenna input signal In menu, the Channel option cannot be selected. Wrong Colours Possible solution Switch on the set. Check that the mains power outlet is properly connected. Select appropriate input mode. Unplug unit for 1 minute, then plug it back in. Have you tuned in the TV stations? Press 1 on the remote control. Connect the antenna.
Information on software license The following open source software component is included in this product: * Freetype 2.1.9 Portions of this software are copyright © 1996-2002 The FreeType Project (www.freetype.org). All rights reserved. JVC has assigned the service and in warranty responsibility to Kesa Electricals plc. FOR CUSTOMER SERVICE, ADDITIONAL SET-UP AND OPERATING ASSISTANCE, OR TO ORDER ACCESSORIES PLEASE CALL: Country Sales Company Tel URL Main UK COMET 0844 8009595 http://www.comet.co.
J3BR2301A SH 11/05 P © 2010 Victor Company of Japan, Limited 3BR2301A_EN.