FRANÇAIS ENGLSIH WIDE LCD PANEL TV TELEVISEUR LCD A ECRAN LARGE BREEDBEELD LCD-TV BREITBILD-LCD-TV INSTRUCTIONS INSTRUCTIONS INSTRUCTIES ANWEISUNGEN Trade Mark of the DVB Digital Video Broadcasting Project (1991 to 1996) Number : 5238: LT-32DC9BH 5239: LT-26DC9BH DEUTSCH NEDERLANDS LT-32DC9BH LT-26DC9BH
ENGLISH Make sure you connect this TV to cable TV to watch digital channels, otherwise you cannot watch on-air digital channels. EN – English Dear Customer, This apparatus is in conformance with the valid European directives and standards regarding electromagnetic compatibility and electrical safety.
notice Read this manual carefully and make sure you understand the instructions provided. For your safety, check what the result of each action will be. To reduce the risk of electric shock, do not remove cover (or back). No user serviceable parts inside. Refer servicing to qualified service personnel. Indicates a situation which, if not avoided, could damage the equipment or other apparatus. This symbol indicates dangerous voltage inside the TV that presents a risk of electric shock or personal injury.
ENGLISH general safety precautions Power ● Plug the power cord into the correct power outlet. An unstable connection may cause fire. ● Do not use damaged power cords or plugs, or use a loose wall outlet. This may cause electrical shock or fire. ● Do never touch the power cord with wet hands. This may cause electrical shock. ● Do not use multiple devices with one outlet. Overheating the outlet may cause fire. ● Do not bend or pull out the power cord using force, nor place heavy objects over it.
GENERAL SAFETY PRECAUTIONS Usage ● Unplug the product from the wall outlet and do not touch the antenna during a thunderstorm. This will prevent damage to the unit due to lightning and power-surges. ● Keep dust or water away from the pins or touching points of the power plug. This will prevent electrical shock or fire. ● Keep children from climbing over the product. The device may cause serious injury or death if it falls on them. ● Do not place anything over the product that children may try to reach.
ENGLISH TABLE OF contents PREPERATION--------------------------------------------------------------------------------------------------------------- 6 Front and Side Panel----------------------------------------------------------------------------------------------------------------------- 6 Rear and Side Panel------------------------------------------------------------------------------------------------------------------------ 8 Remote Control Buttons------------------------------------------------------
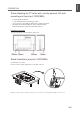
PREPERATION Front and Side Panel Here the shown illustration is LT-32DC9BH model and may be somewhat different from your TV. Changes input source. Displays menu / confirms selection. Changes channel / moves selection. Adjusts volume / moves selection. Power On/Off Power lamp ON: Lit (Blue) / STANDBY : Unlit Remote control sensor Accessories Please check that the following accessories are included with your TV. Note: Package contents may vary according to area.
ENGLISH PREPERATION When attaching the TV to the wall, use the optional JVC wall mounting unit (only for LT-32DC9BH) • Consult a qualified technician. • See the included manual on mounting procedures. • • JVC assumes no responsibility for damage due to improper mounting. Mounting holes for wall mounting unit : M5 x 4, 200mm x 200mm Depth of screw holes: 13.7mm from the surface of the TV Installation requirements To avoid overheating, ensure the unit has ample room.
PREPERATION Rear and Side Panel SMARTCARD SLOT A slot for a Smartcard. Here the shown illustration is LT-32DC9BH model and may be somewhat different from your TV. CI (Common Interface) SLOT A slot for a CI Module (Conditional Access Module). AC INPUT Connects the power cord. HDMI INPUT Connect to the HDMI outputs of DVD or STB. SCART INPUT/OUTPUT Connect to the SCART input/output of VCR, DVD or STB. COMPONENT INPUT Connect to the component outputs of DVD or STB.
ENGLISH PREPERATION Remote Control Buttons (Power On/Off) (MUTE) Mode Switch DVD players / TV / VCRs and DVD recorders. Number Buttons (Information) Displays information on the current channel or input. LCD AV Changes input source. LCD Coloured Buttons Used for interactive applications in the EPG, Edit Channels and Teletext mode. TV/DTV Switches between digital TV and analog TV modes. MENU Displays the OSD menu. OK Confirms (save or enter) your choice in the OSD menu.
PREPERATION Connecting the Antenna 1 Connect the RF coaxial cable from an aerial or a cable TV to the RF jack on the rear of the TV. NOTE ▪ For proper reception of signals, an external antenna is required. For best reception, an outdoor antenna is recommended. ▪ To improve the picture quality in a poor signal area, please purchase a signal amplifier and install properly. Here the shown illustration is LT-32DC9BH model and may be somewhat different from your TV.
ENGLISH PREPERATION Conditional Access (for the digital channels only) Although some TV and radio channels are free to air, most TV and radio channels are available on a subscription basis and can only be enjoyed via a Conditional Access component. Inserting a Smartcard The Smartcard looks similar to a credit card and is inserted into the Smartcard slot on the side of the TV. A valid Smartcard entitles you to view and listen to all the channels you choose to subscribe to.
CONNECTING EXTERNAL DEVICES Connecting the DVD or Set-Top Box Here the shown illustration is LT-32DC9BH model and may be somewhat different from your TV. HDMI DVD SCART STB COMPONENT With a SCART cable Connect the SCART cable between the SCART connector (EXT-1 or EXT-2) on TV and the SCART connector of DVD or STB.
ENGLISH CONNECTING EXTERNAL DEVICES Connecting the VCR With a SCART cable Connect the SCART cable between the SCART connector (EXT-1 or EXT-2) on TV and the SCART connector of VCR. With a composite cable Connect the composite video and audio cable between the composite video and audio input connectors (EXT-4) on TV and the composite video and audio output connectors of VCR.
CONNECTING EXTERNAL DEVICES Connecting the Digital Audio System DIGITAL AUDIO OUT (OPTICAL) Connect the optical cable between the DIGITAL AUDIO OUT (OPTICAL) on TV and the composite optical audio input connector of digital audio system. Here the shown illustration is LT-32DC9BH model and may be somewhat different from your TV.
ENGLISH INSTALLATION WIZARD Wizard for Digital Channels (In Digital TV Mode Only) The installation wizard for digital channels will appear automatically when you perform the followings; ● Turning on your TV for the first time after purchase. (Refer to p.17) ● Performing the default setting in DTV Setup > Installation menu when Digital TV mode. (Refer to p.29) NOTE: ▪ This wizard is available in Digital TV mode only.
INSTALLATION WIZARD Wizard for Analog Channels (APS) (In Analog TV Mode Only) Firstly, switch to Analog TV input mode using the AV or TV/DTV button. When you perform the default setting in Feature menu, the installation wizard for analog channels will appear automatically. (Refer to p.27) NOTE: The default PIN code is 0000. If you have forgotten the PIN code, please contact your local TV distributor. 1 Select the main language using the ◄/► button. 2 Select Channel Search and press the OK button.
ENGLISH BASIC OPERATION Turning on the TV 1 Firstly, connect the power cord correctly. At this stage, the TV switches to standby mode. 2 In standby mode to turn TV on, press the POWER, TV/AV or P / button on the TV or press the POWER, AV, TV/DTV, P / or NUMBER button on the remote control and the TV will switch on. Changing Channel 1 Press the P / button or enter the channel number using the NUMBER buttons to move to the channel directly.
BASIC OPERATION Displaying Information Programme Information (i- plate) (In Digital TV Mode Only) Programme information is displayed for a certain period of time whenever you switch channels. You can view the programme information by pressing the button while watching a programme. The information is displayed as follows on the screen.
11 1 --------ono no ENGLISH BASIC OPERATION Simple Information (except for Digital TV Mode) You can view the information such as the channel number (or input source), and sound mode (or source resolution) by pressing the button while watching an analog TV channel or external input source.
BASIC OPERATION Digital Programme Features (In Digital TV Mode Only) Subtitle If the programme provides subtitle information you can select the language for the subtitle. 1 Press the SUBTITLE button to display the subtitle language list. 2 Select a subtitle language using the ▲/▼ button and press the OK button. Subtitle English Off NOTE: You can select the default subtitle language in DTV Setup > Configuration > Language Setting > Subtitle Language menu.
ENGLISH BASIC OPERATION Selecting the Main Input Source Once you have connected your various audio and video systems, you can view different sources by selecting input sources. 1 Press the AV button. 2 Select a main input among the sources and press the OK button. NOTE: You can easily switch to digital TV from different sources by pressing the TV/DTV button. Setting the Aspect Ratio You can select an aspect ratio mode by pressing the ZOOM button repeatedly on the remote control.
BASIC OPERATION Displaying Teletext information You can display teletext information at any time on your TV. Most TV broadcasting stations provide text information services via teletext. The index page of the teletext service gives you information on how to use the service. NOTE: To properly display teletext information, channel reception must be stable. Otherwise, information may be missing or some pages may not be displayed.
ENGLISH PROGRAMME GUIDE (In Digital TV mode only) The Programme Guide displays the programme information about each digital channel, based on the date and time. You can also schedule your watching using the information given. Press the GUIDE button to display the programme guide. NOTE: Press the GUIDE button again to exit the guide screen.
PROGRAMME GUIDE (IN DIGITAL TV MODE ONLY) Moving the Time Bar You can quickly search the time zone using the time bar. 1 Press the GREEN button to display time control bar. 2 Select each button and press the OK button to move the time bar. If you press a button repeatedly, the same operation is repeated. Exits the time control bar. Now Moves to the current programme. ◄ Moves back to the previous programme or 30 minutes before. ► Moves forwards to the next programme or 30 minutes ahead.
ENGLISH PROGRAMME GUIDE (IN DIGITAL TV MODE ONLY) Schedule Press the YELLOW button to display the schedule list. The schedule screen displays the reserved programme list and lets you add, edit or delete the reservations. To add a new reservation schedule, select a blank space and press the OK button. To edit the reservation information, select a scheduled programme and press the OK button. 1 Schedule Reservation Channel No. Start Time End Time Change Channel No. and Time using the NUMBER buttons.
MENU SETTINGS You can customize your TV which best fits your requirements using the various TV menus. How to Navigate the Menu Button MENU ▲/▼ OK or ► Action Displays the menu. Moves among menus or items. Mode Brightness Contrast Sharpness Colour Selects (Enters) a menu or confirms a selection. ◄/► Adjusts or configures the option. BACK Goes back to the previous screen. NUMBER > Picture Fleshtone Colour Temperature Noise Reduc tion Back light Enters the number (0~9).
ENGLISH MENU SETTINGS Installation Settings (In Analog TV Mode Only) : ● Country: Shows the country. > Installation > Installation Countr y Auto Search Manual Search Edit Channels ● Auto Search: (Refer to p.30) ● Manual Search: (Refer to p.31) ● Edit Channels: (Refer to p.31) Move Feature Settings : Netherland Enter > Feature ● Language: Selects the main language. > Feature ● Time Setting: (Refer to p.
MENU SETTINGS Time Setting Select Feature > Time Setting. >> Time Setting ● Date: Shows the current date. Date Local Time Power On Time ● Local Time: Shows the current time. ● Power On Time: Select On to set time for turning on the power and then enter hour/minute. At the preset time, the TV will automatically be tuned on. ● Power Off Time: Select On to set time for turning off the power and then enter hour/minute. At the preset time, the TV will automatically be tuned off. 19.03.
ENGLISH MENU SETTINGS DTV Setup (In Digital TV Mode Only) : > DTV Setup ● Configuration: (Refer to p.34) ● Edit Channels: (Refer to p.33) > DTV Setup DT V Setup ● Installation: - Channel Search: (Refer to p.32) - Software Update: (Refer to p.36) - Default Setting: (for Digital TV Mode Only) Sets the current all settings of the Digital TV mode to the default settings.
ANALOG CHANNEL SETTINGS (In Analog TV mode only) Analog channels can be searched and edited only in Analog TV input mode. NOTE: You can access this menu only in Analog TV input mode. > Installation Countr y Auto Search Manual Search Edit Channels How to Navigate the Menu Button Action MENU Displays the menu. ▲/▼ Moves among menus or items. OK or ► Selects (Enters) a menu or confirms a selection. ◄/► Adjusts or configures the option. BACK Goes back to the previous screen.
ENGLISH ANALOG CHANNEL SETTING (IN ANALOG TV MODE ONLY) Manual Search Select Manual Search. >> Manual Search ● Colour System: Auto - PAL - SECAM Colour System Audio System Band Channel Programme No Name Search Fine Tune Save ● Audio System: BG – I – DK - L ● Band: C (Air Channel) - S (Cable Channel) ● Channel: Choose or enter the channel number. ● Programme No: Choose or enter the programme number. ● Name: Enter the new channel name. ● Search: Starts to search channels.
DIGITAL CHANNEL SETTINGS (In Digital TV mode only) Digital channels can be searched and edited only in Digital TV input mode. NOTE: You can access this menu only in Digital TV input mode. How to Navigate the Menu Installation Channel Search Button Action Software Update Default Setting MENU ▲/▼ OK or ► BACK or ◄ NUMBER Displays the menu. Moves among menus or items. Selects (Enters) a menu or confirms a selection. Goes back to the previous screen. Enters the number (0~9).
ENGLISH ANALOG CHANNEL SETTING (IN ANALOG TV MODE ONLY) Edit Channels Select DTV Setup > Edit Channels menu. Edit Channel Lists Edit Channels Edit Channel Lists Edit Favourite Channels Select Edit Channel Lists. ● Group: Select the group of channel list. ● Lock: Lock or unlock the channel. ● Select All: Select all channels. ● Unselect All: Unselect all the selected channels.
DTV CONFIGURATION (In Digital TV mode only) This chapter describes how to set up the configuration for digital channels. Configuration NOTE: You can access this menu only in Digital TV input mode. Parental Control Language Setting Schedule How to Navigate the Menu Button Miscellaneous Settings Action Displays the menu. MENU ▲/▼ Moves among menus or items. OK or ► Selects (Enters) a menu or confirms a selection. BACK or ◄ Channel View Control Goes back to the previous screen.
ENGLISH DTV CONFIGULATION (IN DIGITAL TV MODE ONLY) Schedule Schedule Select DTV Setup > Configuration > Schedule. The reserved programmes will be displayed in time order. Select the programme you want to edit and press the OK button. Select a blank space and press the OK button to add a new reservation. NOTE: For detailed information about Schedule, refer to Programme Guide > Reserving a Watching > Schedule (p.25).
DTV SOFTWARE UPDATE (In Digital TV mode only) In order to maintain proper performance of the TV, it is essential to have the most up-to-date software. Installation NOTE: You can access this menu only in Digital TV input mode. Channel Search Software Update Default Setting How to Navigate the Menu Button MENU ▲/▼ OK or ► BACK or ◄ NUMBER Action Displays the menu. Moves among menus or items. Selects (Enters) a menu or confirms a selection.
ENGLISH DTV SOFTWARE UPDATE (IN DIGITAL TV MODE ONLY) OTA (Over the Air) OTA, an abbreviation of Over–the-Air, means that the software can be downloaded through your aerial. The manufacturer reserves the right to decide when and where to release software by this process. The software update via your aerial will only occur under the following circumstances. 1 The equipment should have appropriate loader software.
APPENDIX Menu Map Picture Mode Brightness Contrast Sharpness Colour Hue -------------------------------- (NTSC signal only) Fleshtone Colour Temperature Noise Reduction Backlight p.26 Sound Bass Treble Balance AVL Hyper Sound p.26 Installation (In Analog TV Mode Only) Country Auto Search Manual Search Edit Channels p.27 p.30 p.31 p.
ENGLISH APPENDIX Troubleshooting Before contacting your local service dealer, please make sure you refer to the following guide. If the TV does not work normally after completing the following trouble shooting, please contact your local TV distributor or service centre. (1) No message is displayed or the TV has no power. - Check the main power cable and make sure it is plugged into a suitable power outlet. Check that the mains supply is switched on. Connect the power cable to a different power outlet.
APPENDIX (9) Channel search does not work. - Check that your cable is connected correctly. Make sure that the antenna setting in the menu is correct. Use the appropriate antenna capable of receiving VHF or UHF channels for your area. (10) Cannot update new software. - You can get an update. If the TV does not show a message requesting update, that means no software is available. (11) Cannot watch pay channels.
ENGLISH APPENDIX Specifications Model LT-26DC9BH Broadcasting systems CCIR B/G/I/D/K/L Colour systems PAL, B/G, D/K, I SECAM, B/G, D/K, L Channel and frequencies Digital : 51 MHz ~ 858 MHz Analogue : 45.25 MHz ~ 855.
© 2008 Victor Company of Japan, Limited 0508TKH-HU-HU HLTXXDC9BH/100GB/DE/FR/NL P/N: 20010-00010