EN FR DE IT ◆ LT-32WX50EU 1009HHH-MW-MT RU ES LT-32WX50EU INSTRUCTIONS ZH(T) LCD Monitor 2009 Victor Company of Japan, Limited LCD Monitor LCD Monitor ◆ INSTRUCTIONS Moniteur LCD ◆ MANUEL D’INSTRUCTIONS LCD Monitor ◆ BEDIENUNGSANLEITUNG Televisore a cristalli liquidi ◆ ISTRUZIONI Monitor LCD ◆ MANUAL DE INSTRUCCIONES ЖК-монитор ◆ ИHCTPУKЦИИ ПO ЭKCПЛУATAЦИИ ◆ LCT2621-001A-H WX50_covers_eu.indd 1 09.10.
LCD Monitor ENGLISH LT-32WX50EU INSTRUCTIONS LT-32WX50_eu_en.indb 01 09.10.
Warning Please follow all the guidelines below. Never try to repair the product yourself! ● To prevent electrical shock, do not open cover or take apart the AC adapter. Repair should be done by service personnel only. ● If the problem cannot be solved in “Troubleshooting” (➔ page 44), unplug the power cord and contact your retailer. If the product is damaged or behaving strangely, stop using it at once! ● Unplug the power cord and contact your retailer.
Never cut or damage the power cord! ● If the power plug is not the right shape, or the power cord is not long enough, use an appropriate plug adapter or extension cable. (Consult your retailer.) Do not allow the product to fall! ● Do not rest your elbows on, or allow children to hang from the product. There is a risk that the product will fall and cause injuries. ● Make use of the hole on the back of the stand to prevent the product from falling easily.
Do not carry the product on your own! ● In order to prevent accidents, ensure that the product is carried by two or more people. On disposal of the product! ● Follow the instruction in “Information for Users on Disposal of Old Equipment and Batteries”. (➔ page v) ■ Registered trademarks, the model name, and power rating are written on the labels placed under the terminal cover on the rear of the product. ■ For more details on installation, usage and safety, consult your retailer.
Products Battery Notice: The sign Pb below the symbol for batteries indicates that this battery contains lead. [European Union] These symbols indicate that the electrical and electronic equipment and the battery with this symbol should not be disposed of as general household waste at its end-of-life.
Maintenance Cleaning the screen The screen of this monitor is coated with layers of thin films, such as a coating to prevent unwanted reflections. Damages to these layers can lead to irreversible changes in appearance such as uneven colour, discolouration, and scratches. Follow the instructions below to prevent such troubles. ● Do not paste or stick anything using any glues or adhesive tapes. ● Do not write anything on the screen. ● Do not strike the screen with a hard object.
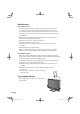
Ventilation openings Keep space around the product as illustrated below at minimum for proper ventilation. 200 mm 150 mm 200 mm 50 mm 150 mm To avoid burn-in Do not display a still picture for an extended period of time. Doing so may cause a faint image to remain on your screen. Warning 50 mm To prevent an accidental fall To prevent injury, the monitor must be fixed to the floor/cabinet.
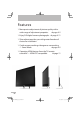
Features › More precise adjustment of picture quality with a wide range of adjustment properties ➔ page A-2 › Enjoy SLR digital camera photographs ➔ page A-11 › Slim cabinet provides you with greater freedom of choice for installation › Quick response making video games more exiting — Game Mode ➔ page A-5 › Operating HDMI devices from the TV remote controller — HDMI CEC compatible ➔ page 11 02 LT-32WX50_eu_en.indb 02 09.10.
Contents Warning . . . . . . . . . . . . . . . . . . . . . . . . . . . . . . . . . . . . . . . . . . . ii Installation . . . . . . . . . . . . . . . . . . . . . . . . . . . . . . . . . . . . . . . 04 04 04 05 05 06 08 08 Parts identification . . . . . . . . . . . . . . . . . . . . . . . . . . . . . . . 09 Controlling HDMI devices . . . . . . . . . . . . . . . . . . . . . . . . . 11 Changing the settings . . . . . . . . . . . . . . . . . . . . . . . . . . . .
Installation Included items ● Main unit (monitor) ● Video cable (D-sub 15 pin / RCA) ● Audio cable (3.
Attaching the covers ● Attach the HDMI cover (3) and AC terminal cover (5) after connections have been made. Fix the HDMI cover to the unit using the supplied screw. Break off the bottom right of the HDMI cover when you want to extend the HDMI cable backwards. ● Attach the D-sub cover (1), hook hole covers (2) and bottom covers (4) when the respective openings are not in use.
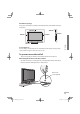
Connecting external devices To connect a device with component terminals ø 3.5 mm stereo mini plug To connect a device with a composite terminal Green To connect a computer To connect a DVI device To INPUT-1 terminal To connect an HDMI device To INPUT-1/INPUT-2 terminals 06 LT-32WX50_eu_en.indb 06 09.10.
● HDMITM (V.1.3, with Deep Color, with x.v.ColourTM, HDMITM CEC Support) INPUT-3: D-sub 15 pin Installation RS-232C terminal (➔ page 40) AUDIO IN terminal : 3.
Connecting the power cable/AC Adapter ● Connect AC plug adapter and power cord to the monitor in the order of numbers below. ● Insert the power terminal firmly until you hear a clicking sound. AC adapter Power cable ● Ground the earth plug of the power cable to the earth terminal of the AC outlet. ● When several kinds of power cord are provided in the package, use the one which fits your AC outlet. Initial settings When you turn on the monitor for the first time, initial settings start.
Parts identification Parts identification Main unit Speaker unit Remote sensor Power indicator Power indicator Lights while the monitor is on. Remote sensor Aim the remote control here. Turns the monitor on/off (on standby). INPUT MENU + OK – BACK Switches the input. Opens the setting menu. Functions as the down cursor key in the menu operations. Functions as the left cursor key and the right cursor key in the menu operations. Turns up the volume. Functions as the OK key in the menu operations.
Remote control LINK OPTION MENU EXIT (Cursor keys) OK BACK ZOOM BLUE RED GREEN YELLOW +/– Turns the monitor on/off (on standby). Opens the operation window for HDMI CEC devices. (➔ page 11) Opens the setup window of HDMI CEC devices. Opens the setting menu of the Photo viewer (➔ page 38). Opens the setting menu. (➔ page 12) Exits from the menu. Selects an item. Confirms your selection. Goes back to the previous screen. Changes the aspect. (➔ page 28) Press accordingly to the on-screen indications.
Controlling HDMI devices You can control HDMI CEC devices connected to this monitor using the remote of the monitor. 1 Press the [LINK] button. Operation window appears. 2 Select the device to control. Select the device name under “Device”. 3 Control the selected HDMI device. Link Controlling HDMI devices ● This function can be customized in the “HDMI” settings (➔ page 34). ● Devices may not operate or may function differently from described, depending on the model or the manufacturer.
Changing the settings Example: to change the setting of “Colour Temperature” 1 Open the menu. Picture 2 3 Select “Picture”. Hue Hue Setting Colour Contrast Contrast Setting Brightness Sharpness Page 1/3 Memory1 Setting Memory Load Preset 0 0 0 0 0 Select “Colour Temperature”. ● The item currently selected is shown in orange. 4 Select the setting you want. ● When the selected item is followed by an adjustment screen, press the [ ] buttons to make adjustments.
Technical information Adjust the picture to your needs A-2 Set up the monitor for your PC A-10 Enjoy SLR digital camera photographs A-11 Menu index by task A-12 Show Your True Colours. LT-32WX50_eu_en.indb A-1 09.10.
Adjust the picture to your needs To use a preset 1 2 Open the menu. Select a memory from “Setting Memory” in “Picture”. In the initial setting, 6 presets are assigned to each memory as follows: ● Memory1 : Standard ● Memory2 : Dynamic ● Memory3 : Theater ● Memory4 : Monitor ● Memory5 : Photo Pro ● Memory6 : Game Picture Hue Hue Setting Colour Contrast Contrast Setting Brightness Sharpness Page 1/3 Memory1 Setting Memory Load Preset 0 0 0 ● See page A-4 for the detail of 0 each preset.
To customize the settings You can create your own set of picture settings by arranging the settings of a preset. Storing several sets of settings helps you to enjoy a picture in the taste you like according to the viewing environment and characteristics of the source. 1 2 3 Adjust the picture to your needs This monitor features rich menus for picture control, in addition to 10 preinstalled sets of picture settings carefully prepared by JVC to suit various types of video content and viewing environment.
● Characteristics of the 10 presets Dynamic Makes pictures colourful and bright, suitable for watching in a well-light room. Standard The most standard setting. Theater Suitable for watching cinemas in a dark room. ● Special settings Signage Suitable for digital signage use in market, shops or hotels. CCTV HD Suitable for monitoring CCTVs in HD format. A-4 LT-32WX50_eu_en.indb A-4 09.10.
➔ See the following pages for the setting values of each preset. Monitor Adjust the picture to your needs Does not apply colour adjustments or noise reductions. Input video signals are displayed as they are. Suitable for monitoring purpose. Photo Pro Suitable for watching still pictures of SLR digital cameras. Game Gives priority to the response time for picture movement. Suitable for game consoles. CCTV SD Suitable for monitoring CCTVs in SD format.
● Setting values of each preset ● The settings are subject to change for amelioration. Hue Hue Setting BY Gain BY/RY Angle Colour Contrast Contrast Setting Black Stretch Dynamic DC Offset Auto Contrast Brightness Sharpness Enhancer Enhancer Setting Detail H.Sharp V.
Signage 0 CCTV HD 0 CCTV SD 0 Option 0 0 0 0 0 0 0 0 0 0 0 +5 0 0 0 +8 +4 0 0 +14 +5 0 0 0 0 Off Off Medium High High Off Off Off Off Off Off Off Off 0 0 Mode-3 Off 0 –15 Mode-3 On 0 –10 Mode-3 On 0 20 Mode-1 On –4 20 Mode-1 Off +2 –30 Mode-3 –15 –5 –15 +5 0 0 0 +10 0 0 –15 +30 0 0 0 +30 0 +5 –5 +30 0 0 0 +18 Off Off Auto Auto sRGB Mode-5 On Off Auto Auto Auto Mode-2 Off Medium Auto Auto Wide Mode-2 Off Medium Auto Auto Wide Mode-3 Off Medium Auto Auto Wide Mode-3 Off
Dynamic White Balance Setting R Drive / G Drive / 0 B Drive R Cutoff / G Cutoff / 0 B Cutoff Colour Management Mode-1 Colour Mngmt.
Signage CCTV HD CCTV SD Option 0 0 0 0 0 0 0 0 0 0 0 0 Off Mode-2 Mode-1 Mode-2 Mode-1 Off 0 0 0 0 0 0 0 0 0 0 0 0 0 0 0 0 0 0 0 0 0 0 0 0 0 0 0 0 0 0 0 0 Mode-3 Off 0 0 Mode-2 Medium 0 0 Mode-3 Medium 0 0 Mode-4 Medium 0 0 Mode-2 High 0 0 Mode-6 Off Auto Off On Off Normal Off Off Auto Low On Off Middle Off Off Auto Low On Off Normal Off Off Auto Low On Off Normal Off Off Auto Low On Off Normal Off Off Off Off Off Off Short Off Off On Off On O
Set up the monitor for your PC Selecting the input signal When you connect a PC to the INPUT-3 terminal, set the type of the input signal accordingly. ● For signals in VGA60 and XGA60 Set “Sampling Mode” to “Std”. (➔ page 32) ● For signals in WVGA60 Set “Sampling Mode” to “Wide”. (➔ page 32) ● For signals in WXGA (1280), WXGA (1360) and WXGA60 1 Set “Sampling Mode” to “Wide”. (➔ page 32) 2 Set “WXGA Select” as follows.
If the picture is not aligned vertically, or letters on the screen look blurred Set the aspect to “1:1”, and adjust “Dot Clock” and “Clock Phase”. (➔ page 33) If the picture is cropped, or extra margins are displayed around it 1 Set the aspect to “Full”. 2 Adjust the position of the picture using “PC Position Adjustment” until the upper left corner of the picture is positioned at the upper left corner of the display.
Sound Sharpness Brightness (signal) Brightness (backlight) Colour adjustment Hue adjustment Menu index by task General tone of colour Tone of colour (including white) Tone of colour (in detail) Range of colour representation Amplitude of the colour difference signal Demodulation angle of the colour difference signal Pattern of colour correction Colour correction (in detail) Page Hue Colour Temperature White Balance Setting Colour Space Hue Setting › BY Gain 14 19 19 18 14 Hue Setting › BY/RY Angle
Picture Setting Memory ● When the input is changed, the memory used for the input last time is automatically applied. ■ Memory1 / Memory2 / Memory3 / Memory4 / Memory5 / Memory6 Load Preset You can load one of the presets below into a memory. You can do further adjustment based on the loaded settings. ● Select a preset and press “Load” to load a preset. Dynamic : Makes pictures colourful and bright, suitable for watching in a well-light room. ■ Standard : The most standard setting.
Hue Adjusts the tone of colour. ■ –30 – +30 (Skin colour reddish ↔ Skin colour greenish) Hue Setting Adjusts the tone of colour in detail. ● The setting is fixed to 0 and unadjustable when “Colour Space” is set to “sRGB”, “AdobeRGB”, or “x.v.Colour”. ● The setting is fixed to 0 and unadjustable when “Colour Space” is set to “Auto” and the xvYCC signal is input to the HDMI terminal. ● The setting is fixed to 0 and unadjustable when “PC Monitor Mode” is set to “On”.
Contrast Contrast Setting Adjusts settings of functions relating with contrast. ● The functions are not available when “Colour Space” is set to “sRGB” or “AdobeRGB”. ● The functions are not available when “PC Monitor Mode” is set to “On”. ◆ Black Stretch Emphasizes darker areas depending on the characteristics of a picture to make contrast clearer. ■ High / Medium / Low / Off Changing the settings : Picture Adjusts the brightness of brighter areas of pictures.
Sharpness Emphasizes outlines on a picture. ● The setting is unadjustable when “Enhancer” is set to “Off”. ■ –30 – +30 (Fuzzy ↔ Sharp) Enhancer Selects the frequency band enhanced by “Sharpness”. ■ Off : Deactivates the function. ■ Mode-1 / Mode-2 / Mode-3 (Emphasizes lower frequency band; for low-resolution picture ↔ Emphasizes higher frequency band; for high-resolution picture) Enhancer Setting Adjusts the effects of “Enhancer” in detail.
Backlight Setting Adjusts settings of functions relating with backlight. Reduces the backlight automatically in dazzling scenes. ■ On / Off ◆ Dynamic Backlight Reduces the backlight automatically in dark scenes to represent black deeper. ■ High / Medium / Low / Off Colour System Selects the colour system for the picture signal which is input to INPUT-3 from composite terminal. Changing the settings : Picture ◆ Smart Picture ● The setting is adjustable only when “Input-3 Setting” is set to “Composite”.
Colour Matrix Selects the colour matrix used for colour conversion. ● The setting is fixed to “Auto” and unadjustable when “Colour Space” is set to “sRGB”, “AdobeRGB”, or “x.v.Colour”. ● The setting is fixed to “Auto” and unadjustable when ”PC Monitor Mode” is set to “On”. ● The setting is fixed to “Auto” and unadjustable when “Colour Space” is set to “Auto” and the xvYCC signal is input to the HDMI terminal. Auto : An appropriate colour matrix is applied automatically.
Colour Temperature ● The setting is fixed to “Mode-5” and unadjustable when “Colour Space” is set to “sRGB” or “AdobeRGB”. ● The setting is fixed to “Mode-5” and unadjustable when “PC Monitor Mode” is set to “On”. Mode-1 : Bluish display. (approx. 13000 K) Mode-2 : Less bluish than “Mode-1”. (approx. 11000 K) ■ Mode-3 : For general purpose. (approx. 9300 K) ■ Mode-4 : For special purposes including medical imaging. (approx. 8000 K) ■ Mode-5 : Standard setting. (approx.
Colour Management Adjusts the total colouring of pictures. Three colour management presets are available to suit a variety of colour temperature settings. ● The setting is fixed to “Off” and unadjustable when “Colour Space” is set to “sRGB”, “AdobeRGB”, or “x.v.Colour”. ● The setting is fixed to “Off” and unadjustable when ”PC Monitor Mode” is set to “On”. ● The setting is fixed to “Off” and unadjustable when “Colour Space” is set to “Auto” and the xvYCC signal is input to the HDMI terminal.
◆ Green Hue / Green Colour Adjusts the tone/colourfulness of green colours. ■ –15 – +15 (Yellow ↔ Cyan) / –30 – +30 (Dilute ↔ Dense) ◆ Cyan Hue / Cyan Colour Changing the settings : Picture Adjusts the tone/colourfulness of blue colours. ■ –15 – +15 (Green ↔ Blue) / –30 – +30 (Dilute ↔ Dense) ◆ Skin Hue / Skin Colour Adjusts the tone/colourfulness of skin colours. ■ –15 – +15 (Red ↔ Yellow) / –30 – +30 (Dilute ↔ Dense) ◆ Colour : Bright Area Adjusts the colour depth of bright areas.
Noise Reduction Adjusts the settings of picture noise reduction. ● The functions are unavailable when “PC Monitor Mode” is set to “On” or when signals in a PC signal format are coming in. ◆ Digital VNR Reduces picture noise. ■ Auto : Estimates the amount of noise automatically and applies suitable noise reduction processing. ■ High / Medium / Low / Off ◆ MPEG NR Reduces noise on MPEG pictures such as mosquito-noise and blocknoise.
Natural Cinema ● The setting is fixed to “Off” and unadjustable when “Picture Delay Time” is set to “Short”. ● The setting is fixed to “Off” and unadjustable when “PC Monitor Mode” is set to “On”. ● The setting is fixed to “Off” and unadjustable when progressive picture signal is input. ■ Auto / Off Picture Delay Time Adjusts the time spent for picture-improving processes. The delay time becomes shorter though picture quality is down when the processes are skipped.
Eco Mode Adjusts the brightness of backlight depending on the luminance of the room to reduce power consumption. ■ Demo : Activating the function and indicating its performance. ■ On : Activating the function. Its performance is not indicated. ■ Off : Deactivates the function. Other ◆ Real Bit Driver Makes the gradation of 8 bit signals natural and smooth. ● Also effective on signals not in 8 bit. ■ On / Off ◆ 100/120Hz CMD Doubles the number of frames per second to reduce image blur.
Sound ● The following settings are not adjustable while using the Photo viewer (➔ page 36). Changing the settings : Sound Bass Adjusts bass tone. ■ –6 – +6 (Weaker ↔ Stronger) Treble Adjusts treble tone. ■ –6 – +6 (Weaker ↔ Stronger) Balance Adjusts sound balance. ■ L10 – 10R (To the left ↔ To the right) Auto Volume Control Turns down the volume automatically when an excessive strong sound signal is input. ■ On / Off Lip Sync Adjusts the delay time of sound.
PEQ Optimizes the sound for the monitor’s supplied speaker unit. When the speaker unit is connected, setting “PEQ“ to “On“ brings high and low tones into balance, making the sound clearer. Select “Off“ when connecting other speakers. ● “PEQ” stands for “Parametric Equalizer”. ■ On / Off Turn On Volume Adjusts the initial volume when turning on the monitor. ■ 0 – 50 ■ Current : Setting the current volume to the initial.
Setup You can choose the language used for on-screen messages. ■ English (EU) / Deutsch / Français(UE) / Italiano / Français(UE) / Català / Nederlands / Dansk / Svenska / Norsk / Suomi / Polski / Magyar / Русский / Ελληνικά / Português / Česky / Български / Українська/ Türkçe / Română / / / / / Bahasa Melayu / / Español (US) / Français(US) / English (US) / Front Panel Lock Makes operations through the buttons on the monitor ineffective. ■ On : Making the buttons on the monitor ineffective.
Zoom Adjusts the aspect of pictures. ● The setting is also adjustable through the [ZOOM] button on the remote control. ◆ Options when the current input signal is SD ■ Auto : When the video signal contains information about aspect ratio (WSS etc.), the aspect is switched accordingly. In other cases, the picture is displayed in either “Regular” or “Panoramic”, depending on the setting of “4:3 Aspect Setting” (➔ page 31). ■ Regular : No modifying of aspect.
◆ Options when the current input signal is HD ■ Full : Stretching a picture to the width of the monitor. ■ Full Native : Displaying a picture of 1080i/p without enlargement. ■ Slim : Shrinking a picture horizontally. Black areas remain at the left and right side of the picture. ■ Panoramic Zoom : Zooming a picture without unnatural deformation in the way to edge out the black parts around a 4:3-aspect cinema program transferred through 16:9-aspect signal.
Position Adjustment Adjusts the picture position on the monitor. ● Vertical adjustment is effective when “Zoom” is set to “14:9 Zoom”, “16:9 Zoom”, “Panoramic”, “16:9 Zoom Subtitle”, or “Panoramic Zoom”. ● Horizontal adjustment is effective only when “Zoom” is set to “Panoramic Zoom”. ● When a PC signal is input, adjust the position on “PC Position Adjustment” in ”PC Setting”. ● The positioning is reset as the power is turned off. ● The positioning is reset as the signal format changes.
Input Label 4:3 Aspect Setting Selects the aspect setting which is applied when “Zoom” (➔ page 28) is set to “Auto”. The picture is displayed in the selected aspect when the aspect is 4:3 or when the monitor cannot detect the aspect of a picture. ■ Regular : Displays the picture in “Regular”. ■ Panoramic : Displays the picture in “Panoramic”. 1080 Auto Setting Changing the settings : Setup Adds a source name specifying a device after the source name (“Input-1” “Input-3”).
PC Setting Adjusts the settings for PC signals. ● The items below are unadjustable when no PC signal is input: “H Size”, “V Size”, “Dot Clock”, “Clock Phase”, “PC Position Adjustment”, and “Auto Position Adjustment”. ● “Auto Position Adjustment” is unavailable for INPUT-3. ● “Dot Clock” and “Clock Phase” are unavailable for INPUT-1, INPUT-2. ◆ Sampling Mode Sets the display size for an analog input signal.
◆ Dot Clock Adjust this when the picture is not aligned vertically. ● The adjustment is kept after turning off the power. ■ –20 – +20 Adjust this when letters on the screen look blurred or swaying. ● The adjustment is kept after turning off the power. ■ 0 – 31 ◆ PC Position Adjustment Adjusts the picture position on the monitor. ● The adjustment is kept after turning off the power. ◆ Auto Position Adjustment Adjusts the picture position automatically.
HDMI Control with HDMI Makes an HDMI CEC-compatible external component controllable through this monitor. ■ On : Enables HDMI CEC control. ■ Off : Deactivates HDMI CEC control. One Touch Play Starting playback on an HDMI CEC-compatible external component automatically turns on the monitor and change its source to the component. ● The setting is fixed to “Off” and unadjustable when “Control with HDMI” is set to “Off”. ● Dedicated HDMI components cooperate with the monitor regardless of the setting.
AMP Control ● The setting is fixed to “Off” and unadjustable when “Control with HDMI” is set to “Off”. ■ On / Off Input-1 Audio Selects the audio signal type for INPUT-1. ■ Auto : Detects the type automatically. ■ Digital : For HDMI equipment. ■ Analogue : For DVI equipment. Changing the settings : HDMI Makes an HDMI CEC-compatible amplifier controllable through the monitor. Reset Restores the settings of “HDMI” to the initial. 35 LT-32WX50_eu_en.indb 35 09.10.
Viewing photographs on SD card/USB device Cautions ● Insert or remove SD cards and USB devices gently and in the right direction. Otherwise, the devices or the monitor may be damaged. ● It is recommended to keep a backup of your files. ● Do not connect a mouse, keyboard or the like. ● Do not use a USB hub or extension cable. 1 Insert an SD card/USB device into the SD card slot/USB terminal on the side of the monitor.
3 Select a photograph to display, and press [OK]. The selected photograph is displayed full-screen. Viewing photographs on SD card/USB device ● To view the next/previous page, press [GREEN]/[RED]. ● When you turn on the monitor while both an SD card and a USB device are connected, the photographs on the SD card are displayed. Select “Flash Device“ in the “Device” setting (➔ page 38) to display the photographs on the USB device. ● The thumbnails of some files may not be shown.
To customize the settings 1 Open the menu. Photo Viewer Device Sort Interval Time Transition Initial Mode 2 Change the settings. 3 Exit the menu. SD Card Viewer Option SD Card Date 10 sec Box Folder Index ◆ Device Select which device is displayed when both are connected; SD card or USB device. ◆ Sort Select the display order of photographs. ■ File Name : In alphabetic order by file name. ■ Date : In order of the date when the file was modified.
Playable files ● Format: JPEG (.jpg, .JPG) ● Pixel size: 160 x 120 – 8192 x 8192 (The file size must be under 10 MB.) ● Picture files of other than JPEG format, Progressive JPEG files, JPEG 2000 files, MOTION JPEG files or music files cannot be played back.
External Control You can control LT-32WX50EU from external control equipment (a personal computer or a dedicated controller) via the RS-232C terminal on the rear of the monitor. ● Connect the RS-232C extension cable to the RS-232C terminal on the rear side of the monitor.
Command outline To control the monitor from external control equipment, send operation commands to the monitor. Example of communication procedures LT-32WX50EU ! 0x82 0x80 IP 3 Lf External Control 1 External control equipment 3 2 Ack 0x82 0x80 IP 3 Lf 1Operation command to select “Input-3”. 2 Acknowledgment from the monitor. 3The input is changed to “Input-3”. Command structure ! 0x82 0x80 IP 3 Lf a b c d e f a: Header ! : Operation command from the external control device.
Command list ● “*” is the monitor ID. Normally, set it to “0x80”. ● Enter the appropriate data to “xx” or “x”. No.
Data 0: Off 1: On +: Switches the power status. 1: Input-1 2: Input-2 3: Input-3 4: Input-4 00 – 50: Sets the volume directly. +: Turns the volume up. –: Turns the volume down. 0: Mute is released. 1: The sound is muted. +: Switches the mute status. 0: Memory1 / 1: Memory2 / 2: Memory3 / 3: Memory4 / 4: Memory5 / 5: Memory6 / +, –: Changes the setting.
Troubleshooting The following are not malfunctions. ● This LCD display is built with very high precision technology; however, be aware that a few pixels may be missing or constantly lit. ● When a still image is displayed for a long time, it may remain indistinctly on the screen after the picture has changed. The remaining picture will disappear after a while. ● The following symptoms are problems only when pictures or sounds are not played back normally.
Cannot turn on the monitor. ● Connect the power cord properly. (➔ page 08) The remote control does not work. ● Insert the batteries in the correct direction. (➔ page 04) ● Replace the batteries with new ones. ● Aim the remote control to the remote sensor on the monitor. (➔ page 09) ● Get closer to the monitor. ● Remove any obstruction between the remote control and the monitor. No picture from a connected device. ● Select the correct input on the monitor. ● Connect the external device properly.
No sound from HDMI devices. ● Set “Input-1 Audio” properly. (➔ page 35) Cannot control HDMI CEC devices. ● Set “Control with HDMI” to “On”. (➔ page 34) ● Some devices may not accept controls by HDMI CEC. Cannot operate the product using the buttons on the monitor. ● Set “Front Panel Lock” to “Off”. (➔ page 27) Picture from a computer is strange. ● Adjust the items under “PC Setting”. (➔ page 32) The source indication stays on the display. ● Turn on the selected external device and start playback.
Specifications Luminance (TYP.) Contrast ratio (TYP.) Panel response speed Horizontal/vertical frequency (computer signal) Compliant video signal formats Speakers Audio output Operating environment Power requirements AC adapter (FSP180-AKAN1) Power consumption Power consumption (on standby) Dimensions Mass LT-32WX50EU 32-inch (viewable) 801.3 mm 1920×1080 1.07 billion colours (10 bit colour) 178 ° (Horizontally) 178 ° (Vertically) 400 cd/m2 4000 : 1 6.5 msec (G to G) Horizontal: 24.83 kHz – 67.
Supplied accessories Input terminals Output terminals External control ➔ page 04 HDMI ×2, D-sub (15 pin) ×1, Audio input (3.5 mm stereo mini jack), USB type slot, SD card slot Speaker output RS-232C-compliant Display Calibration When you want to calibrate the gamma and the white balance of the monitor, you can download a dedicated software from the web page below. http://www.jvc-victor.co.
Dimensions Specifications unit: mm 1 : 496.1 2 : 55.0 /80.0 (with the speaker unit) 3 : 772.4 4 : 40.7 5 : 254.0 6 : 214.7 7: 8: 9: 0: -: =: ~: 46.5 544.1 7.8 22.5 190.9 173.7 336.2 !: @: #: $: %: ^: &: 99.8 133.7 136.0 100.0 100.0 45.0 45.0 ● Use screws of adequate length (M4 × 12 – 16) to fix the VESA bracket and wall mount adapter. 49 LT-32WX50_eu_en.indb 49 09.10.
Compliant signal formats (1) INPUT-3 terminal (PC) Signal PC98 VGA 60†1 VGA 72 VGA 75 WVGA 60†2 SVGA 60 SVGA 72 SVGA 75 XGA 60†1 XGA 70 XGA 75 WXGA(1280)†2†3 WXGA(1360)†2†4 WXGA 60†2†5 SXGA 60†6 SXGA+ 60†7 SXGA+ 60* 1280x720 1920x1080 Vertical (Hz) 56.42 59.94 72.81 75.00 60.00 60.32 72.19 75.00 60.00 70.07 75.03 59.87 60.02 60.00 60.02 60.02 60.00 60.00 60.00 Frequency Horizontal (kHz) 24.823 31.469 37.861 37.500 31.020 37.879 48.077 46.875 48.363 56.476 60.023 47.776 47.712 48.363 63.981 63.981 65.
Effective pixels pixel per line line per frame 640 400 640 480 640 480 640 480 848 480 800 600 800 600 800 600 1024 768 1024 768 1024 768 1280 768 1360 768 1366 768 1280 1024 1400 1050 1400 1050 1280 720 1920 1080 Standard — VESA Standard VESA Standard VESA Standard — VESA Standard VESA Standard VESA Standard VESA Standard VESA Standard VESA Standard — VESA Standard — VESA Standard — — — EIA/CEA-861-D Specifications Total pixels pixel per line line per frame 848 440 800 525 832 520 840 500 1088 517 1056
Compliant signal formats (2) INPUT-3 terminal (component) INPUT-3 terminal (composite) Signal PAL/50 Frequency Vertical (Hz) Horizontal (kHz) 50.00 15.63 Signal 480/60i Frequency Vertical (Hz) Horizontal (kHz) 59.94 15.73 PAL/60 59.94 15.73 576/50i 50.00 15.63 SECAM 50.00 15.63 480/60p 59.94 31.47 NTSC3.58 59.94 15.73 576/50p 50.00 31.25 59.94 15.73 720/60p 59.94 44.96 NTSC4.43 PAL M 59.94 15.73 720/50p 50.00 37.50 PAL N 50.00 15.63 1080/60i 59.94 33.72 1080/50i 50.
Specifications Total pixels Effective pixels pixel per line line per frame pixel per line line per frame 800 858 1650 2200 858 2200 864 1980 2640 864 2640 2750 2640 2200 525 525 750 562/563 262/263 1125 625 750 562/563 312/313 1125 1125 1125 1125 640 720 1280 1920 720 1920 720 1280 1920 720 1920 1920 1920 1920 480 480 720 1080 480 1080 576 720 1080 576 1080 1080 1080 1080 * EIA/CEA-861-D-compliant ● Signals in a format not listed above may not be displayed properly.
● This software is based in part on the work of the lndependent JPEG Group. ● The open source software is embedded in this product. For more information, please go to: http://www.jvc-victor.co.jp/download/lnx/09jvc_mo/index.html ● DejaVu font is used in this product under the license below. _____________________________________________________ Fonts are (c) Bitstream (see below). DejaVu changes are in public domain.
Arev Fonts Copyright -----------------------------Copyright (c) 2006 by Tavmjong Bah. All Rights Reserved.
Index Composite . . . . . . . . . . . . . . . . . 06 Computer. . . . . . . . . . . . 06, A-10 Connection . . . . . . . . . . . . . . . . 06 Contrast . . . . . . . . . . . . . . . . . . . 15 Contrast Setting. . . . . . . . . . . . 15 Control with HDMI . . . . . . . . . 34 Icons . . . . . . . . . . . . . . . . . . . . . . . . 10 . . . . . . . . . . . . . . . . . . . . . 10 . . . . . . . . . . . . . . . . . . . . . . . . . 10 +/– . . . . . . . . . . . . . . . . . . . . . 10 Numbers 3DY/C . . . . . . . . . . .
LINK . . . . . . . . . . . . . . . . . . . . . . . 11 Lip Sync . . . . . . . . . . . . . . . . . . . 25 M Main unit . . . . . . . . . . . . . . . . . . 09 MENU . . . . . . . . . . . . . . . . . . . . . 12 Menu Language . . . . . . . . . . . 27 R Remote control unit. . . . . . . . 10 Remote sensor . . . . . . . . . . . . . 09 Reset . . . . . . . . . . . . . . . 26, 33, 35 RS-232C . . . . . . . . . . . . . . . . . . . 40 S Setup . . . . . . . . . . . . . . . . . . . . . . 27 Sharpness . . . . . . . . . . . .
LT-32WX50_eu_en.indb 58 09.10.
EN FR DE IT ◆ LT-32WX50EU 1009HHH-MW-MT RU ES LT-32WX50EU INSTRUCTIONS ZH(T) LCD Monitor 2009 Victor Company of Japan, Limited LCD Monitor LCD Monitor ◆ INSTRUCTIONS Moniteur LCD ◆ MANUEL D’INSTRUCTIONS LCD Monitor ◆ BEDIENUNGSANLEITUNG Televisore a cristalli liquidi ◆ ISTRUZIONI Monitor LCD ◆ MANUAL DE INSTRUCCIONES ЖК-монитор ◆ ИHCTPУKЦИИ ПO ЭKCПЛУATAЦИИ ◆ LCT2621-001A-H WX50_covers_eu.indd 1 09.10.