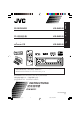
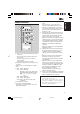
KD-SH9105 ENGLISH CD RECEIVER !" KD-SH9105 ‰∑¬ `a= ‡§√◊ËÕ߇≈Ëπ CD Detachable KD-SH9105 ATT ANGLE EQ CD DAB DISC FM PRESET PRESET AM RD MOSFET CH SRC DISC KD-SH9105 50Wx4 D DISP AUX SEL VOLUME BBE ATT MODE SEL 1 2 3 4 5 6 M RM-RK100 • This unit is equipped with the display demonstration. To cancel it, see page 8. • ! !"#$%&'!"()*+,-.
ENGLISH IMPORTANT FOR LASER PRODUCTS Precautions: 1. CLASS 1 LASER PRODUCT 2. CAUTION: Invisible laser radiation when open and interlock failed or defeated. Avoid direct exposure to beam. 3. CAUTION: Do not open the top cover. There are no user-serviceable parts inside. Leave all servicing to qualified service personnel. 4. CAUTION: This CD player uses invisible laser radiation, however, is equipped with safety switches to prevent radiation emission when unloading CDs.
ENGLISH Thank you for purchasing a JVC product. Please read all instructions carefully before operation, to ensure your complete understanding and to obtain the best possible performance from the unit. CONTENTS How to reset your unit .............................. 2 LOCATION OF THE BUTTONS ........... 4 Control panel ............................................ Remote controller ..................................... Preparing the remote controller ................ 4 5 6 BASIC OPERATIONS ............
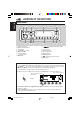
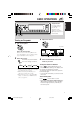
ENGLISH LOCATION OF THE BUTTONS Control panel 1 SRC 2 3 4 6 5 7 D DISP BBE ATT MODE SEL 8 1 2 3 9p q 1 2 3 4 5 6 SRC (source) button DISP (D) (display) button 5 (up) button 4/¢ buttons Display window • 0 (eject) button • (angle) button 7 BBE button 4 5 6 M w e r t 8 • (standby/on/attenuator) button • Control dial 9 Remote sensor p ∞ (down) button q SEL (select) button w Number buttons e MODE (M) button r (control panel release) button t Reset button Illumination Navigation for
1 ATT ANGLE 2 6 EQ 7 CD DAB DISC FM 3 4 8 PRESET PRESET AM RD 9 CH DISC AUX p SEL VOLUME 5 RM-RK100 1 • Turns on the unit if pressed when the unit is turned off. • Turns off the unit if pressed and held for a few seconds. • Drops the volume level in a moment if pressed briefly. Press again to resume the volume. 2 Changes the angle of the control panel to four positions. 3 Skips to the root while listening to an MP3 disc. 4 • CD : Selects CD player. • FM : Selects FM tuner.
ENGLISH Preparing the remote controller Before using the remote controller: • Aim the remote controller directly at the remote sensor on the main unit. Make sure there is no obstacle in between. SRC 3. Return the battery holder. Insert again the battery holder pushing it until you hear a clicking sound. (back side) D DISP ATT 1 SEL 2 3 4 Remote sensor • Do not expose the remote sensor to strong light (direct sunlight or artificial lighting).
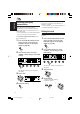
SRC Display indication: If you have changed some PSM items (see page 40), the indications on the display you see may be different from those used in this manual. D DISP BBE ATT MODE SEL 1 2 3 4 5 6 ENGLISH BASIC OPERATIONS M 2 1, 3 3 Turning on the power 1 Adjust the volume. ATT Turn on the power. ATT Clock time Note on One-Touch Operation: When you select a source in step 2 below, the power automatically comes on. You do not have to press this button to turn on the power.
ENGLISH Canceling the display demonstration When shipped from the factory, display demonstration has been activated, and starts automatically when no operations are done for about 20 seconds. • It is recommended to cancel the demonstration before you use the unit for the first time. To cancel the display demonstration, follow the procedure below: 1 Setting the clock You can also set the clock system to 24 hours or 12 hours.
Set the clock system. 1 Select “24H/12H.” 2 Adjust “24Hours” or “12Hours.” 1 4 2 Select the level meter pattern you want. As you turn the control dial, the level meters change as follows: ATT ATT Standard Meter 3 6 5 Finish the setting. ENGLISH 5 Meter 1 Meter 2 Finish the setting. SEL SEL To check the current clock time when the unit is turned off, press DISP (D). The power turns on and the clock time is shown for about 5 seconds, then the power turns off.
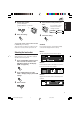
ENGLISH RADIO OPERATIONS SRC D DISP BBE ATT MODE SEL 1 2 3 Listening to the radio 1 5 6 M Note: This receiver has three FM bands (FM1, FM2, FM3). You can use any one of them to listen to an FM broadcast. You can use either automatic searching or manual searching to tune in to a particular station. Searching a station automatically: Auto search 4 2 Start searching a station. to search Press ¢ stations of higher frequencies. Select the band (FM1 – 3, AM).
Searching a station manually: Manual search While searching FM stations (including SSM— see page 12), this unit stops searching whenever it detects signals (DX mode: The DX indicator is lit—initial setting). If received signals are weak, you may only hear noises. By setting LO/DX to “Local,” you can make this unit detects only stations with sufficient signal strength. 1 1 Press MODE (M) while listening to an FM stereo broadcast. “Mode” appears on the display, and the number buttons start flashing.
ENGLISH When an FM stereo broadcast is hard to receive: Storing stations in memory Set the FM reception mode to “Mono On.” You can use one of the following two methods to store broadcasting stations in memory. • Automatic preset of FM stations: SSM (Strongstation Sequential Memory) • Manual preset of both FM and AM stations 1 Press MODE (M) while listening to an FM stereo broadcast. “Mode” appears on the display, and the number buttons start flashing.
You can preset up to 6 stations in each band (FM1, FM2, FM3 and AM) manually. Ex.: Storing an FM station of 92.5 MHz into the preset number 1 of the FM1 band. 1 Select the band (FM1 – 3, AM) you want to store stations into (in this example, FM1). SRC 1 Press SRC (source) repeatedly to select the tuner. 2 Press and hold SRC for more than 1 second. AM FM1 3 Within about 5 seconds, press SRC again. Each time you press the button, the band changes.
ENGLISH Selecting a preset station using the preset station list Changing the display pattern If you forget what stations are stored in what preset numbers, you can check the preset station list, then select your desired station on the list. By pressing DISP (D), you can change the information shown on the display. D Each time you press the button, the DISP display patterns change as follows: 1 Select the band (FM1 – 3, AM). 1 Press SRC (source) repeatedly to select the tuner.
SRC D DISP BBE ATT ENGLISH CD OPERATIONS MODE 1 SEL 2 3 4 5 6 M This unit has been designed to reproduce CDs, CD-Rs (Recordable), CD-RWs (Rewritable), and CD Texts. • This unit is also compatible with MP3 and WMA discs. For details about these discs, refer to “A Guide to MP3/WMA” (separate volume). Playing a disc 1 Open the control panel. About MP3 and WMA discs 2 Insert a disc into the loading slot.
ENGLISH • Display indications when inserting an audio CD or a CD Text: 23 1 5 • Display indications when inserting an MP3 or a WMA disc 4 1 * If a name has been assigned to the audio CD (see page 44), it will be shown on the display. 4 3 6 1 Total track number 2 Total playback time of the disc 3 Disc title/performer (if no title is recorded or assigned*, “No Name” appears.) 4 Track title (if no title is recorded, “No Name” appears.
What is ImageLink When an MP3 or a WMA folder includes an image file edited by Image Converter (supplied in the CD-ROM), you can show the image on the display while the tracks in the folder are played back. • While reading an image file, no sounds come out (the preset image of a coffee cup is shown on the display during this period). Album 1 (Folder 1) Music001.mp3 Display window Music002.mp3 Music003.mp3 Photo1.jml Photo1.jml Album 2 (Folder 2) Music004.wma Display window Music005.
ENGLISH Locating a track on a disc 2 Press 5 (up) or ∞ (down), while To go to a particular track directly (ONLY for CD and CD Text discs) 1 2 3 4 5 6 Press the number button corresponding to the track number to start its playback. • To select a track number from 1 – 6: Press 1 (7) – 6 (12) briefly. • To select a track number from 7 – 12: Press and hold 1 (7) – 6 (12) for more than 1 second. “Mode” is still on the display.
To skip to the next or previous folder (either on the same or different hierarchy levels) The following operations are only possible when playing an MP3 or a WMA disc. 01 To go to a folder directly Press the number button corresponding to the folder number to start playing the first track in the selected folder. 3 4 04 On the control panel: Press 5 (up) while playing a disc to skip to the next folder.
ENGLISH To skip to the next or previous folder within a folder (on the same hierarchy level) To skip to the folders on the lower or on the higher hierarchy levels Example 1 01 05 01 ROOT 05 Example 2 03 01 02 05 04 03 03 04 04 See the hierarchy diagram on page 15. See the hierarchy diagram on page 15. ONLY on the remote controller: PRESET ONLY on the remote controller: DISC PRESET Press 3 (right) while playing a disc to skip to the next folder.
To select a track and start playback 1 The following operations are only possible when playing an MP3 or a WMA disc. Press and hold 5 (up) or ∞ (down) so that the folder name list of the inserted disc appears on the display. ENGLISH Selecting a folder and a track using the name lists The currently playing folder will be highlighted on the display. You can show the folder name and track name lists on the display while playing a disc, then select a folder or a track you want to play.
ENGLISH Selecting playback modes Mode To play back tracks at random (Random Play) You can play back tracks on a disc (or in a folder for MP3 and WMA discs) at random. 1 Press MODE (M) while playing a Random Folder*: All tracks of the current folder, then moves to the next folder and so on. • While playing, lights up on the display. Random Disc: All tracks on the disc. • While playing, up on the display. MODE disc.
For audio CD and CD Text discs: Intro Track Repeat Off For MP3 and WMA discs: Intro Off For MP3 and WMA discs: Intro Track Repeat Track Repeat Folder Repeat Off Mode ENGLISH Repeat Track For audio CD and CD Text discs: Intro Folder Intro Off Plays repeatedly Mode Plays the beginnings of Repeat Track : Current (or specified) track. • While playing, lights up on the display. Intro Track : Repeat Folder*: All tracks of the current (or specified) folder.
ENGLISH Changing the display pattern By pressing DISP (D), you can change the information shown on the display.
Selecting the DSP modes 1 Using the DSP (Digital Signal Processor) modes built in this unit, you can create a more acoustic sound field in your car compartment. Press SEL (select) once to show the DSP mode selection screen. The last selected DSP mode screen appears. SEL ENGLISH DSP OPERATIONS Available DSP modes: THEATER: Reminds you of the intensity reproducing a theater. HALL: Reminds you of a large concert hall with a being-there feeling.
ENGLISH 3 Adjust the DSP effect level—1, 2, or 3. ATT The selected DSP effect level is valid for all DSP modes except “V.CANCEL.” • As the number increases, the effect level becomes stronger. To make further precise settings for the DSP modes You can also make further precise settings to make the best sound field in your car compartment. These settings you make are valid for all DSP modes except “V.CANCEL.” Setting items: Ex.
Press number button 6 to enter the further precise setting screen. 5 ATT 6 If you select “4ch,” rotate the control dial to select your car size. As you rotate it, the car size changes as follows: Compact 3 Select your listening seats position. 1 4 2 3 4 5 6 Middle ENGLISH 2 Large • Compact: Select when the distance from the rear speakers to the listening seat position is shorten than that from the front speakers.
ENGLISH EQUALIZER OPERATIONS Selecting preset sound modes (iEQ: intelligent equalizer) You can select a preset sound mode (iEQ: intelligent equalizer) suitable to the music genre. 2 Press the number button to select one of the sound modes listed on the display. • This unit has two sound mode selection screens. To move to the other screen, press 5 (up) or ∞ (down). Available sound modes: H.
Make adjustments as you like. ENGLISH Storing your own sound modes 4 You can adjust the sound modes to your preference and store your own adjustments in memory (USER 1, USER 2 and USER 3). 1 Press SEL (select) twice to show the sound mode selection screen. Buttons used for adjustments The last selected sound mode is called up. SEL 1) Press ¢ or 4 to select the frequency band—60Hz, 150Hz, 400Hz, 1kHz, 2.4kHz, 6kHz, 12kHz.
ENGLISH SOUND ADJUSTMENTS Performing the basic sound settings You can set the speaker output balance, subwoofer output level, and input level of each source. 2 Adjust the level. To adjust fader and balance—Fad, Bal: Make these two adjustments at the same time. • If you are using a two-speaker system, set the fader level to “00.” • Press 5 (up) or ∞ (down) to adjust the fader. • Press ¢ or 4 to adjust the balance. • There is a time limit in doing the following procedure.
Adjust to match the input level to the FM sound level. • You cannot make an adjustment if the source is FM. “FIX” will appear. To increase the level. ATT Making sounds natural —BBE Digital BBE Digital* is a new digital processing method to restore the brilliance and clarity of the original live sound in recording, broadcasts, etc. When a speaker reproduces sound, it introduces frequency-dependent phase shifting, causing high-frequency sounds to take longer to reach the ear than low frequency sounds.
ENGLISH GRAPHIC DISPLAYS With Image Converter included in the supplied CD-ROM, you can edit your own favorite pictures and use them as your own opening screen, ending screen, and graphic screen while playing a source. What is Image Converter Image Converter is a JVC’s original software to produce a custom image to show on your JVC Car Audio.
Before starting the following procedure, prepare a CD-ROM including still images (pictures) and animations (movies). • The supplied Image Converter CD-ROM includes sample images and animations, so you can use this disc as your first trial. IMPORTANT: • Still images (pictures) should have , and animations (movies) should have as their extension code in their file names.
ENGLISH 5 Notes: • On this list, the folders including the target files— files for “Picture” and files for the others—are shown. • The display can show only six names at a time. You can show the other names on the next lists by pressing 5 (up) or ∞ (down). • If a disc inserted does not include any and files, beeps sound and you cannot go to the next step. Select (highlight) one of the listed items for which you want to download a file.
Select a file you want to download. 1 2 3 4 5 6 Deleting unwanted files • When “BACK” is shown on the display above number button 5, you can go back to the previous screen by pressing number button 5. ENGLISH 9 To delete all the stored files at a time The file name appears, and the unit will ask you “Download OK?” 10 If it is OK, press number button 1 to start downloading. 1 Downloading starts, and “Downloading...” appears on the display. If it is over, the file name list appears again.
ENGLISH To delete the files stored for “PowerOn,” “PowerOff,” “Picture (all stored images at a time),” and “Movie” MODE 1 Press MODE (M) while playing any source. “Mode” appears on the display, and the number buttons and 5 (up)/ ∞ (down) buttons start flashing. M 2 Press number button 6 to show the 6 download selection screen. To delete the stored files for “Picture” (one by one) MODE 1 Press MODE (M) while playing any source.
8 Press DISP (D) to resume the 3 D source indication screen. DISP Activating the downloaded images and animations Ex. When you select “Opening” 4 To activate the animations stored for opening and ending screens Press and hold SEL (select) for more than 2 seconds so that one of the PSM items appears on the display. (PSM: see page 40.) SEL 2 Select “User.” ATT After the unit turns on or before the unit turns off, you can see preset animations on the display.
ENGLISH 2 Press number button 1 to select “MOVIE”—Movie category of the PSM settings. 1 The “Graphics” setting screen appears on the display. 3 To select a still image for graphic display—User Picture You cannot select “UserPict.” as a PSM item in the following cases: • If no image is stored in “Picture,” or • “UserPict.” is not selected for the “Graphics” setting (see the left column). 1 Select “UserMovie,” “UserSlide,” or “UserPict.
Changing the general settings (PSM) 3 Select the PSM item you want to adjust. You can change the items listed on the table on the next page by using the PSM (Preferred Setting Mode) control. • The PSM items are grouped into five categories—MOVIE, CLOCK, DISP (display), TUNER, and AUDIO. Basic Procedure • By pressing ¢ or 4 repeatedly, you can also move to another category. Ex.
Indications Graphics CLOCK MOVIE ENGLISH Preferred Setting Mode (PSM) items DISP (display) TUNER AUDIO Initial settings Page See page 41. Movie demonstration Long Short Int Demo 41 Long 41 KeyIn CFM Key-in confirmation Opening*1 Opening animation Default User Default 36,37 Ending*1 Ending animation Default User Default 36,37 UserPict.
You can change the graphics shown on the display. These graphics appear if no operation is done for about 20 seconds (except for “ImageLink”). • All Demo: Display demonstration (animation) appears (see page 8). • Int Demo: Display demonstration (animation) and playback source indication appears alternately (see page 8). • UserMovie: Your edited animation appears (see pages 37 and 38). • UserSlide: Your edited still images appears in sequence (see pages 37 and 38). • UserPict.
ENGLISH To select the font on the display —Font Type You can change the font types used on the display. Select either “1” or “2” according to your preference. To turn the tag display on or off—Tag An MP3 and WMA track can contain track information called “Tag” where its album name, performer, track title, etc. are recorded. • On: • Off: Turns on the Tag display while playing MP3 or WMA tracks. • If a track does not have Tags, folder name and track name appear.
You can dim the display at night automatically or as you set the timer. When shipped from the factory, Auto Dimmer mode is activated. ATT Note: Auto Dimmer equipped with this unit may not work correctly on some vehicles, particularly on those having a control dial for dimming. In this case, select any other than “Auto.” 1 • Auto: Activates Auto Dimmer. When you turn on the car head lights, the display automatically dims. • Off: Cancels Auto Dimmer. • On: Always dims the display.
ENGLISH Assigning names to the sources 3 You can assign names to station frequencies, CDs (both in this unit and in the CD changer), and the external component. After assigning a name, it will appears on the display when you select the source. Station frequencies Up to 10 characters (up to 30 station frequencies including both FM and AM) CDs* Up to 32 characters (up to 40 discs) External component Up to 8 characters * You cannot assign a name to CD Text, MP3, and WMA discs. .
The control panel angles changes as follows: ENGLISH Changing the control panel angle You can change the angle of the control panel to four positions. 1 Press and hold 0 ( ) until the angle adjustment screen appears. The 5 (up) and ∞ (down) buttons start flashing to teach you that they can be used for the next operational steps. 2 Adjust the angle to the position you want. Adj.1 Adj.2 Adj.3 CAUTION: NEVER insert your finger in between the control panel and the unit, as it may get caught or hurt.
ENGLISH Detaching the control panel You can detach the control panel when leaving the car. When detaching or attaching the control panel, be careful not to damage the connectors on the back of the control panel and on the panel holder. Attaching the control panel 1 Insert the left side of the control panel into the groove on the panel holder. Detaching the control panel Before detaching the control panel, be sure to turn off the power. 1 Unlock the control panel.
SRC ENGLISH CD CHANGER OPERATIONS D DISP BBE ATT MODE SEL 1 We recommend that you use the JVC MP3compatible CD changer with your unit. By using this CD changer, you can play back your original CD-Rs (Recordable) and CD-RWs (Rewritable) recorded either in audio CD format or in MP3 format. • You can also connect other CH-X series CD changers (except CH-X99 and CH-X100). However, they are not compatible with MP3 discs, so you cannot play back MP3 discs.
ENGLISH • When the current disc is an MP3 disc: To go to a particular disc directly Press the number button corresponding to the disc number to start its playback (while the CD changer is playing). 1 1 2 3 4 2 3 4 5 6 • To select a disc number from 1 – 6: Press 1 (7) – 6 (12) briefly. • To select a disc number from 7 – 12: Press and hold 1 (7) – 6 (12) for more than 1 second.
This operation is only possible when using JVC MP3-compatible CD changer CH-X1500. 1 Press MODE (M) while playing a disc. “Mode” appears on the display, and the number buttons and 5 (up)/ ∞ (down) buttons start flashing. How to go to the desired track quickly • Ex. 1: To select track number 32 while playing track number 6 MODE ENGLISH To go to a track quickly MODE M While playing an audio CD or a CD Text disc: M Track 6 (Three times) (Twice) \ 10 \ 20 \ 30 \ 31 \ 32 • Ex.
ENGLISH Locating a folder on a disc The following operations are only possible when playing an MP3 disc using a JVC MP3compatible CD changer, CH-X1500. To skip to the next or previous folder within a folder (on the same hierarchy level) Example 1 01 05 01 05 To skip to the next or previous folder (either on the same or different hierarchy levels) Example 2 03 01 02 03 04 03 04 04 See the hierarchy diagram on page 15. See the hierarchy diagram on page 15.
While playing an MP3 disc, you can also show the folder list(s) and track list(s) on the display, then select a folder or track. To select a disc using the disc lists 1 While playing an MP3 disc, If you forget what discs are loaded in the CD changer, you can show the disc name list and select a disc in the list shown on the display. • The display can show only six names at a time. 1 press and hold 5 (up) or ∞ (down) until a disc name list appears on the display.
ENGLISH Selecting playback modes For audio CD and CD Text discs: Random Disc Random All Random Off To play back tracks at random (Random Play) You can play back tracks on a disc, on all loaded discs (or in a folder for MP3 discs) at random. 1 Press MODE (M) while playing a For MP3 discs: Random Folder Random Off Random Disc Random All MODE disc. “Mode” appears on the display, then the number buttons and the 5 (up)/∞ (down) buttons start flashing.
To play back only intros (Intro Scan) You can play back a track, a disc (or a folder for MP3 discs) repeatedly. You can play back the first 15 seconds of each track sequentially. 1 Press MODE (M) while playing a 1 Press MODE (M) while playing a MODE disc. “Mode” appears on the display, then the number buttons and the 5 (up)/ ∞ (down) buttons start flashing. 2 Press number button 2, while “Mode” is still on the display.
ENGLISH EXTERNAL COMPONENT OPERATIONS SRC D DISP BBE ATT MODE SEL 1 2 3 Playing an external component 3 You can connect an external components to the LINE IN plugs on the rear. • If you cannot select “LINE IN” as the source, change the “Line In” setting to “On.” (See pages 40 and 42.) Select the external component (LINE IN). SRC Each time you press the button, the source changes as described on page 7. When you select a source, the power automatically comes on. 5 6 M Adjust the volume.
Sound modes (preset frequency level settings) The list below shows the preset frequency level settings for each sound mode. • You can adjust the preset sound modes temporarily. However, your temporary adjustments will be reset when you select another sound mode. Sound Mode Preset equalizing values 60 Hz Flat ENGLISH ADDITIONAL INFORMATION 150 Hz 400 Hz 1 kHz 2.
ENGLISH TROUBLESHOOTING What appears to be trouble is not always serious. Check the following points before calling a service center. Symptoms You are driving on rough roads. Stop playback while driving on rough roads. Disc is scratched. Change the disc. Connections are incorrect. Check the cords and connections. The “PowerAmp” setting is set to “Off.” Set it to “On” (see page 42). Connections are incorrect. Check the cords and connections. • CD-R/CD-RW cannot be played back.
You are trying to download an animation of many frames. This is normal (see page 33). • Animation does not move. Temperature in the car compartment is very low— (LOW TEMP.) indicator appears. Wait until the operating temperature resumes—until (LOW TEMP.) indicator goes off. • “No Disc” flashes on the display . No disc in the magazine. Insert a disc. • “Reset 08” flashes on the display . This unit is not connected to a CD changer correctly.
ENGLISH MAINTENANCE Handling discs When playing a CD-R or CD-RW This unit has been designed to reproduce CDs, CD-Rs (Recordable), CD-RWs (Rewritable), and CD Texts. • This unit is also compatible with MP3 and WMA discs. How to handle discs Center holder When removing a disc from its case, press down the center holder of the case and lift the disc out, holding it by the edges. • Always hold the disc by the edges. Do not touch its recording surface.
AUDIO AMPLIFIER SECTION CD PLAYER SECTION Maximum Power Output: Front: 50 W per channel Rear: 50 W per channel Continuous Power Output (RMS): Front: 19 W per channel into 4 Ω, 40 Hz to 20 000 Hz at no more than 0.8% total harmonic distortion. Rear: 19 W per channel into 4 Ω, 40 Hz to 20 000 Hz at no more than 0.8% total harmonic distortion. Load Impedance: 4 Ω (4 Ω to 8 Ω allowance) Equalizer Control Range: Frequencies: 60 Hz, 150 Hz, 400 Hz, 1 kHz, 2.
KD-SH9105 Installation/Connection Manual !"#$ °“√µ‘¥µ—Èß/§ŸË¡◊Õ°“√µ‘¥µ—Èß qOVu² «ØVO d² « ULOKFð VÒO² LVT1006-003A [U] V J ENGLISH • !"#$% 12 V !"#$%& INSTALLATION (IN-DASH MOUNTING) 1 2 Remove the trim plate.
• When installing the unit without using the sleeve • !"#$%&'($ • ‡¡◊ËÕµ‘¥µ—Èß™ÿ¥ª√–°Õ∫‚¥¬‰¡Ë „™Èª≈Õ°ÀÿÈ¡ w «u « qJON « «bq²Ý« ÊËbÐ “UN'« V dð U bMŽ • • When using the optional stay • !"# • ‡¡◊ËÕ„™Èµ—«¬÷¥·∫∫‡≈◊Õ°‰¥È (“¡“√∂‡≈◊Õ°‡ª‘¥§È“߉«È ‰¥È) XO³¦²K w#U{« bMK «bq²Ý« bMŽ • Fire wall Washer ºπ—ß°—π‰ø Stay (option) !"#$% In a Toyota for example, first remove the car radio and install the unit in its place. !"TOYOTA !"#$%&' ()*+,-.
ENGLISH Typical Connections / !"#$ / ‰∑¬ °“√‡™◊ËÕ¡µËÕ·∫∫ª°µ‘ /WOł–uLM « wÐdŽ öOVu² « !"#$%&'()*+,-. !"#$%&'()*+,-."#$/ !"#$%&'()* !" #$%!&'(" )*+,-. Before connecting: Check the wiring in the vehicle carefully. Incorrect connection may cause serious damage to this unit. The leads of the power cord and those of the connector from the car body may be different in color.
Connecting the leads / !"# Twist the core wires when connecting. / µËÕ “¬µ–°—Ë« / „öÝô« qOVuð Solder the core wires to connect them securely. !"#$% !"#$%&'() ‡™◊ËÕ¡∫—¥°√’‡ Èπ≈«¥·°π∑—ÈßÀ¡¥‡¢È“¥È«¬°—π ‡æ◊ËÕ§«“¡ª≈Õ¥¿— ¬„π°“√„™Èß“π ∫‘¥‡ Èπ≈«¥·°π‡æ◊ËÕ‡™◊ËÕ¡µËÕ ÆqOVu² « q³ `O×V qJAÐ „öÝô« ÂdЫ CAUTION / =/ ¢ÈÕ§«√√–«—ß / tO³Mð • To prevent short-circuit, cover the terminals of the UNUSED leads with insulating tape. • !"#$%&'()*+,-.
CAUTION / / / / ENGLISH To install this unit, fit the unit into the mounting sleeve by pushing both the left and right edges of the unit. Do not press the portion, shaded in the illustration; otherwise, it may result in a malfunction of the unit. LV43462-002A [U] CAUTION KD_SH9105[U].pm6 2 03.3.
Canceling the demonstration / 1 !"# / °“√¬°‡≈‘°°“√· ¥ßµ—«Õ¬Ë“ß / !" !"== == 2 SEL 3 1 2 3 4 5 6 4 ATT ENGLISH When shipped from the factory, display demonstration has been activated, and starts automatically when no operations are done for about 20 seconds. • It is recommended to cancel the demonstration before you use the unit for the first time.
ENGLISH A Guide to MP3/WMA What are MP3/WMA? MP3 (MPEG Audio Layer 3) is one of digital audio compression standards. • This player cannot play back MP3i and MP3 PRO formats. WMA (Windows Media® Audio) is the digital audio compression format developed by Microsoft Corporation. WMA formatted files copy-protected with DRM cannot be decoded and played on this product.
About functions restrained during MP3/WMA playback ENGLISH • The search function works but search speed is not constant during search. • When skip is tried at the last file in a folder, the next folder is selected. Glossary CD-DA The data of music CD Mixed-CD A CD-R/RW on which audio tracks (CD-DA data) have been added to data tracks before closing a session. Enhanced-CD A CD-R/RW on which data tracks have been added to audio tracks (CD-DA data) before closing a session.
‡: Compatible Table of playable disc types Discs containing both MP3 files and WMA files Mixed-CD MP3 + CD-DA WMA + CD-DA MP3/WMA + CD-DA Other files + CD-DA Enhanced CD CD-DA + MP3/WMA File name system ISO9660 Level1 ISO9660 Level2 ISO9660 Level3 Romeo Joliet Windows long file name Multiple session 80-minute discs (capacity: 700 MB) ENGLISH KD-LH3105 (compatible with only MP3 files) MP3 playback MP3 playback CD-DA playback MP3 playback CD-DA playback CD-DA playback Up to 12 characters (8.
ENGLISH Table for playable MP3/WMA files WMA playback MP3 Bit-rate VBR Sampling frequency MPEG-1 MPEG-2 Joint stereo Emphasis ID3-Tag WMA Bit-rate Sampling frequency WMA-Tag m3u playlist Manual search Maximum number of folder hierarchy Maximum number Files on each folder of files/folders Folders on a disc Total Maximum number of characters on the display Playback order ‡: Compatible KD-LH3105 (compatible with only MP3 files) Not playable 8 kbps—320 kbps ‡ 48 kHz, 44.1 kHz, 32 kHz 24 kHz, 22.