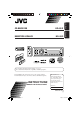
CD RECEIVER KD-S52 ENGLISH RECEPTOR CON CD KD-S52 ESPAÑOL For canceling the display demonstration, see page 8. Para cancelar la demostración en pantalla, consulte la página 8. For installation and connections, refer to the separate manual. Para la instalación y las conexiones, refiérase al manual separado. INSTRUCTIONS For customer Use: Enter below the Model No. and Serial No. which are located on the top or bottom of the cabinet. Retain this information for future reference.
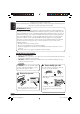
ENGLISH Thank you for purchasing a JVC product. Please read all instructions carefully before operation, to ensure your complete understanding and to obtain the best possible performance from the unit. INFORMATION (For U.S.A.) This equipment has been tested and found to comply with the limits for a Class B digital device, pursuant to Part 15 of the FCC Rules. These limits are designed to provide reasonable protection against harmful interference in a residential installation.
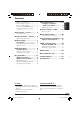
How to reset your unit ........................... How to forcibly eject a disc ................... How to read this manual ........................ How to use the M MODE button........... How to detach/attach the control panel ................................................... Control panel — 2 2 4 4 Sound adjustments ................ 16 Selecting preset sound modes (C-EQ: custom equalizer) .................. 16 4 General settings — PSM ......... 17 KD-S52 ........... 5 Parts identification ......
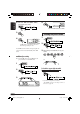
ENGLISH How to read this manual The following methods are used to make the explanations simple and easy-to-understand: • Some related tips and notes are explained in “More about this unit” (see pages 25 and 26). • Button operations are mainly explained with the illustrations as follows: How to use the M MODE button If you press M MODE, the unit goes into functions mode, then the number buttons and 5/∞ buttons work as different function buttons. Ex.: When number button 2 works as MO (monaural) button.
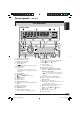
KD-S52 ENGLISH Control panel — Parts identification Display window 1 2 3 4 5 6 7 8 9 p q w e r t y u i o 5 (up) / ∞ (down) buttons E EQ (equalizer) button D DISP (display) button S SEL (select) button • Control dial • (standby/on attenuator) button Display window Remote sensor • DO NOT expose the remote sensor to strong light (direct sunlight or artificial lighting).
ENGLISH Remote controller — RM-RK60 Installing the lithium coin battery (CR2025) • Aim the remote controller directly at the remote sensor on the unit. Make sure there is no obstacle in between. Main elements and features 1 Warning: • Do not install any battery other than CR2025 or its equivalent; otherwise, it may explode. • Store the battery in a place where children cannot reach to avoid risk of accident.
Basic operations ⁄ ENGLISH Getting started Adjust the volume. Volume level appears. ~ Volume level indicator @ Ÿ Adjust the sound as you want. (See page 16.) To drop the volume in a moment (ATT) To restore the sound, press it again. You cannot select some sources if they are not ready. ! • For FM/AM tuner To turn off the power • For SIRIUS® radio Caution on volume setting: * Select “CD-CH” when using an Apple iPod® or a JVC D. player (see page 21).
ENGLISH Canceling the display demonstrations Setting the clock 1 If no operations are done for about 20 seconds, display demonstration starts. [Initial: DEMO ON]—see page 17. 1 2 2 Set the hour and minute. 1 Select “CLOCK H” (hour), then adjust the hour. 2 Select “CLOCK M” (minute), then adjust the minute. 3 3 Finish the procedure. 4 Finish the procedure. To check the current clock time when the power is turned off To activate the display demonstration In step 3 above... 8 EN06-11_KD-S52[J]f.
Listening to the radio 2 Select the desired station frequencies. ENGLISH Radio operations When an FM stereo broadcast is hard to receive 1 ~ 2 Ÿ Selected band appears. Lights up when monaural mode is activated. Lights up when receiving an FM stereo broadcast with sufficient signal strength. ! Start searching for a station. When a station is received, searching stops. To stop searching, press the same button again. Reception improves, but stereo effect will be lost.
ENGLISH 2 Select the FM band (FM1 – FM3) 4 you want to store into. Preset number flashes for a while. 3 Listening to a preset station 1 4 “SSM” flashes, then disappears when automatic presetting is over. Local FM stations with the strongest signals are searched and stored automatically in the FM band. 2 3 Select the preset station (1 – 6) you want. Manual presetting Ex.: Storing FM station of 92.5 MHz into the preset number 4 of the FM1 band.
Playing a disc in the unit • When inserting an audio CD or a CD Text disc: Total playing time of the inserted disc All tracks will be played repeatedly until you change the source or eject the disc. About MP3 and WMA discs MP3 and WMA (Windows Media® Audio) “tracks” (words “file” and “track” are used interchangeably) are recorded in “folders.” Total track number of the inserted disc ENGLISH Disc operations CD Text: Disc title/performer = Track title appears automatically (see page 14).
ENGLISH Playing discs in the CD changer Ÿ Select a disc. For disc number from 01 – 06: For disc number from 07 – 12: About the CD changer It is recommended to use a JVC MP3compatible CD changer with your unit. • You can also connect other CH-X series CD changers (except CH-X99 and CH-X100). However, they are not compatible with MP3 discs, so you cannot play back MP3 discs. • You cannot play any WMA disc in the CD changer. • You cannot use the KD-MK series CD changers with this unit.
CD Text: Disc title/performer = Track title appears automatically (see page 14). Clock*3 To locate a particular track (for CD) or folder (for MP3 or WMA discs) directly To select a number from 01 – 06: ENGLISH • When the current disc is an audio CD or a CD Text disc: Current track number To select a number from 07 – 12: *3 Elapsed playing time appears for a while if the current disc is an audio CD.
ENGLISH 2 Changing the display information First time you press +10 or –10 button, the track skips to the nearest higher or lower track with a track number of multiple ten (ex. 10th, 20th, 30th). Then each time you press the button, you can skip 10 tracks. • After the last track, the first track will be selected and vice versa. While playing an audio CD or a CD Text ( / ) 3 Prohibiting disc ejection You can lock a disc in the loading slot.
ENGLISH Selecting the playback modes You can use only one of the following playback modes at a time. 1 2 Select your desired playback mode. Mode Repeat play Plays repeatedly TRK RPT : The current track. • RPT lights up. FLDR RPT*3 : All tracks of the current folder. • and RPT light up. DISC RPT*4 : All tracks of the current disc. • and RPT light up. RPT OFF : Cancels. Ex.
ENGLISH Sound adjustments Selecting preset sound modes 2 (C-EQ: custom equalizer) Indication pattern changes as you adjust the level. Ex.: When “TRE” is selected You can select a preset sound mode suitable to the music genre.
General settings — PSM 3 Adjust the PSM item selected. ENGLISH Basic procedure You can change PSM (Preferred Setting Mode) items listed (except for SID) in the table that follows. 1 4 Repeat steps 2 and 3 to adjust the other PSM items if necessary. 5 Finish the procedure. 2 Select a PSM item. Ex.
ENGLISH Indications Selectable settings, [reference page] CLK ADJ*1 Clock adjustment AUTO OFF : [Initial]; The built-in clock will be adjusted automatically using the clock data provided via the SIRIUS® radio channel. : Cancels. T-ZONE*1, *2 Time zone Select your residential area from one of the following time zone for clock adjustment.
Selectable settings, [reference page] EXT IN*5 External input CHANGER : [Initial]; To use a JVC CD changer, an Apple iPod or a JVC D. player, [21]. EXT IN : To use another external component (other than SIRIUS DLP), [21]. L/O MODE External output When connecting amplifiers and/or subwoofer (see the Installation/ Connection Manual for details), set this correctly. FRONT : [Initial]; Select if the both LINE OUT terminals are used for connecting the amplifiers.
ENGLISH Other main functions Assigning titles to the sources 3 Assign a title. 1 Select a character. You can assign titles to station frequencie and CDs (both in this unit and in the CD changer). Sources Maximum number of characters FM/AM tuner Up to 8 characters (up to 30 station frequencies including both FM and AM) CDs/CD-CH Up to 32 characters (up to 30 discs) 2 Move to the next (or previous) character position. * You cannot assign a title to a CD Text or an MP3/WMA disc.
This unit is ready for any Apple iPod® or JVC D. player control interface. • For details, refer also to the manual supplied with the interface adapter for iPod®—KS-PD100 or D. player— KS-PD500. ~ ENGLISH External component operations For selecting the external component connected to.... • AUX input jack Playing an external component • CD changer jack on the rear using KS-U57 If “EXT IN” does not appear, see page 19 and select the external input (“EXT IN”). You can connect an external component to...
ENGLISH SIRIUS® radio operations About SIRIUS radio SIRIUS is a satellite radio that can deliver digital-quality sound. SIRIUS has 65 music channels which are all commercial-free and 50 channels of sports, news, and entertainment programs. You can enjoy and control the SIRIUS radio digital entertainment channels from the unit by connecting the JVC SIRIUS radio DLP— Down Link Processor (optionally purchased) to the CD changer jack on the rear.
Storing channels in memory You can preset six channels for each band. Ex.: Storing a channel into preset number 4. ENGLISH Listening to the SIRIUS® radio 1 Perform steps ~ to ⁄ on the left column, to tune in to a channel you want. ~ 2 Preset number flashes for a while. Listening to a preset channel Ÿ ! 1 Select a category. 2 You can tune in to all the channels of every category by selecting “ALL.” Selecting a particular category (SPORTS, ENTERTAINMENT, etc.
ENGLISH Maintenance How to clean the connectors Frequent detachment will deteriorate the connectors. To minimize this possibility, periodically wipe the connectors with a cotton swab or cloth moistened with alcohol, being careful not to damage the connectors. To keep discs clean A dirty disc may not play correctly. If a disc does become dirty, wipe it with a soft cloth in a straight line from center to edge. • Do not use any solvent (for example, conventional record cleaner, spray, thinner, benzine, etc.
Basic operations Inserting a disc Turning on the power • When a disc is inserted upside down, “PLEASE” and “EJECT” appear alternately on the display. Press 0 to eject the disc. • Do not insert 8 cm (3-3/16") discs (single CD) and unusual shape discs (heart, flower, etc.) into the loading slot. • By pressing SOURCE on the unit, you can also turn on the power. If the source is ready, playback also starts.
ENGLISH Playing an MP3/WMA disc • This unit can play back MP3/WMA files with the extension code <.mp3> or <.wma> (regardless of the letter case—upper/lower). • This unit can show the names of albums, artists (performer), and ID3 Tag (Version 1.0, 1.1, 2.2, 2.3, or 2.4) for MP3 files and for WMA files. • This unit can handle only one-byte characters. No other characters can be correctly displayed.
What appears to be trouble is not always serious. Check the following points before calling a service center. MP3/WMA playback Disc playback FM/AM General Symptoms • Sound cannot be heard from the speakers. Remedies/Causes • Adjust the volume to the optimum level. • Check the cords and connections. • The unit does not work at all. Reset the unit (see page 2). • SSM automatic presetting does not work. Store stations manually. • Static noise while listening to the radio.
ENGLISH SIRIUS CD chnager Symptoms Remedies/Causes • “NO DISC” appears on the display. Insert a disc into the magazine. • “NO MAG” appears on the display. Insert the magazine. • “RESET 8” appears on the display. Connect this unit and the CD changer correctly and press the reset button of the CD changer. • “RESET 1” – “RESET 7” appears on the display. Press the reset button of the CD changer. • The CD changer does not work at all. Reset the unit (see page 2).
AUDIO AMPLIFIER SECTION Power Output: 20 W RMS × 4 Channels at 4 Ω and ≤ 1% THD+N Signal to Noise Ratio: 80 dBA (reference: 1 W into 4 Ω) Load Impedance: 4 Ω (4 Ω to 8 Ω allowance) Tone Control Range: Bass: ±10 dB at 100 Hz Treble: ±10 dB at 10 kHz Frequency Response: 40 Hz to 20 000 Hz Line-Out Level/Impedance: 2.5 V/20 kΩ load (full scale) Output Impedance: 1 kΩ Subwoofer-Out Level/Impedance: 2.
Having TROUBLE with operation? Please reset your unit Refer to page of How to reset your unit Still having trouble?? USA ONLY Call 1-800-252-5722 http://www.jvc.com We can help you! EN, SP © 2005 Victor Company of Japan, Limited Rear_KD-S52[J]f.
KD-S52 GET0322-002A Installation/Connection Manual Manual de instalación/conexión 0805DTSMDTJEIN EN, SP [J] ENGLISH You need the installation kits which corresponds to your car. • Mark all the check boxes ( ) to make sure you have follow the instructions and the listed parts. Check the battery system in your car.
A Typical Connections Before connecting: The leads of the power cord and those of the connector from the car body may be different in color. B Connecting the external amplifiers You can connect another power amplifier for front speakers. For connecting another power amplifier, set “L/O MODE” to “FRONT” (See page 19 of the INSTRUCTIONS.) JVC Amplifier Signal cord (not supplied) Line out Subwoofer can be connected only to the front LINE OUT terminals.