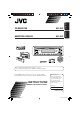
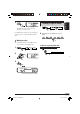
CD RECEIVER KD-S12 ENGLISH RECEPTOR CON CD KD-S12 ESPAÑOL For canceling the display demonstration, see page 7. Para cancelar la demostración en pantalla, consulte la página 7. For installation and connections, refer to the separate manual. Para la instalación y las conexiones, refiérase al manual separado. INSTRUCTIONS For customer Use: Enter below the Model No. and Serial No. which are located on the top or bottom of the cabinet. Retain this information for future reference.
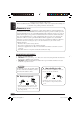
ENGLISH Thank you for purchasing a JVC product. Please read all instructions carefully before operation, to ensure your complete understanding and to obtain the best possible performance from the unit. INFORMATION (For U.S.A.) This equipment has been tested and found to comply with the limits for a Class B digital device, pursuant to Part 15 of the FCC Rules. These limits are designed to provide reasonable protection against harmful interference in a residential installation.
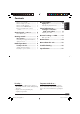
How to reset your unit ........................... How to forcibly eject a disc ................... How to read this manual ........................ How to use the MODE button ............... How to detach/attach the control panel ................................................... Control panel — 2 2 4 4 4 KD-S12 ........... 5 Parts identification ................................. 5 Getting started ....................... 6 Basic operations ..................................
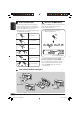
ENGLISH How to read this manual The following methods are used to make the explanations simple and easy-to-understand: • Some related tips and notes are explained in “More about this unit” (see page 15). • Button operations are mainly explained with the illustrations as follows: How to use the MODE button If you press MODE, the unit goes into functions mode, then the number buttons work as different function buttons. Ex.: When number button 2 works as MO (monaural) button. Press briefly.
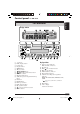
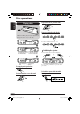
KD-S12 ENGLISH Control panel — Parts identification Display window 1 2 3 4 5 6 7 8 9 p q w e r t y u i +/– buttons DISP (display) button Loading slot Display window MODE button 0 (eject) button ¢/4 buttons (standby/on/attenuator) button SEL (select) button MO (monaural) button SSM (Strong-station Sequential Memory) button CD button FM/AM button RPT (repeat) button RND (random) button EQ (equalizer) button (control panel release) button Number buttons Display window o Tuner reception indicators MO (mon
ENGLISH Getting started Basic operations To drop the volume in a moment (ATT) To restore the sound, press it again. To turn off the power ~ Caution on volume setting: Ÿ Discs produce very little noise compared with other sources. Lower the volume before playing a disc to avoid damaging the speakers by the sudden increase of the output level. You cannot select “CD” as the playback source if there is no disc in the loading slot. ! Volume level appears.
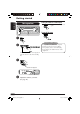
ENGLISH Canceling the display demonstrations Setting the clock 1 If no operations are done for about 20 seconds, display demonstration starts. [Initial: DEMO ON]—see page 13. 1 2 Set the hour and minute. 1 Select “CLOCK H” (hour), then adjust the hour. 2 Select “CLOCK M” (minute), 2 then adjust the minute. 3 Finish the procedure. 3 To check the current clock time when the power is turned off 4 Finish the procedure. To activate the display demonstration In step 3 above... 7 EN06-09_KD-S12[J]f.
ENGLISH Radio operations Listening to the radio When an FM stereo broadcast is hard to receive 1 2 ~ Lights up when monaural mode is activated. Lights up when receiving an FM stereo broadcast with sufficient signal strength. Reception improves, but stereo effect will be lost. Selected band appears. Ÿ Start searching for a station. To restore the stereo effect, repeat the same procedure so that the MO indicator goes off. Storing stations in memory You can preset six stations for each band.
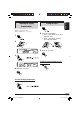
Listening to a preset station 1 “SSM” flashes, then disappears when automatic presetting is over. Local FM stations with the strongest signals are searched and stored automatically in the FM band. ENGLISH 3 2 Select the preset station (1 – 6) you want. Manual presetting Ex.: Storing FM station of 92.5 MHz into the preset number 4 of the FM1 band. 1 To check the current clock time while listening to an FM or AM station 2 3 Preset number flashes for a while. 9 EN06-09_KD-S12[J]f.
ENGLISH Disc operations Playing a disc To go to the next or previous tracks To go to a particular track directly To select a number from 01 – 06: All tracks will be played repeatedly until you change the source or eject the disc.
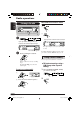
ENGLISH Selecting the playback modes You can use only one of the following playback modes at a time. 1 2 Select your desired playback mode. Repeat play Mode Plays repeatedly TRK RPT : The current track. • RPT lights up. RPT OFF : Cancels. Ex.: When “TRK RPT” is selected Random play Mode Plays at random DISC RND : All tracks of the current disc. • RND lights up. RND OFF : Cancels. Ex.: When “DISC RND” is selected 11 EN10-13_KD-S12[J]f.
ENGLISH Sound adjustments Selecting preset sound modes 2 (C-EQ: custom equalizer) Indication pattern changes as you adjust the level. You can select a preset sound mode suitable to the music genre. Ex.
General settings — PSM ENGLISH 3 Adjust the PSM item selected. Basic procedure You can change PSM (Preferred Setting Mode) items listed on the table that follows. 1 4 Repeat steps 2 and 3 to adjust the other PSM items if necessary. 2 Select a PSM item. 5 Finish the procedure. Ex.
ENGLISH Maintenance How to clean the connectors Frequent detachment will deteriorate the connectors. To minimize this possibility, periodically wipe the connectors with a cotton swab or cloth moistened with alcohol, being careful not to damage the connectors. To keep discs clean A dirty disc may not play correctly. If a disc does become dirty, wipe it with a soft cloth in a straight line from center to edge. • Do not use any solvent (for example, conventional record cleaner, spray, thinner, benzine, etc.
Basic operations Playing a CD-R or CD-RW Turning on the power • Use only “finalized” CD-Rs or CD-RWs. • This unit can play back multi-session discs; however, unclosed sessions will be skipped while playing. • Some CD-Rs or CD-RWs may not play back on this unit because of their disc characteristics, and for the following causes: – Discs are dirty or scratched. – Moisture condensation occurs on the lens inside the unit. – The pickup lens inside the unit is dirty.
What appears to be trouble is not always serious. Check the following points before calling a service center. Symptoms FM/AM General ENGLISH Troubleshooting Remedies/Causes • Sound cannot be heard from the speakers. • Adjust the volume to the optimum level. • The unit does not work at all. Reset the unit (see page 2). • SSM automatic presetting does not work. Store stations manually. • Static noise while listening to the radio. Connect the antenna firmly. • Disc automatically ejects.
AUDIO AMPLIFIER SECTION Power Output: 18 W RMS × 4 Channels at 4 Ω and ≤ 1% THD+N Signal to Noise Ratio: 80 dBA (reference: 1 W into 4 Ω) Load Impedance: 4 Ω (4 Ω to 8 Ω allowance) Tone Control Range: Bass: ±10 dB at 100 Hz Treble: ±10 dB at 10 kHz Frequency Response: 40 Hz to 20 000 Hz Line-Out Level/Impedance: 2.0 V/20 kΩ load (full scale) Output Impedance: 1 kΩ TUNER SECTION Frequency Range: FM: 87.5 MHz to 107.9 MHz (with channel interval set to 200 kHz) 87.5 MHz to 108.
Having TROUBLE with operation? Please reset your unit Refer to page of How to reset your unit Still having trouble?? USA ONLY Call 1-800-252-5722 http://www.jvc.com We can help you! EN, SP © 2005 Victor Company of Japan, Limited Rear_KD-S12[J]f.
KD-S12 GET0317-002A Installation/Connection Manual Manual de instalación/conexión 0705DTSMDTJEIN EN, SP [J] ENGLISH You need the installation kits which corresponds to your car. • Mark all the check boxes ( ) to make sure you have follow the instructions and the listed parts. Check the battery system in your car.
ELECTRICAL CONNECTIONS Make sure to disconnect the battery’s negative terminal. High • Be sure to ground this unit to the car’s chassis again after installation. Note: It is recommended to connect to the speakers with maximum power of more than 50 W (both at the rear and at the front, with an impedance of 4 Ω to 8 Ω). If the maximum power is less than 50 W, change “AMP GAIN” setting to prevent the speakers from being damaged (see page 13 of the INSTRUCTIONS).