
INSTRUCTIONS

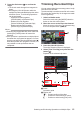
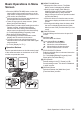
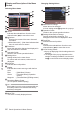


Table Of Contents
- Introduction
- Preparations
- Shooting
- Basic Shooting Procedures
- Selecting System Definition, File Format and Video Format
- Zoom Operation
- Focus Operation
- Adjusting the Focusing by Face Detection
- Using Scene Select
- Adjusting the Brightness
- Adjusting the Iris
- Setting the Gain
- Setting the Electronic Shutter
- Adjusting the White Balance
- Adjusting the Camera Image
- Using the Image Stabilizer
- Audio Recording
- Monitoring Audio Sound During Recording Using a Headphone
- Time Code and User’s Bit
- Setting Time Code Generator
- Setting the User’s Bit
- Synchronizing Time Code on Another Camera
- Setting Zebra Pattern
- Viewing Recorded Videos Immediately (Clip Review)
- Splitting the Clips Freely (Clip Cutter Trig)
- Series Rec
- Dual Rec
- Backup Rec
- Special Recording
- Playback
- Menu Display and Detailed Settings
- Display/Status Screen
- Camera Features
- Connecting External Devices
- Others

5
Press the Set button (R) to confirm the
range.
0
The check marks change from magenta to
green.
0
Pressing the [LOLUX/3] button while the
multiple
clips are selected displays the action
selection screen. The following operations
can be performed.
0
Appends OK mark together:
[Add OK Mark]
B [Selected Clips]
0
Deletes OK mark together:
[Delete OK Mark]
B [Selected Clips]
0
Deletes selected clips together:
[Delete Clips]
B [Selected Clips]
Memo :
0
Selecting clips appended with check mark and
pressing the [OIS/2] button will cancel the
selection.
0
If the
operation is performed on multiple clips at
the same time, a progress bar appears. You can
stop the operation by pressing the Set button (R)
while the operation is in progress. However, it is
not possible to undo operations that are
completed.
Trimming Recorded Clips
You can
extract (trim) the necessary parts of a clip
recorded in the SD card.
The trimmed clip is saved as a new file on the same
SD card as the original clip. No changes are made
to the original clip.
1
Switch to Media mode.
Switch the mode using the [MODE] selection
button on the side control panel.
2
Move the cursor to the clip to be trimmed.
Move the cursor to the clip to be trimmed using
the cross-shaped button (JKH I).
.
2
3
Press the [LOLUX/3] button.
The action selection screen is displayed.
4
Select [Trim This Clip], and press the Set
button (R).
Playback of the selected clip starts.
.
282min
0
12 :34 :56
Jan 12, 2016
00:00: 00.00
1920x1080
60 i HQ
40 30 20 10 0
1000/ 2000
IN
OUT
TRIM
30min
11:22: 33.00
11:23: 44.00
00:08: 22
A
B
C
4
A
Guide
Operation guide
B
Position bar
6
: Current position of the video
7
:
Position to start trimming (in point)
8
: Position to end trimming (out point)
Selecting and Performing Operations on Multiple Clips
83
Playback