
INSTRUCTIONS


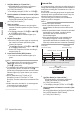


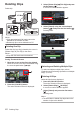
Table Of Contents
- Introduction
- Preparations
- Shooting
- Basic Shooting Procedures
- Selecting System Definition, File Format and Video Format
- Zoom Operation
- Focus Operation
- Adjusting the Focusing by Face Detection
- Using Scene Select
- Adjusting the Brightness
- Adjusting the Iris
- Setting the Gain
- Setting the Electronic Shutter
- Adjusting the White Balance
- Adjusting the Camera Image
- Using the Image Stabilizer
- Audio Recording
- Monitoring Audio Sound During Recording Using a Headphone
- Time Code and User’s Bit
- Setting Time Code Generator
- Setting the User’s Bit
- Synchronizing Time Code on Another Camera
- Setting Zebra Pattern
- Viewing Recorded Videos Immediately (Clip Review)
- Splitting the Clips Freely (Clip Cutter Trig)
- Series Rec
- Dual Rec
- Backup Rec
- Special Recording
- Playback
- Menu Display and Detailed Settings
- Display/Status Screen
- Camera Features
- Connecting External Devices
- Others

Memo :
0
The object
of action is the clip of the current slot
being displayed.
0
[Selected Clips] cannot be performed if there are
no selected (appended with check mark) clips.
0
[This Clip
] cannot be performed if there are more
than one selected (appended with check mark)
clips.
0
If the write-protect switch of an SD card is set,
OK mark cannot be appended or deleted, and
the clips cannot be deleted.
Playing back
Use the operation buttons on the side control panel
of the camera recorder to play back.
.
AE LEVEL
MENU/THUMB
CANCEL
A
C
B
A
IW Button
0
Plays back/pauses the clip pointed by the
cursor.
0
You can
press the cross-shaped button (HI)
to perform frame-by-frame forward playback
during pause mode.
B
S/T Button
Skips in the reverse or forward direction.
O
/N Button
During Playback:
Fast forwards in the reverse or forward
direction.
While paused:
Frame-by-frame playback in the reverse or
forward direction.
C
o Button
Stops playback.
1
In the thumbnail screen, move the cursor to
the clip to be played back.
Move the cursor to the clip to be played back
using the cross-shaped button (JKH I).
2
Press the playback/pause button.
Playback of the selected clip starts.
Audio Output during Playback
0
You can confirm the playback sound from the
monitor speaker, or the headphone connected
to the [x] terminal. When a headphone is
connected
to
the [x] terminal, sound cannot be
output from the monitor speaker.
(A P126 [Connecting the Headphone] )
0
Adjust the volume of the monitor speaker and
headphone using the [MONITOR +/-] volume
adjustment button on the LCD monitor section
of the camera recorder.
Time Code Playback
Time code or user’s bit recorded on an SD card can
be displayed on the LCD monitor and viewfinder.
Memo :
0
If a
section without time code is played back, the
time code will stop. However, playback will
continue.
Playing Recorded Clips
79
Playback