
INSTRUCTIONS


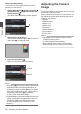
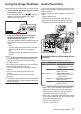
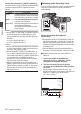
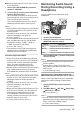
Table Of Contents
- Introduction
- Preparations
- Shooting
- Basic Shooting Procedures
- Selecting System Definition, File Format and Video Format
- Zoom Operation
- Focus Operation
- Adjusting the Focusing by Face Detection
- Using Scene Select
- Adjusting the Brightness
- Adjusting the Iris
- Setting the Gain
- Setting the Electronic Shutter
- Adjusting the White Balance
- Adjusting the Camera Image
- Using the Image Stabilizer
- Audio Recording
- Monitoring Audio Sound During Recording Using a Headphone
- Time Code and User’s Bit
- Setting Time Code Generator
- Setting the User’s Bit
- Synchronizing Time Code on Another Camera
- Setting Zebra Pattern
- Viewing Recorded Videos Immediately (Clip Review)
- Splitting the Clips Freely (Clip Cutter Trig)
- Series Rec
- Dual Rec
- Backup Rec
- Special Recording
- Playback
- Menu Display and Detailed Settings
- Display/Status Screen
- Camera Features
- Connecting External Devices
- Others

4
Turn the iris dial to adjust the iris manually.
The open F-number of the aperture varies
according to the zoom position.
Wide [W] end :
F1.2
Tele [T] end : F2.8
F-number Description
Decrease The subject appears brighter.
The focused range becomes
sharper, while the background is
blurred to produce a soft image.
Increase The subject appears darker.
Background of image becomes
focused as well.
Memo :
0
Pressing the [PUSH AUTO] button during
Manual Iris mode activates One Push Auto Iris
mode. And holding down the [
PUSH AUTO]
button activates Push Auto Iris mode.
One Push Auto Iris
When the camera recorder is in Manual Iris mode,
press the [PUSH AUTO
]
button to adjust the iris
according to the brightness of the object.
Push Auto Iris
When the camera recorder is in Manual Iris mode,
hold down the [PUSH AUTO] button to change to
Auto Iris mode temporarily. The iris will be
automatically
adjusted according to the brightness
of the object.
Setting the Gain
This function electrically boosts the light sensitivity
when there
is insufficient illumination on the object.
You can set the gain of the video amplifier
according to the brightness of the object. Select the
setting mode according to your shooting
conditions.
.
TIME CODE
GAIN
L
M
H
FULL AUTO
ON
OFF
Automatic Gain Mode (Automatic Gain
Adjustment)
1
Set the [FULL AUTO ON/OFF] switch to
“OFF”
to turn off the Full Auto mode.
2
Set
the [SCENE SELECT
] switch to “OFF” to
turn off the Scene Select mode.
3
Press the [GAIN] button to set to the
Automatic Gain mode.
The sensitivity value (in dB) will not be displayed
in the Auto Gain mode.
Memo :
0
Set the [FULL AUTO ON/OFF] switch on the
camera
recorder to “ON” to enter the Automatic
Gain mode ([AGC] fixed). The gain of the video
amplifier is automatically set according to the
brightness of the object.
In this case, the [GAIN] switch on the camera
recorder is disabled.
0
The upper limit of the gain setting value during
AGC operation can be set in
[Main Menu]
B
[Camera Function] B [AGC Limit].
(A P89
[ AGC Limit ] )
Manual Gain Mode (Manual Gain
Switching)
1
Set the [FULL AUTO ON/OFF] switch to
“OFF” to turn off the Full Auto mode.
2
Set
the [SCENE SELECT
] switch to “OFF” to
turn off the Scene Select mode.
3
Press the [GAIN]
button to set to the Manual
Gain mode.
0
Use the [L/M/H] switch to set the gain of the
selected video amplifier.
0
The gain level appears on the screen.
0
The default positions of the switch are as
follows.
[L] : 0dB
[
M
] : 6dB
[H] : 12dB
Memo :
0
You
can
change the gain value of each position
in the menu. Increasing the sensitivity causes
the screen to appear grainier.
(A P89 [GAIN L, GAIN M, GAIN H] )
Adjusting the Iris
51
Shooting