
INSTRUCTIONS
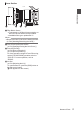
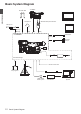


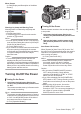
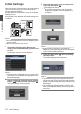

Table Of Contents
- Introduction
- Preparations
- Shooting
- Basic Shooting Procedures
- Selecting System Definition, File Format and Video Format
- Zoom Operation
- Focus Operation
- Adjusting the Focusing by Face Detection
- Using Scene Select
- Adjusting the Brightness
- Adjusting the Iris
- Setting the Gain
- Setting the Electronic Shutter
- Adjusting the White Balance
- Adjusting the Camera Image
- Using the Image Stabilizer
- Audio Recording
- Monitoring Audio Sound During Recording Using a Headphone
- Time Code and User’s Bit
- Setting Time Code Generator
- Setting the User’s Bit
- Synchronizing Time Code on Another Camera
- Setting Zebra Pattern
- Viewing Recorded Videos Immediately (Clip Review)
- Splitting the Clips Freely (Clip Cutter Trig)
- Series Rec
- Dual Rec
- Backup Rec
- Special Recording
- Playback
- Menu Display and Detailed Settings
- Display/Status Screen
- Camera Features
- Connecting External Devices
- Others

Initial Settings
When the
power is first turned on, the Initial Setting
screen for performing the initial settings in the
camera recorder appears.
Set the date/time of the built-in clock in the [Initial
Setting] screen.
All operations are disabled until initial settings are
complete.
.
TIME CODE
MODE
POWER
ON
OFF
AE LEVEL
MENU/THUMB
CANCEL
MENU/THUMB
CANCEL
Memo :
0
It is
recommended to use the AC adapter as the
power supply.
0
Be sure to close the lens cover.
1
Hold down the lock button (blue) at the
center of the [POWER ON/OFF] switch to set
to “ON”.
A language selection screen appears.
.
Memo :
0
The menus and messages on the screen of the
LCD monitor or viewfinder are displayed in the
selected language.
2
Select a language using the cross-shaped
button (JK), and press the Set button (R).
The Initial Setting screen appears.
.
3
Ensure that the lens cover is closed, and
press the Set button (R).
0
Self-diagnosis starts.
0
A progress bar appears, and “Complete
Diagnosis” appears when the diagnosis is
complete.
.
Memo :
0
It takes about 6 minutes to complete the
diagnosis. During the diagnosis, do not operate
or turn off the camera recorder.
4
Press the Set button (R) after confirming
the exit screen.
The [Initial Setting] screen appears.
.
Memo :
0
The
[Initial Setting] screen appears when the
power
is turned on for the first time and when the
power is turned on after the built-in battery is fully
discharged.
0
The configured date/time data is saved in the
built-in rechargeable
battery even if the power is
turned off.
28
Initial Settings
Preparations