
INSTRUCTIONS
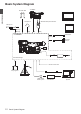

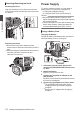

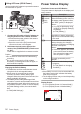
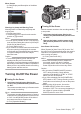
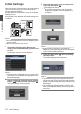

Table Of Contents
- Introduction
- Preparations
- Shooting
- Basic Shooting Procedures
- Selecting System Definition, File Format and Video Format
- Zoom Operation
- Focus Operation
- Adjusting the Focusing by Face Detection
- Using Scene Select
- Adjusting the Brightness
- Adjusting the Iris
- Setting the Gain
- Setting the Electronic Shutter
- Adjusting the White Balance
- Adjusting the Camera Image
- Using the Image Stabilizer
- Audio Recording
- Monitoring Audio Sound During Recording Using a Headphone
- Time Code and User’s Bit
- Setting Time Code Generator
- Setting the User’s Bit
- Synchronizing Time Code on Another Camera
- Setting Zebra Pattern
- Viewing Recorded Videos Immediately (Clip Review)
- Splitting the Clips Freely (Clip Cutter Trig)
- Series Rec
- Dual Rec
- Backup Rec
- Special Recording
- Playback
- Menu Display and Detailed Settings
- Display/Status Screen
- Camera Features
- Connecting External Devices
- Others

Attaching/Detaching the Hood
Attaching the Hood
Align the markings on the camera recorder and
hood; turn
the hood in the direction of the arrow until
it is locked.
.
Detaching the Hood
0
Remove the hood when attaching a filter,
teleconverter or
wide converter to the front of the
lens.
0
While pressing
the hood release button, turn the
hood in the direction of the arrow (anti-
clockwise) to remove it.
.
TIME CODE
Power Supply
To use this camera recorder, you can attach a
battery pack or connect an AC adapter to it.
(A P24 [Using a Battery Pack] )
(A P26 [Using AC Power (DC IN Power)] )
Caution :
0
Set the [
POWER ON/OFF] switch to “OFF”
before changing the power supply that operates
this camera recorder.
0
This product
does not come with a battery pack.
When using a battery, please purchase the
recommended battery pack (SSL-JVC50).
Using a Battery Pack
Charging the Battery
Charge the battery immediately after purchase or
when the battery power is running low.
.
1
2
3
4
4
POWER
/CHG
MODE
POWER
ON
OFF
1
Hold down the lock button (blue) at the
center of the [POWER ON/OFF] switch to set
to “OFF”.
2
Attach the battery.
Slide it in until you hear a click.
3
Connect the supplied AC adapter to the
[DC]
terminal.
Open
the cover of the [DC] terminal
and connect
as shown in the diagram.
4
Connect the AC adapter to a power outlet.
0
The [POWER/CHG] lamp blinks during
charging and will go out after charging is
complete.
0
Remove the AC adapter after charging is
complete.
24
Settings and Adjustments Before Use
Preparations