
INSTRUCTIONS
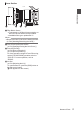
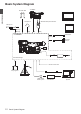

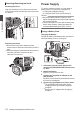

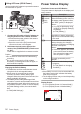
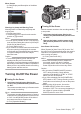
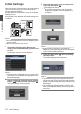

Table Of Contents
- Introduction
- Preparations
- Shooting
- Basic Shooting Procedures
- Selecting System Definition, File Format and Video Format
- Zoom Operation
- Focus Operation
- Adjusting the Focusing by Face Detection
- Using Scene Select
- Adjusting the Brightness
- Adjusting the Iris
- Setting the Gain
- Setting the Electronic Shutter
- Adjusting the White Balance
- Adjusting the Camera Image
- Using the Image Stabilizer
- Audio Recording
- Monitoring Audio Sound During Recording Using a Headphone
- Time Code and User’s Bit
- Setting Time Code Generator
- Setting the User’s Bit
- Synchronizing Time Code on Another Camera
- Setting Zebra Pattern
- Viewing Recorded Videos Immediately (Clip Review)
- Splitting the Clips Freely (Clip Cutter Trig)
- Series Rec
- Dual Rec
- Backup Rec
- Special Recording
- Playback
- Menu Display and Detailed Settings
- Display/Status Screen
- Camera Features
- Connecting External Devices
- Others

Settings and Adjustments
Before Use
.
Adjusting the Grip Belt
Open the pad and adjust the position of the grip belt
accordingly.
.
AUX
INPUT2
INPUT1
DEVICE
AV
A
BATT.RELEASE
POWER
/CHG
B
HDMI
REMOTE
DC
REC
Caution :
0
If the
grip is loose, the camera recorder may fall
off resulting in injuries or malfunction.
Attaching an External Microphone
You can attach a separately sold microphone to the
microphone holder.
.
4
5
1, 3
2
1
Turn the knob on the microphone holder
counterclockwise to loosen and open the
microphone holder.
2
Place the microphone in the microphone
holder.
3
Turn the knob on the microphone holder
clockwise to secure the microphone.
4
Connect the microphone cable to the
[INPUT1]
or [
INPUT2] terminal.
5
Pin the microphone cable to the clamp.
6
Perform the settings for the microphone
correctly.
(A P57 [Audio Recording] )
Attaching the Tripod
Use the screw hole at the bottom of this camera
recorder.
(3/8×16UNC, 1/4×20UNC)
Use the screw hole that suits the tripod.
To prevent the camera recorder from falling off,
which may result in injuries or damages, read the
“INSTRUCTIONS” of the tripod to be used and
make sure that it is securely attached.
.
oBottom
Caution :
0
If the camera recorder exceeds the weight limit
of the tripod, do not mount it on the tripod.
0
Use the tripod on a stable surface.
0
To prevent the camera recorder from falling,
attach securely using the rotation prevention
hole.
0
Use screws
with screw length 5 mm and below.
Opening/Closing the Lens Cover
Use the lens cover open/close switch to open or
close the lens cover.
Before shooting, open the lens cover.
When this
camera recorder is not in use, close the
lens cover to protect the lens.
.
Caution :
0
Do not press against the lens cover with force.
Doing so may damage the lens or the cover.
Settings and Adjustments Before Use
23
Preparations