
INSTRUCTIONS

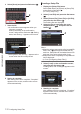


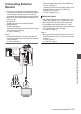


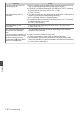
Table Of Contents
- Introduction
- Preparations
- Shooting
- Basic Shooting Procedures
- Selecting System Definition, File Format and Video Format
- Zoom Operation
- Focus Operation
- Adjusting the Focusing by Face Detection
- Using Scene Select
- Adjusting the Brightness
- Adjusting the Iris
- Setting the Gain
- Setting the Electronic Shutter
- Adjusting the White Balance
- Adjusting the Camera Image
- Using the Image Stabilizer
- Audio Recording
- Monitoring Audio Sound During Recording Using a Headphone
- Time Code and User’s Bit
- Setting Time Code Generator
- Setting the User’s Bit
- Synchronizing Time Code on Another Camera
- Setting Zebra Pattern
- Viewing Recorded Videos Immediately (Clip Review)
- Splitting the Clips Freely (Clip Cutter Trig)
- Series Rec
- Dual Rec
- Backup Rec
- Special Recording
- Playback
- Menu Display and Detailed Settings
- Display/Status Screen
- Camera Features
- Connecting External Devices
- Others

Connecting the
Headphone
0
Audio output from the [x] terminal can be
selected using the
[A/V Set
] B [Monitor] item or
the [MONITOR] selection switch on the camera
recorder.
(A
P103 [ Monitor ] )
0
The different combinations of settings that are
output from the [
x] terminal and monitor
speaker are as follows.
[MONITOR]
Selection
Switch Setting
[Monitor]
Setting
[x]
Terminal
Speaker *
L R
[CH1] - CH1 CH1
[BOTH] [Mix] CH1+CH2 CH1+CH2
[Stereo] CH1 CH2
[CH2] - CH2 CH2
* Audio is output from the speaker only in Media
mode. Does not output in the Camera mode.
.
AUX
INPUT2
INPUT1
DEVICE
AV
A
BATT.RELEASE
POWER
/CHG
B
HDMI
REMOTE
DC
REC
AUX
POWER
/CHG
Memo :
0
If both CH1 and CH2 are set to built-in
microphone and the [MONITOR]
selection
switch has been set to “BOTH”, stereo sound is
output from the [x] terminal regardless of the
[Monitor] setting.
Connecting Wired Remote
Control
You can operate the functions of this unit with a
wired remote control.
Memo :
0
When the switches of the camera recorder and
remote control unit are operated at the same
time, the switch operation of the remote control
unit takes priority over that of the camera
recorder.
1
Connect a wired remote control to the
camera recorder.
Connect the wired remote control (sold
separately) to the [REMOTE] terminal of this
camera recorder.
.
AUX
INPUT2
INPUT1
DEVICE
AV
A
BATT.RELEASE
POWER
/CHG
B
HDMI
REMOTE
DC
REC
REMOTE
Connect the wired
remote control
Caution :
0
Turn off
the power of the camera recorder when
connecting a wired remote control.
2
Turn on the power of the camera recorder.
126
Connecting the Headphone
Connecting External Devices