CONTENTS DIGITAL VIDEO CAMERA GR-DV1 ABOUT DVC 5 QUICK OPERATION GUIDE 6 PROVIDED ACCESSORIES 7 GETTING STARTED 8 Charging The Battery .................. 8 Installing The Battery .................. 9 Indoor Use ............................... 10 Using The CAM Stand ............... 10 Clock (Lithium) Battery CR2025 Insertion/Removal .................... 11 Date/Time Settings ................... 12 Loading/Unloading A Cassette ................................ 13 Hand Strap Attachment .............
EN Dear Customer, Thank you for purchasing this Digital Video Camera. Before use, please read the safety information and precautions contained in the following pages to ensure safe use of this product. Using This Instruction Manual • All major sections and subsections are listed in the cover. • Notes appear after most subsections. Be sure to read these as well. • Basic and advanced features/operation are separated for easier reference. It is recommended that you . . . ....
EN CAUTIONS: n To prevent shock, do not open the cabinet. No user serviceable parts inside. Refer servicing to qualified personnel. n When you are not using the AC Power Adapter/Battery charger for a long period of time, it is recommended that you disconnect the power cord from AC outlet. CAUTION (applies to the Docking Station): TO REDUCE THE RISK OF FIRE, DO NOT REMOVE COVER (OR BACK). NO USER– SERVICEABLE PARTS INSIDE. REFER SERVICING TO QUALIFIED SERVICE PERSONNEL.
EN SAFETY PRECAUTIONS CAUTION: About Batteries DANGER! Do not attempt to take the batteries apart, or expose them to flame or excessive heat, as there is a risk of fire or explosion. WARNING! Do not allow the battery terminals, or the battery itself, to come in contact with metals, as this can result in a short circuit and possibly start a fire. • When transporting, make sure the provided battery cap is attached to the battery. If you misplace the battery cap, carry the battery in a plastic bag.
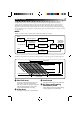
ABOUT DVC EN 5 The digital video camera converts incoming audio and video signals into digital form for recording. A video signal is composed of a luminance signal (Y) and colour signals (R-Y and B-Y). These signals are identified and recorded digitally (Digital Component Recording). The A/D (Analog to Digital) converter samples the Y signal at 13.5 MHz, and R-Y and B-Y at 6.75 MHz, and changes them to an 8-bit quantum signal.
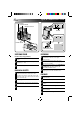
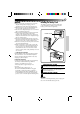
QUICK OPERATION GUIDE EN CASSETTE COVER CASSETTE HOLDER OPEN/EJECT SWITCH STANDBY PAUSE POWER LAMP BATTERY COVER AY PL OFF R EC 5S REC RECORDING START/STOP BUTTON SUPPLYING POWER RECORDING Install A Fully Charged Battery 1 2 3 Pull out the viewfinder and align the mark with “STANDBY”. The lens cover opens automatically. LOADING A CASSETTE 4 When you’re finished, push the viewfinder in, aligning its mark with “CAMERA OFF”.
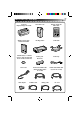
PROVIDED ACCESSORIES AC Power Adapter/Charger AA-V70EK EN Soft camera case Remote control unit RM-V708U T MiniDV Cassette Tape 30 min M-DV30ME Lithium battery x 2 CR2025 (one for clock operation and one for remote control unit) Power cord Cable adapter W Docking Station CAM Stand Battery pack BN-V712U Hand strap AUDIO and VIDEO cable (Phono Docking Station TV or VCR) AUDIO and VIDEO cable (ø3.
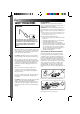
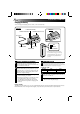
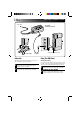
GETTING STARTED EN Charging The Battery You can charge one battery pack at a time, or two consecutively. ATTACH CHARGE INDICATOR 1 CHARGE INDICATOR 2 DETACH BATTERY PACK BN-V712U To AC outlet RED POWER CORD DC JACK BLACK CHARGE MARKER POWER LAMP • The charge marker does not move by itself. After charging or removing a discharged battery, be sure to set the marker to the predetermined position.
EN NOTES: ● If you connect the camcorder’s DC cord to the adapter during battery charging, power is supplied to the camcorder and charging stops. ● When using the AC Power Adapter/Charger, be sure to use the supplied power cord only. ● The AC Power Adapter/Charger is for use with the BN-V712U Battery Pack only. ● When charging the Battery Pack for the first time or after a long storage period, the Charge Indicator may not light.
GETTING STARTED (Cont.) EN To AC outlet AC POWER ADAPTER/CHARGER POWER CORD MIC AV-OUT DC-IN 6V CAM STAND DC CORD Connector is under this cover Indoor Use Using The CAM Stand When using the camcorder indoors, you can use the AC Adapter instead of a battery. During Recording 1 SUPPLY POWER TO ADAPTER Connect the power cord between the AC Adapter and an AC outlet. 2 SUPPLY POWER TO CAMCORDER Connect the AC Adapter to the camcorder.
EN 11 Clock (Lithium) Battery CR2025 Insertion/Removal This battery is necessary to operate the clock and to perform date/time settings. BATTERY COVER 1 OPEN BATTERY COVER 2 REMOVE OLD BATTERY Slide off as shown in the illustration. Pull the battery holder out as shown, and slide the battery down and out of the holder. 3 INSERT NEW BATTERY Insert the battery, with the “+” side showing, in the holder. Then insert the battery holder in the battery cover.
GETTING STARTED (Cont.) EN Date/Time Settings If you set the date and time beforehand, the data will automatically be recorded separately from the video signal. Even if the date and time do not appear during recording, you can display them on the screen or remove them from the screen at any time during playback. VIEWFINDER T W VIEWFINDER O FF WIDE MODE 20 X ZOOM OFF DIS AGC GA I N UP TO FADER / W IPE MENU TO P.
EN 13 Loading/Unloading A Cassette If you have already installed a fully charged battery, you can open the door without external power. CASSETTE HOLDER OPEN/EJECT SWITCH CASSETTE COVER Erase protection switch PUSH HERE Once you open the cassette cover, a blank portion is recorded on the tape even if you close it before the cassette holder comes out. See page 26 for information about recording from the middle of a tape.
GETTING STARTED (Cont.) EN Hand Strap Attachment Diopter Adjustment The provided Hand Strap helps you to keep a firm hold on the camcorder. Make sure you never hold the camcorder without using the Hand Strap. Adjust the viewfinder display for best viewing. VIEWFINDER AY PL OFF R E C 5S POWER DIAL DIOPTER ADJUST LEVER 2 1 PAUSE 1 ATTACH HAND STRAP Slide the strap through the eyelet, pulling firmly to ensure secure attachment.
EN 15 RM-V708U Remote Control Unit You can use the RM-V708U to control the camcorder when it’s attached to the Docking Station. RECORDING START/STOP Button ( Z pg. 58) PAUSE IN connector (Z pg. 52) ZOOM Buttons ( Z pg. 48) DISPLAY Button (Z pg. 57) T POWER ON/OFF Button When the camcorder’s Power Dial is set to “PLAY”, you can turn the unit’s power on and off using the RM-V708U. W SHIFT Button (Z pg. 48) SLOW Rewind/Forward Buttons (Z pg. 43) LEFT/RIGHT Buttons (Z pg. 48) FADE/WIPE Button (Z pg.
RECORDING EN Full Auto/Manual Operation The following chart shows you which functions are available in the Full Auto and Manual operation modes. AUTO FOCUS EXP. WB SET PRO SELECT DIAL FULL AUTO MODE MANUAL MODE SELECT DIAL POSITION SELECT DIAL POSITION AUTO FOCUS EXP. WB PRO Snapshot (Z pg. 23) YES YES YES YES YES Scene (Z pg. 20)*2 YES*1 YES YES YES YES Self-Timer (Z pg. 26) YES YES YES YES YES Date/Time Display (Z pg.
EN 17 Menus The Recording Menu allows you to set these functions: Squeeze, Zoom Magnification, Digital Image Stabilizer, Gain Up, Fade/Wipe ( Z pg. 29), P.AE/Effects (Z pg. 34), Date/Time Menu , and System Menu. The following selection procedure applies to Squeeze, Zoom Magnification, Stabilization and Gain Up. VIEWFINDER O FF WIDE MODE 20 X ZOOM OFF DIS AGC GA I N UP TO F ADER / W IPE MENU TO P .
RECORDING (Cont.) EN 10X 20X 100X OFF SQUEEZE CINEMA O FF WIDE MODE 2 0X ZOOM OFF DIS AGC GA I N UP TO FADER / W IPE MENU TO P . AE / EFFECT MENU TO DAT E / TIME MENU TO SYSTEM MENU END I TEM ZOOM SW . SET SET BUTTON A AGC OFF ON OFF Wide Mode This recording mode is compatible with wide-screen TVs (16:9 aspect ratio). When using this mode, please refer to your wide-screen TV’s instruction manual. SQUEEZE–For playback on TVs with an aspect ratio of 16:9.
EN VIEWFINDER T W VIEWFINDER O FF WIDE MODE 2 0X ZOOM OFF DIS AGC GA I N UP TO FADER / W IPE MENU TO P . AE / EFFECT MENU TO DAT E / TIME MENU TO SYSTEM MENU END SCENE BEEP W IND CUT SOUND MODE I D No . I T EM ZOOM SW . SET SET BUTTON 5S ON OFF 4 8kHz 07 I T EM ZOOM SW . SET SET BUTTON END RECORDING MENU MENU BUTTON 19 SYSTEM MENU ZOOM LEVER SET BUTTON MANUAL AUTO FOCUS EXP.
RECORDING (Cont.) EN 5S 5SD ANIM. SCENE BEEP W IND CUT SOUND MODE I D No . END 5S ON OFF 4 8kHz ON OFF OFF AUTO 07 48 kHz 32 kHz I TEM ZOOM SW . SET SET BUTTON This number will be necessary in the future when connecting the camcorder to a computer [01 to 99]. Sound Beep Sound signals can be sampled at 48 kHz or 32 kHz. The beep sounds when the power is turned on or off, and at the beginning and end of recording. ON–To activate the beep. OFF–To turn off the beep.
EN 21 Basic Recording You should already have performed the necessary preparations (Z pgs. 10 – 22). Set the Select Dial to “AUTO” and try recording that way before attempting to use more advanced features. AY PL VIEWFINDER OFF R EC 5S REC STANDBY RECORDING START/STOP BUTTON POWER LAMP VIEWFINDER PAUSE AY PL DURING RECORDING AUTO OFF R E C FOCUS EXP. 5S SET WB PRO RECORD/STANDBY NOTE: Before starting recording, make sure you set the date and time (Z pg. 12).
RECORDING (Cont.) EN 29 min 3 0min REC 1 min blinking 0 min blinking 2 min blinking 3 min STOP PLAY /PAUSE RE SHOOT BUTTON CAN. BUTTON Tape Remaining Indicator Re Shoot A Scene The time remaining on the tape is automatically monitored and displayed in the viewfinder ( Z pg. 64). When the tape ends, “TAPE END” appears in the viewfinder.
RECORDING Advanced Features EN 23 STANDBY PRESS SNAPSHOT DURING RECORDING PRESS SNAPSHOT DURING RECORD/STANDBY SNAPSHOT BUTTON Snapshot Use your camcorder like a regular camera and take a snapshot, or several of them in succession. 1 PULL OUT VIEWFINDER Align its mark to “STANDBY”. The lens cover opens automatically. 2 TAKE SNAPSHOT Press SNAPSHOT. “PHOTO” appears in the viewfinder, and the image, bordered by a white frame, will be recorded and displayed in the viewfinder for 6 seconds.
RECORDING Advanced Features (Cont.) EN ZOOM LEVER Digital zoom zone D T 10X zoom zone W ZOOM DISPLAY T ZOOM IN (T: Tight) W D T D T D T D T W W W W T ZOOM OUT (W: Wide) W Zoom Select any one of the three powers of magnification and get “closer” to the subject (Z pg. 18). Simply slide the Zoom Lever to either zoom in (toward “+”) or zoom out (toward “–”). The Zoom speed is variable — the quicker you slide the Zoom Lever, the quicker the zoom action.
EN AY PL 25 OFF R E C 5S RECORDING START/STOP BUTTON STANDBY VIEWFINDER REC 5 S MODE Dissolve in the 5-Second mode Select “5SD” at the System Menu (Z pg. 19). “5SD MODE” appears in the viewfinder in step 2 below. Record one 5-second clip, and the image at the end of the clip is stored. If you record the next clip within 5 minutes, the previous scene dissolves as the new scene appears. * If you turn the power off, the stored image will be lost. After 5 sec.
RECORDING Advanced Features (Cont.) EN STANDBY VIEWFINDER AY PL OFF R E F . AUTO C F . AUTO ––– REC 5S PAUSE After 15 sec. RECORDING START/STOP BUTTON DURING RECORDING Self-Timer Once the camcorder is set, you (or whomever is operating the camcorder) can get into the scene, putting the final touch on a memorable picture. 1 PULL OUT VIEWFINDER 3 END RECORDING 2 SELECT MODE To Take A Snapshot In The Self-Timer Mode . . . .... in step 2, press SNAPSHOT instead of RECORDING START/STOP.
EN AY PL 27 OFF R EC 5S AY PL OFF R EC 5S RECORDING START/STOP BUTTON STOP PLAY REW FF /PAUSE RE SHOOT CAN. PLAY /PAUSE Recording From The Middle Of A Tape When removing a tape on which you were recording, or when you resume recording on a tape after playing back the recording previously made (without taking the tape out between recordings), perform this procedure. 1 SELECT MODE 2 START SEARCH Set the Power Dial to “PLAY”. Press PLAY, then press REW or FF.
RECORDING Advanced Features (Cont.) EN VIEWFINDER T W VIEWFINDER O FF WIDE MODE 20 X ZOOM OFF DIS AGC GA I N UP TO FADER / W IPE MENU TO P . AE / EFFECT MENU TO DAT E / TIME MENU TO SYSTEM MENU END ON SCREEN D I SPLAY DATE / TIME I T EM ZOOM SW . SET SET BUTTON END RECORDING MENU MENU BUTTON OFF OFF 25. 12. 96 17: 30 I T EM ZOOM SW . SET SET BUTTON DATE/TIME MENU ZOOM LEVER SET BUTTON MANUAL AUTO FOCUS EXP.
EN VIEWFINDER VIEWFINDER FADER / W I P E SEL EC T OFF 1 2 3 4 5 WH BK WH I T E F ADER B L ACK F ADER P D I SSOL VE CORNER W I PE W I NDOW W I PE 29 FADER / W IPE SELECT T OFF W 1 2 3 4 5 WH BK I T EM ZOOM SW . WH I TE FADER BLACK FADER P D I SSOL VE CORNER W I PE W I NDOW W I PE I TEM ZOOM SW . FADER/WIPE MENU After 2 sec. EFFECT AUTO WH FOCUS PAUSE EXP. SET WB PRO SET BUTTON SELECT DIAL POWER DIAL FADE/WIPE Effects Use these to spice up the transition from one scene to the next.
RECORDING Advanced Features (Cont.) EN FADE EXAMPLE WH WHITE FADER Fade In Fade Out WIPE EXAMPLE SCROLL WIPE Wipe In RECORDING START/STOP BUTTON Wipe Out Fades and Wipes A scene gradually appears on a black or white screen (Fade In/Wipe In), or disappears, leaving a black or white screen (Fade Out/Wipe Out). Select Fade or Wipe at the Fader/Wipe Menu (Z pg. 29).
EN Previous scene end 31 EXAMPLE P SCROLL WIPE The next scene gradually wipes in over the previous scene. Within 5 minutes . . . RECORDING START/STOP BUTTON Wipe In Picture Wipe/Dissolve Combine the Picture Wipe and Dissolve functions for a professional transition effect. There are 6 Picture Wipe effects and 1 Dissolve effect. Select the Picture Wipe effect at the Fader/Wipe Menu (Z pg. 29). If you want to use effects not currently appearing on the menu, exchange those appearing for others (Z pg.
RECORDING Advanced Features (Cont.) EN RECORDING START/STOP BUTTON Random Variations ?R RANDOM FADER: When this function is activated, the camcorder randomly selects the effect used in scene transition (from the Fade and Wipe effects). WH BK B/W 1 START RECORDING Press RECORDING START/STOP, and “ ? R ” appears in the viewfinder. The camcorder does the rest, selecting an effect at random. •The recording starts with a Fade In or Wipe In.
EN T W O FF WIDE MODE 2 0X ZOOM OFF DIS AGC GA I N UP TO F ADER / W IPE MENU TO P . AE / EFFECT MENU TO DAT E / TIME MENU TO SYSTEM MENU F ADER / W I P E CUSTOM I ZE 1 2 3 4 5 I T EM ZOOM SW . SET SET BUTTON END 33 WH BK END RECORDING MENU WH I T E F ADER B L ACK F ADER P D I SSOL VE CORNER W I PE W I NDOW W I PE I T EM ZOOM SW . SET SET BUTTON FADER/WIPE CUSTOMIZE MENU BUTTON ZOOM LEVER SET BUTTON AUTO FOCUS EXP.
RECORDING Advanced Features (Cont.) EN VIEWFINDER VIEWFINDER P . AE / E F F EC T SEL ECT OFF 1 1/250 SHUT T ER 1/250 TW I L I GH T 2 S EP I A 3 4 B/W B L ACK /WH ITE C L AS S I C F I L M 5 P . AE / EF F EC T SEL ECT T W OFF 1 1/250 SHUTTER 1/250 TW I L I GH T 2 SEP I A 3 4 B/W B L ACK / WH I TE C L ASS I C F I L M 5 I T EM ZOOM SW . I TEM ZOOM SW . P.AE/EFFECTS MENU (FACTORY SETTING) After 2 sec. EFFECT PAUSE AUTO FOCUS EXP.
EN B/W MONOTONE u Like classic black and white films, your footage is shot in B/W. Used together with the Wide Cinema function, it enhances the “classic film” effect. SEPIA 35 VIDEO ECHO Adds a “ghost” to the subject, giving your recording a “fantasy” feeling. u Recorded scenes have a brownish tint like old photos. Combine this with the Cinema mode for a classic look. STROBE CLASSIC FILM u SHUTTER (Variable (Shutter (Speed) Gives recorded scenes a strobe effect.
RECORDING Advanced Features (Cont.) EN VIEWFINDER T W VIEWFINDER O FF WIDE MODE 20 X ZOOM OFF DIS AGC GA I N UP TO F ADER / W IPE MENU TO P . AE / EFFECT MENU TO DAT E / TIME MENU TO SYSTEM MENU END P . AE / EF F EC T CUSTOM I ZE 1 1/250 SHUT T ER1/250 2 TW I L I GH T 3 SEP I A 4 B/W MONOTONE 5 C L ASS I C F I L M I T EM ZOOM SW . SET SET BUTTON END P.AE/EFFECT CUSTOMIZE MENU RECORDING MENU MENU BUTTON I TEM ZOOM SW . SET SET BUTTON ZOOM LEVER SET BUTTON AUTO FOCUS EXP.
EN 37 FOCUS ZONE (Focus is adjusted at the centre of the screen) FOCUS ZOOM LEVER T MANUAL FOCUS INDICATOR W AY PL AUTO OFF R EC FOCUS 5S EXP. SET WB SET BUTTON PRO POWER DIAL SELECT DIAL Manual Focus Adjustment The recorder, in most cases, adjusts the focus from 10 cm to infinity automatically. However, when focusing is difficult or when the subject is not in the middle of the viewfinder, adjust the focus manually. 1 SELECT MODE Set the Select Dial to “FOCUS”.
RECORDING Advanced Features (Cont.) EN EXP. 0 ZOOM LEVER T EXPOSURE DISPLAY W AY PL AUTO OFF R E C FOCUS 5S EXP. SET WB SET BUTTON PRO POWER DIAL SELECT DIAL Exposure Control Usually this is adjusted automatically. However, when the background is too bright or too dark in comparison with the subject, adjust the Exposure manually. 1 SELECT MODE Set the Select Dial to “EXP”. “EXP” is displayed in the viewfinder. 2 ADJUST EXPOSURE Slide the Zoom Lever while holding down SET.
EN 39 L IRIS LOCK INDICATOR AY PL AUTO OFF R EC FOCUS 5S EXP. SET BUTTON SET WB PRO POWER DIAL SELECT DIAL Iris Lock Use this function when shooting a moving subject, when zooming, when the subject changes its distance (thus its size in the viewfinder), or when you want to lock the brightness level. When the subject is close, keep the iris locked. Even when the subject moves away from you, the image will not darken. 1 SELECT MODE Set the Select Dial to “EXP”. “EXP.
RECORDING Advanced Features (Cont.) EN POWER DIAL SELECT DIAL AUTO MWB AUTO FOCUS EXP. WB SET WHITE BALANCE SELECT PRO ZOOM LEVER SET BUTTON WB PAUSE AUTO MWB T W White Balance Adjustment The white balance is usually adjusted automatically. However, when you want to shoot in various types of lighting, or when shooting a scene with changing tint, use this function. 1 SELECT MODE 4 ENTER SELECTION 2 ACCESS WHITE BALANCE DISPLAY To Return To Automatic White Balance . . .
EN 41 AUTO MWB WHITE PAPER T AUTO MWB W AUTO WB FOCUS PAUSE EXP. SET AUTO MWB WB PRO SET BUTTON MWB Operation Set this function before shooting subjects under various types of lighting. MODE 1 SELECT Z In step 3 of the White Balance adjustment ( pg. 40), select “MWB ”. 2 SET MWB Hold a sheet of plain white paper in front of the subject. Adjust zoom or position yourself so that the white paper fills the screen. 3 ENTER SETTING Press and hold SET.
PLAYBACK Basic Connections EN POWER DIAL RELEASE BUTTON TO DC INPUT JACK AC POWER ADAPTER/CHARGER To AC outlet LOCK LEVER MULTI JACK DOCKING STATION POWER CORD TO DC JACK Docking Station Attachment When you attach your camcorder to the Docking Station, you can add many interesting effects during playback. 1 CONFIRM POWER-OFF STATUS CAMCORDER IN DOCKING 2 PLACE STATION Make sure the camcorder’s power is off.
EN 43 TV Playback * Please refer to your VCR and/or TV instruction manual(s) when connecting. NOTE: During playback, if the camcorder is left on its side for an extended period, its surface will become very warm. It is recommended that you use the Docking Station (Z pg. 42) or the CAM Stand (Z pg. 10) during playback. AC POWER ADAPTER/CHARGER DC CORD TO DC OUTPUT JACK TO S-VIDEO INPUT JACK TO DC INPUT JACK S-VIDEO CABLE When an S-Video jack is available.
PLAYBACK Basic Connections (Cont.) EN VCR/TV Connection B MIC C c AV-OUT To AV OUT DC-IN 6V b A a CAM STAND AUDIO and VIDEO cable (ø3.5 DV TV or VCR) VIDEO OUT select switch (Y/C or CVBS) To AUDIO and VIDEO IN connectors Cable adapter (provided) CAMCORDER TO TV OR 1 CONNECT 6 START PLAYBACK Z VCR Connect as shown in the illustration. If your TV/VCR has the SCART connector, use the provided cable adapter. 2 ATTACH CAM STAND TO CAMCORDER Line up A with a , B with b and C with c .
PLAYBACK Basic Playback EN 45 You can watch what you’ve recorded in the viewfinder. AY PL OFF R EC 5S POWER LAMP REW RE SHOOT POWER DIAL PLAY /PAUSE OPERATION PANEL COVER 1 SELECT MODE Pull out the viewfinder and set the Power Dial to “PLAY”. 2 OPEN COVER Slide the camcorder’s Operation Panel cover as shown in the illustration. 3 REWIND TAPE Press REW. If you rewind all the way to the end of the tape, it stops automatically. 4 WATCH RECORDING 3 END PLAYBACK 5 Press PLAY.
PLAYBACK (Cont.) EN Playback Menu The Playback Menu allows you to set the following functions: Playback Sound (48 kHz, 32 kHz), Synchro Comp, Display and Time Code. The following procedure applies to all except Synchro Comp (Z pgs. 55–56). PLAYBACK MENU 4 8 kHz MODE 3 2 kHz MODE SYNCHRO D I SPLAY T I ME CODE POWER DIAL FULL SOUND SOUND 1 0.0 ON OFF I TEM ZOOM SW .
EN 47 Playback Sound During playback, the camcorder detects the sound mode in which the recording was made, and plays the sound back. Select the type of sound to accompany your playback picture. (48 kHz is preset to “FULL SOUND” and 32 kHz is preset to “SOUND 1”.
PLAYBACK Advanced Features EN POWER DIAL PLAY BUTTON PAUSE BUTTON Normal playback REMOTE SENSOR ZOOM BUTTONS Press T T W SHIFT BUTTON LEFT/RIGHT/UP/ DOWN BUTTONS STOP BUTTON PAUSE BUTTON Press © (RIGHT) to move image RM-V708U (provided) Playback Zoom The recorded pictures can be magnified up to 10x at any time during playback. 1 FIND ‘ZOOM’ SCENE 2 ACTIVATE ZOOM Press PLAY to start playback. Press ZOOM on the remote control.
EN 49 POWER DIAL PLAY BUTTON REMOTE SENSOR E F F EC T SEL ECT OFF 1 2 B/W 3 4 5 C L AS S I C F I L M MONOTONE S EP I A STROBE V I DEO ECHO P.AE EFFECT SELECT SCREEN (Playback) T EFFECT BUTTON W EFFECT ON/OFF BUTTON RM-V708U (provided) Playback Effects These effects allow you to be creative with the playback picture. You can use any one of the 5 effects. 1 START PLAYBACK PRODUCTION EFFECTS 2 ACCESS MENU Press PLAY. Point the remote control at the Docking Station’s sensor and press EFFECT.
EDITING EN Docking Station Refer to “Docking Station Attachment” on pages 42 and 43 for attachment procedures. Make sure the camcorder is attached to the Docking Station before beginning editing. Dubbing You can copy recorded scenes from the camcorder onto a videotape. Refer to your VCR’s instruction manual for details.
EN 51 Brand Setting Before you can perform Automatic Dubbing, or control the VCR using the RM-V708U remote control, you must set the VCR brand. The remote control is capable of controlling basic VCR functions (PLAY, FF, REW, PAUSE, STOP). After you’ve set the brand, point the remote at the VCR’s sensor and press the appropriate button. *Some video decks cannot be controlled. VCR (Recording deck) 3 T There are two types of signals: A [ Operation Confirmation When the VCR does not operate . . .
EDITING (Cont.) EN Random Assemble Editing Using the RM-V708U remote control, you can use P.AE/Effects and make an original edited tape.
EN 53 PROGRAMME IN RM-V708U (provided) POWER DIAL REMOTE SENSOR : 1 2 3 4 5 6 7 8 T I ME CODE TOTAL T W FADE/WIPE BUTTON EFFECT BUTTON EDIT IN/OUT BUTTON ~ ~ ~ ~ ~ ~ ~ ~ OUT : MODE : 00 : 00 RANDOM ASSEMBLE EDITING MENU PLAY BUTTON R.A.EDIT ON/OFF BUTTON CANCEL BUTTON 4 SET EDIT-IN POINT At the beginning of the scene, press EDIT IN/ OUT on the remote control. The Edit In position appears in the viewfinder and on the connected TV.
EDITING (Cont.) EN IN 1 2 3 4 5 6 7 8 WH OUT 00 : 25~02 : 05 03 : 33~05 : 53 09 : 30~13 : 15 : 15 : 55~ ~ ~ ~ T I ME CODE 15 : 55 TOT AL 09 : 02 FF BUTTON REW BUTTON MODE P P 07 : 18~08 : 31 B/W R.A.EDIT PROGRAMME SCREEN STOP BUTTON EDIT BUTTON T W RM-V708U (provided) FADE/WIPE BUTTON EFFECT BUTTON EDIT IN/OUT BUTTON 9 PREPARE SOURCE TAPE Rewind the tape in the camcorder to the beginning of the scene you want to edit and press PAUSE.
EN 55 VCR (Recording deck) REMOTE SENSOR PROGRAMME 1 T W RM-V708U (provided) ON/OFF BUTTON IN 1 2 3 4 5 6 7 8 : T I ME CODE TOT AL ~ ~ ~ ~ ~ ~ ~ ~ OUT : MODE : 00 : 00 R.A.EDIT PROGRAMME SCREEN For More Accurate Editing Some VCRs make the transition from RECORD/STANDBY to RECORD mode faster than others. Even if you begin editing for the camcorder and the VCR at exactly the same time, you may lose scenes you wanted, or find that you’ve recorded scenes you didn’t want.
EDITING (Cont.) EN VCR (Recording deck) SET BUTTON MENU BUTTON POWER DIAL ZOOM LEVER STOP BUTTON PLAY BUTTON 4 8 kHz MODE 3 2 kHz MODE SYNCHRO D I SPLAY T I ME CODE END FULL SOUND SOUND 1 0.0 ON OFF 4 8 kHz MODE 3 2 kHz MODE SYNCHRO D I SPLAY T I ME CODE T W I TEM ZOOM SW . SET SET BUTTON END FU LL SOUND SOUND 1 –0.1 ON OFF I TEM ZOOM SW .
EN 57 Audio Dubbing Using a tape recorded at 32 kHz, you can customize the soundtrack of a tape you’ve recorded. NOTE: Audio Dubbing is not possible on a tape recorded at 48 kHz. POWER DIAL EXT. MIC INPUT CONNECTOR REMOTE SENSOR DISPLAY BUTTON T W 6e AUDIO MONITOR BUTTON A.DUB BUTTON PLAY BUTTON STOP BUTTON PAUSE BUTTON AUDIO DUB STANDBY RM-V708U (provided) 1 FIND EDIT-IN POINT Play back the tape to locate the point where editing will start, then press PAUSE.
EDITING (Cont.) EN Insert Editing You can insert snapshots and other scenes in previously recorded footage. POWER DIAL REMOTE SENSOR RECORDING START/STOP BUTTON 6w T W DISPLAY BUTTON INSERT BUTTON 12:34 PLAY BUTTON PAUSE BUTTON REW(IND) BUTTON RM-V708U (provided) EDIT OUT POINT 1 FIND Z Confirm the time code at this point. ( pg. 47) 2 FIND EDIT IN POINT Press REW until the point is located, then press PAUSE.
TROUBLESHOOTING EN 59 If, after following the steps in the chart below, the problem still exists, please consult your nearest JVC dealer or Technical Service Center. SYMPTOM POSSIBLE CAUSES CORRECTIVE ACTION 1. No power is supplied. 1. •The power is not connected properly. •The battery is dead. •The viewfinder hasn’t been pulled out. 1. •Connect the AC Adapter securely (Z pg. 10). •Replace the dead battery with a fully charged one (Z pg. 9). •Pull the viewfinder out. 2.
EN SYMPTOM TROUBLESHOOTING (Cont.) POSSIBLE CAUSES CORRECTIVE ACTION 13. Digital Zoom doesn’t work. 13. •10x optical zoom is selected. •The Video Echo effect is activated. •Picture Wipe or Dissolve are being used in a scene transition. •5-Second recording was done with the Power Dial set to “5S”, and with “5SD” selected in the System Menu. •Snapshot Dissolve was attempted during Digital Zoom. 13. • Turn off the Video Echo effect. • Wait until the Picture Wipe or Dissolve effects are completed.
EN SYMPTOM POSSIBLE CAUSES 61 CORRECTIVE ACTION 18. The Picture Wipe function doesn’t work. 18. •The Slow (Slow Shutter) effect is activated. •The Squeeze or Cinema mode is selected in the Recording Menu. 18. •Make sure the Squeeze mode, Cinema mode, or Slow effect is not activated when preparing to use the Picture Wipe function. 19. Even when Slow (Slow Shutter) isn't selected, the image looks like it is activated. 19.
AFTER USE EN CASSETTE DOOR VIEWFINDER COVER BATTERY PACK CASSETTE HOLDER Audio/Video cable (ø3.5 DV TV or VCR) CAM STAND Cleaning The Camcorder Wipe gently with a soft cloth. 7 RESET VIEWFINDER Blow it with a blower brush, then wipe gently with lens cleaning paper. 8 CLOSE CASSETTE DOOR 1 CLEAN EXTERIOR 2 CLEAN LENS Close the viewfinder's cover and push the viewfinder back in.
CONTROLS, INDICATIONS AND CONNECTORS EN 63 Main Unit 1 Battery Pack Remaining Power Indicator changes as follows according to the battery pack’s remaining power level: 2 (Blinks) Fullly charged 3 2/3 Charge Remaining 1/3 Charge Remaining No Charge Remaining When the power is almost gone, the indicator blinks, then the unit shuts off. Replace the battery pack with a fully charged one.
EN CONTROLS, INDICATIONS AND CONNECTORS (Cont.) Viewfinder Indications p o i D T y t r u W 48kHz / FULL 1 2 3 45 678 F . AUTO 1 A PAUSE P 0 L PHOTO 3 0min REC 9 ! 6we # T AP E ! e 5 SD MODE SOUND 32 kHz 00: 00: 00 w q ) % 25. 12. 96 10 : 3 5 0 @ $ ^ & (* Recording And Playback No. 1 2 3 4 NAME & FUNCTION Select Dial Position GAIN UP Indicator Wide Mode (Z pg. 16) (Z pg. 18) (Z pg. 18) “Battery Low” Indicator No.
EN 65 Docking Station 1 2 3 45 6 # $ %^ @ ! 098 & 7 ) (* 1 Fan 2 3 4 5 6 7 8 9 0 ! Comes on automatically when camcorder is attached; serves to cool the unit down. Take care not to interfere with the blades. EDIT Button ........................................ Z pg. 54 CHARGE Indicator .............................. Z pg. 42 PAUSE Button ..................................... Z pg. 48 PLAY Button ........................................ Z pg. 48 RELEASE Button ..................................
CAUTIONS EN Battery Packs Cassettes The supplied battery pack is a lithium-ion battery. Before using the supplied battery pack or an optional battery pack, be sure to read the following cautions: To properly use and store your cassettes, be sure to read the following cautions: Cap Terminals Battery 1. To avoid hazard . . . .... .... .... .... do not burn. do not short-circuit the terminals. do not modify or disassemble. use only specified chargers. 2.
EN Main Unit 1. For safety, DO NOT . . . .... open the camcorder’s chassis. .... disassemble or modify the unit. .... short-circuit the terminals of the battery pack. Keep it away from metallic objects when not in use. .... allow inflammables, water or metallic objects to enter the unit. .... remove the battery pack or disconnect the power supply while the power is on. .... leave the battery pack attached when the camcorder is not in use. 2. Avoid using the unit . . . ....
SPECIFICATIONS EN MAIN UNIT General Power Power consumption Format Signal format Video signal recording format Data compression rate Digital compression technology Cassette Tape Speed Maximum recording time Continuous recoring time Fast-Forward/Rewind Time Pickup Zoom Lens diameter (Filter Diameter) Viewfinder White balance Iris Microphone Operating temperature Operating humidity Storage temperature Dimensions Weight During recording : DC 6 V (using AC Adapter), DC 3.6 V (using Battery) : 6.
EN Battery Pack BN-V712U Power Dimensions Weight : DC 3.6 V /1.250mAh : 20 mm (W) x 20 mm (H) x 71 mm (D) : Approx. 50 g Remote Control Unit RM-V708U Power Battery Life Effective distance Operating temperature Storage temperature Dimensions Weight : DC 3 V (Lithium Battery CR2025) : Approx. 1 year (depending on usage) : Approx. 5 m (front shaft) : 0°C — 40°C : –20°C — 50°C : 54 mm (W) x 86 mm (H) x 12 mm (D) : Approx.
EN GLOSSARY OF TERMS Iris Works like the pupil of the human eye. In a well-lighted environment, the human pupil contracts to keep too much light from entering. In low lighting, the pupil dilates to allow more light in. Colour temperature A measurement in Kelvin degrees which indicates the colour contents of a light source; bluish light has a higher colour temperature than reddish light.
INDEX A Animation ................................................ Z pg. 20 Audio Dubbing ........................................ Z pg. 57 Auto Focus ............................................... Z pg. 37 B Battery ....................................................... Z pg. 8 Battery Low .............................................. Z pg. 63 C Charging .................................................... Z pg. 8 Charging While Docked ........................... Z pg. 42 Cleaning The Camcorder ......
GR-DV1 VICTOR COMPANY OF JAPAN, LIMITED COPYRIGHT© 1996 VICTOR COMPANY OF JAPAN, LTD.