GR-DV1 DIGITAL VIDEO CAMERA ENGLISH CAMERA VIDEO NUMERIQUE CAMARA DE VIDEO DIGITAL ESPAÑOL FRANÇAIS GR-DV1 INSTRUCTIONS MANUEL D’INSTRUCTIONS MANUAL DE INSTRUCCIONES ed in Japan MSV UN YP * * For Customer Use: Enter below the Serial Nos. of the GR-DV1U camcorder and the AA-V70U AC Power Adapter/Charger. The serial numbers are located on the bottom of the GR-DV1U and the AA-V70U. Model No. GR-DV1U/AA-V70U Serial No.
Dear Customer, Thank you for purchasing this Digital Video Camera. Before use, please read the safety information and precautions contained in the following pages to ensure safe use of this product. Using This Instruction Manual • All major sections and subsections are listed in the Table Of Contents (Z pg. 9). • Notes appear after most subsections. Be sure to read these as well. • Basic and advanced features/operation are separated for easier reference. It is recommended that you . . . ......
SAFETY PRECAUTIONS CAUTION: 3 About Batteries DANGER! Do not attempt to take the batteries apart, or expose them to flame or excessive heat, as there is a risk of fire or explosion. WARNING! Do not allow the battery terminals, or the battery itself, to come in contact with metals, as this can result in a short circuit and possibly start a fire. • When transporting, make sure the provided battery cap is attached to the battery. If you misplace the battery cap, carry the battery in a plastic bag.
IMPORTANT PRODUCT SAFETY INSTRUCTIONS Electrical energy can perform many useful functions. But improper use can result in potential electrical shock or fire hazards. This product has been engineered and manufactured to assure your personal safety. In order not to defeat the built-in safeguards, observe the following basic rules for its installation, use and servicing. ATTENTION: Follow and obey all warnings and instructions marked on your product and its operating instructions.
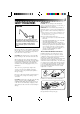
USE SERVICING 1. Accessories 1. Servicing To avoid personal injury: • Do not place this product on an unstable cart, stand, tripod, bracket or table. It may fall, causing serious injury to a child or adult, and serious damage to the product. • Use only with a cart, stand, tripod, bracket, or table recommended by the manufacturer or sold with the product. • Use a mounting accessory recommended by the manufacturer and follow the manufacturer’s instructions for any mounting of the product.
ABOUT DVC The digital video camera converts incoming audio and video signals into digital form for recording. A video signal is composed of a luminance signal (Y) and color signals (R-Y and B-Y). These signals are identified and recorded digitally (Digital Component Recording). The A/D (Analog to Digital) converter samples the Y signal at 13.5 MHz, and R-Y and B-Y at 3.375 MHz, and changes them to an 8-bit quantum signal.
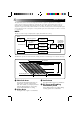
QUICK OPERATION GUIDE CASSETTE COVER CASSETTE HOLDER OPEN/EJECT SWITCH STANDBY PAUSE POWER LAMP BATTERY COVER AY PL OFF R EC 5S REC RECORDING START/STOP BUTTON SUPPLYING POWER RECORDING Install A Fully Charged Battery 1 2 3 Pull out the viewfinder and align the mark with “STANDBY”. The lens cover opens automatically. LOADING A CASSETTE 4 When you’re finished, push the viewfinder in, aligning its mark with “CAMERA OFF”.
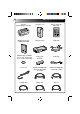
PROVIDED ACCESSORIES AC Power Adapter/Charger AA-V70U Soft camera case Remote control unit RM-V708U T MiniDV Cassette Tape 30 min M-DV30ME W Docking Station CAM Stand Battery pack BN-V712U Hand strap Power cord AUDIO and VIDEO cable (Phono Docking Station TV or VCR) AUDIO and VIDEO cable (ø3.
CONTENTS ABOUT DVC QUICK OPERATION GUIDE PROVIDED ACCESSORIES GETTING STARTED 6 7 8 10 Charging The Battery ................................................................. 10 Installing The Battery ................................................................. 11 Indoor Use .............................................................................. 12 Using The CAM Stand ................................................................. 12 Clock (Lithium) Battery Insertion/Removal ..............
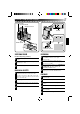
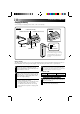
GETTING STARTED Charging The Battery You can charge one battery pack at a time, or two consecutively. ATTACH CHARGE INDICATOR 1 CHARGE INDICATOR 2 DETACH BATTERY PACK BN-V712U RED POWER CORD DC JACK BLACK CHARGE MARKER POWER LAMP • The charge marker does not move by itself. After charging or removing a discharged battery, be sure to set the marker to the predetermined position. Charge Marker The charge marker makes it easy for you to differentiate between charged and discharged batteries.
NOTES: ● If you connect the camcorder’s DC cord to the adapter during battery charging, power is supplied to the camcorder and charging stops. ● When using the AC Power Adapter/Charger, be sure to use the supplied power cord only. ● The AC Power Adapter/Charger is for use with the BN-V712U Battery Pack only. ● When charging the Battery Pack for the first time or after a long storage period, the Charge Indicator may not light.
GETTING STARTED (Cont.) AC POWER ADAPTER/CHARGER POWER CORD MIC AV-OUT DC-IN 6V DC CORD Connector is under this cover CAM STAND Indoor Use Using The CAM Stand When using the camcorder indoors, you can use the AC Adapter instead of a battery. During Recording 1 SUPPLY POWER TO ADAPTER Connect the power cord between the AC Adapter and an AC outlet. 2 SUPPLY POWER TO CAMCORDER Connect the AC Adapter to the camcorder.
Clock (Lithium) Battery CR2025 Insertion/Removal This battery is necessary to operate the clock and to perform date/time settings. BATTERY COVER 1 OPEN BATTERY COVER 2 REMOVE OLD BATTERY Slide off as shown in the illustration. Pull the battery holder out as shown, and slide the battery down and out of the holder. 3 INSERT NEW BATTERY Insert the battery, with the “+” side showing, in the holder. Then insert the battery holder in the battery cover.
GETTING STARTED (Cont.) Date/Time Settings If you set the date and time beforehand, the data will automatically be recorded separately from the video signal. Even if the date and time do not appear during recording, you can display them on the screen or remove them from the screen at any time during playback. VIEWFINDER T W VIEWFINDER O FF WIDE MODE 20 X ZOOM OFF DIS AGC GA I N UP TO FADER / W IPE MENU TO P.
Loading/Unloading A Cassette If you have already installed a fully charged battery, you can open the door without external power. CASSETTE HOLDER CASSETTE COVER OPEN/EJECT SWITCH PUSH Make sure the window side is facing out. 1 OPEN CASSETTE DOOR Turn on the power, then slide the OPEN/EJECT switch in the direction of the arrow. The cassette cover releases. Open the cover in the direction of the arrow until it locks. The holder opens automatically. •Do not touch internal components.
GETTING STARTED (Cont.) Hand Strap Attachment Diopter Adjustment The provided Hand Strap helps you to keep a firm hold on the camcorder. Make sure you never hold the camcorder without using the Hand Strap. Adjust the viewfinder display for best viewing. VIEWFINDER AY PL OFF R E C 5S POWER DIAL DIOPTER ADJUST LEVER 2 1 PAUSE 1 ATTACH HAND STRAP Slide the strap through the eyelet, pulling firmly to ensure secure attachment.
RM-V708U Remote Control Unit You can use the RM-V708U to control the camcorder when it’s attached to the Docking Station. RECORDING START/STOP Button ( Z pg. 60) PAUSE IN connector (Z pg. 54) ZOOM Buttons ( Z pg. 50) DISPLAY Button (Z pg. 59) T POWER ON/OFF Button When the camcorder’s Power Dial is set to “PLAY”, you can turn the unit’s power on and off using the RM-V708U. W SHIFT Button (Z pg. 50) SLOW Rewind/Forward Buttons (Z pg. 45) LEFT/RIGHT Buttons (Z pg. 50) FADER/WIPE Button ( Z pg.
RECORDING Full Auto/Manual Operation The following chart shows you which functions are available in the Full Auto and Manual operation modes. AUTO FOCUS EXP. WB SET PRO SELECT DIAL FULL AUTO MODE MANUAL MODE SELECT DIAL POSITION SELECT DIAL POSITION AUTO FOCUS EXPOSURE WB PRO Snapshot (Z pg. 25) YES YES YES YES YES Scene (Z pg. 22)*2 YES*1 YES YES YES YES YES YES YES YES YES AUTO/LOCK Self-Timer (Z pg. 28) Focus (Z pg. 39) D.I.Stabilizer (Z pg. 20) Exposure Control (Z pg.
Menus The Recording Menu allows you to set these functions: Squeeze, Zoom Magnification, Digital Image Stabilizer, Gain Up, FADE/WIPE, P.AE/EFFECT, Date/Time Menu, and System Menu. The following selection procedure applies to Squeeze, Zoom Magnification, Stabilization and Gain Up. VIEWFINDER O FF WIDE MODE 20 X ZOOM OFF DIS AGC GA I N UP TO F ADER / W IPE MENU TO P .
RECORDING (Cont.) 10X 20X 100X OFF SQUEEZE CINEMA O FF WIDE MODE 2 0X ZOOM OFF DIS AGC GA I N UP TO FADER / W IPE MENU TO P . AE / EFFECT MENU TO DAT E / TIME MENU TO SYSTEM MENU END I TEM ZOOM SW . SET SET BUTTON A AGC OFF ON OFF Wide Mode This recording mode is compatible with wide-screen TVs (16:9 aspect ratio). When using this mode, please refer to your wide-screen TV’s instruction manual. SQUEEZE–For playback on TVs with an aspect ratio of 16:9.
VIEWFINDER T W VIEWFINDER O FF WIDE MODE 2 0X ZOOM OFF DIS AGC GA I N UP TO FADER / W IPE MENU TO P . AE / EFFECT MENU TO DAT E / TIME MENU TO SYSTEM MENU END SCENE BEEP W IND CUT SOUND MODE I D No . I T EM ZOOM SW . SET SET BUTTON MENU BUTTON 07 I T EM ZOOM SW . SET SET BUTTON END RECORDING MENU 5S ON OFF 4 8kHz SYSTEM MENU ZOOM LEVER SET BUTTON MANUAL AUTO FOCUS EXP.
RECORDING (Cont.) 5S 5SD ANIM. SCENE BEEP W IND CUT SOUND MODE I D No . END 5S ON OFF 4 8kHz ON OFF OFF AUTO 07 48 kHz 32 kHz I TEM ZOOM SW . SET SET BUTTON This number will be necessary in the future when connecting the camcorder to a computer [01 to 99]. Sound Beep Sound signals can be sampled at 48 kHz or 32 kHz. The beep sounds when the power is turned on or off, and at the beginning and end of recording. ON–To activate the beep. OFF–To turn off the beep.
Basic Recording You should already have performed the necessary preparations (Z pgs. 10 – 22). Set the Select Dial to “AUTO” and try recording that way before attempting to use more advanced features. AY PL VIEWFINDER OFF R EC 5S REC STANDBY RECORDING START/STOP BUTTON POWER LAMP VIEWFINDER PAUSE AY PL DURING RECORDING AUTO OFF R E C FOCUS EXP. 5S SET WB PRO RECORD/STANDBY NOTE: Before starting recording, make sure you set the date and time (Z pg. 14).
RECORDING (Cont.) 29 min 3 0min REC 1 min blinking 0 min blinking 2 min blinking 3 min STOP PLAY /PAUSE RE SHOOT BUTTON CAN. BUTTON Tape Remaining Indicator Re Shoot A Scene The time remaining on the tape is automatically monitored and displayed in the viewfinder ( Z pg. 66). When the tape ends, “TAPE END” appears in the viewfinder. If you aren’t pleased with a scene you just recorded (after having checked it in the viewfinder), you can easily return to the beginning and record it again.
RECORDING Advanced Features STANDBY PRESS SNAPSHOT DURING RECORDING PRESS SNAPSHOT DURING RECORD/STANDBY SNAPSHOT BUTTON Snapshot Use your camcorder like a regular camera and take a snapshot, or several of them in succession. 1 PULL OUT VIEWFINDER Align its mark to “STANDBY”. The lens cover opens automatically. 2 TAKE SNAPSHOT Press SNAPSHOT. “PHOTO” appears in the viewfinder, and the image, bordered by a white frame, will be recorded and displayed in the viewfinder for 6 seconds.
RECORDING Advanced Features (Cont.) ZOOM LEVER Digital zoom zone D T 10X zoom zone W ZOOM DISPLAY T ZOOM IN (T: Tight) W D T D T D T D T W W W W T ZOOM OUT (W: Wide) W Zoom Select any one of the three powers of magnification and get “closer” to the subject (Z pg. 20). Simply slide the Zoom Lever to either zoom in (toward “+”) or zoom out (toward “–”). The Zoom speed is variable — the quicker you slide the Zoom Lever, the quicker the zoom action.
AY PL OFF R E C 5S RECORDING START/STOP BUTTON STANDBY VIEWFINDER REC 5 S MODE Dissolve in the 5-Second mode Select “5SD” at the System Menu (Z pg. 21). “5SD MODE” appears in the viewfinder in step 2 below. Record one 5-second clip, and the image at the end of the clip is stored. If you record the next clip within 5 minutes, the previous scene dissolves as the new scene appears. * If you turn the power off, the stored image will be lost. After 5 sec.
RECORDING Advanced Features (Cont.) STANDBY VIEWFINDER AY PL OFF R E F . AUTO C F . AUTO ––– REC 5S PAUSE After 15 sec. RECORDING START/STOP BUTTON DURING RECORDING Self-Timer Once the camcorder is set, you (or whomever is operating the camcorder) can get into the scene, putting the final touch on a memorable picture. 1 PULL OUT VIEWFINDER 3 END RECORDING 2 SELECT MODE To Take A Snapshot In The Self-Timer Mode . . . ..... in step 2, press SNAPSHOT instead of RECORDING START/STOP.
AY PL OFF R EC 5S AY PL OFF R EC 5S RECORDING START/STOP BUTTON STOP PLAY REW FF /PAUSE RE SHOOT CAN. PLAY /PAUSE Recording From The Middle Of A Tape When removing a tape on which you were recording, or when you resume recording on a tape after playing back the recording previously made (without taking the tape out between recordings), perform this procedure. 1 SELECT MODE 2 START SEARCH Set the Power Dial to “PLAY”. Press PLAY, then press REW or FF.
RECORDING Advanced Features (Cont.) VIEWFINDER T W VIEWFINDER O FF WIDE MODE 20 X ZOOM OFF DIS AGC GA I N UP TO FADER / W IPE MENU TO P . AE / EFFECT MENU TO DAT E / TIME MENU TO SYSTEM MENU END ON SCREEN D I SPLAY DATE / TIME I T EM ZOOM SW . SET SET BUTTON END RECORDING MENU MENU BUTTON OFF OFF DEC 2 5 ’ 96 PM 5 : 30 I T EM ZOOM SW . SET SET BUTTON DATE/TIME MENU ZOOM LEVER SET BUTTON MANUAL AUTO FOCUS EXP.
VIEWFINDER VIEWFINDER FADER / W I P E SEL EC T OFF 1 2 3 4 5 WH BK WH I T E F ADER B L ACK F ADER P D I SSOL VE CORNER W I PE W I NDOW W I PE FADER / W IPE SELECT T OFF W 1 2 3 4 5 WH BK I T EM ZOOM SW . WH I TE FADER BLACK FADER P D I SSOL VE CORNER W I PE W I NDOW W I PE I TEM ZOOM SW . FADER/WIPE MENU After 2 sec. EFFECT AUTO WH FOCUS PAUSE EXP. SET WB PRO SET BUTTON SELECT DIAL POWER DIAL FADE/WIPE Effects Use these to spice up the transition from one scene to the next.
RECORDING Advanced Features (Cont.) FADE EXAMPLE WH WHITE FADER Fade In Fade Out WIPE EXAMPLE SCROLL WIPE Wipe In RECORDING START/STOP BUTTON Wipe Out Fades and Wipes A scene gradually appears on a black or white screen (Fade In/Wipe In), or disappears, leaving a black or white screen (Fade Out/Wipe Out). Select Fade or Wipe at the Fader/Wipe Menu (Z pg. 31).
Previous scene end EXAMPLE P SCROLL WIPE The next scene gradually wipes in over the previous scene. Within 5 minutes . . . RECORDING START/STOP BUTTON Wipe In Picture Wipe/Dissolve Combine the Picture Wipe and Dissolve functions for a professional transition effect. There are 6 Picture Wipe effects and 1 Dissolve effect. Select the Picture Wipe effect at the Fader/Wipe Menu (Z pg. 31). If you want to use effects not currently appearing on the menu, exchange those appearing for others (Z pg. 35).
RECORDING Advanced Features (Cont.) RECORDING START/STOP BUTTON Random Variations ?R RANDOM FADER: When this function is activated, the camcorder randomly selects the effect used in scene transition (from the Fade and Wipe effects). WH BK B/W 1 START RECORDING Press RECORDING START/STOP, and “ ? P ” appears in the viewfinder. The camcorder does the rest, selecting an effect at random. •The recording starts with a Fade In or Wipe In.
T W O FF WIDE MODE 2 0X ZOOM OFF DIS AGC GA I N UP TO F ADER / W IPE MENU TO P . AE / EFFECT MENU TO DAT E / TIME MENU TO SYSTEM MENU F ADER / W I P E CUSTOM I ZE 1 2 3 4 5 I T EM ZOOM SW . SET SET BUTTON END WH BK END RECORDING MENU WH I T E F ADER B L ACK F ADER P D I SSOL VE CORNER W I PE W I NDOW W I PE I T EM ZOOM SW . SET SET BUTTON FADER/WIPE CUSTOMIZE MENU BUTTON ZOOM LEVER SET BUTTON AUTO FOCUS EXP.
RECORDING Advanced Features (Cont.) VIEWFINDER VIEWFINDER P . AE / E F F EC T SEL ECT OFF 1 1/250 SHUT T ER 1/250 TW I L I GH T 2 S EP I A 3 4 B/W B L ACK /WH ITE C L AS S I C F I L M 5 P . AE / EF F EC T SEL ECT T W OFF 1 1/250 SHUTTER 1/250 TW I L I GH T 2 SEP I A 3 4 B/W B L ACK / WH I TE C L ASS I C F I L M 5 I T EM ZOOM SW . I TEM ZOOM SW . P.AE/EFFECTS MENU (FACTORY SETTING) After 2 sec. EFFECT PAUSE AUTO FOCUS EXP.
B/W MONOTONE u Like classic black and white films, your footage is shot in B/W. Used together with the Wide Cinema function, it enhances the “classic film” effect. SEPIA VIDEO ECHO Adds a “ghost” to the subject, giving your recording a “fantasy” feeling. u Recorded scenes have a brownish tint like old photos. Combine this with the Cinema mode for a classic look. STROBE CLASSIC FILM u SHUTTER (Variable (Shutter (Speed) Gives recorded scenes a strobe effect.
RECORDING Advanced Features (Cont.) VIEWFINDER T W VIEWFINDER O FF WIDE MODE 20 X ZOOM OFF DIS AGC GA I N UP TO F ADER / W IPE MENU TO P . AE / EFFECT MENU TO DAT E / TIME MENU TO SYSTEM MENU END P . AE / EF F EC T CUSTOM I ZE 1 1/250 SHUT T ER1/250 2 TW I L I GH T 3 SEP I A 4 B/W MONOTONE 5 C L ASS I C F I L M I T EM ZOOM SW . SET SET BUTTON END P.AE/EFFECT CUSTOMIZE MENU RECORDING MENU MENU BUTTON I TEM ZOOM SW . SET SET BUTTON ZOOM LEVER SET BUTTON AUTO FOCUS EXP.
FOCUS ZONE (Focus is adjusted at the center of the screen) FOCUS ZOOM LEVER T MANUAL FOCUS INDICATOR W AY PL AUTO OFF R EC FOCUS 5S EXP. SET WB SET BUTTON PRO POWER DIAL SELECT DIAL Manual Focus Adjustment The recorder, in most cases, adjusts the focus from 10 cm to infinity automatically. However, when focusing is difficult or when the subject is not in the middle of the viewfinder, adjust the focus manually. 1 SELECT MODE Set the Select Dial to “FOCUS”.
RECORDING Advanced Features (Cont.) EXP. 0 ZOOM LEVER T EXPOSURE DISPLAY W AY PL AUTO OFF R E C FOCUS 5S EXP. SET WB SET BUTTON PRO POWER DIAL SELECT DIAL Exposure Control Usually this is adjusted automatically. However, when the background is too bright or too dark in comparison with the subject, adjust the Exposure manually. 1 SELECT MODE Set the Select Dial to “EXP”. “EXP” is displayed in the viewfinder. 2 ADJUST EXPOSURE Slide the Zoom Lever while holding down SET.
L IRIS LOCK INDICATOR AY PL AUTO OFF R EC FOCUS 5S EXP. SET BUTTON SET WB PRO POWER DIAL SELECT DIAL Iris Lock Use this function when shooting a moving subject, when zooming, when the subject changes its distance (thus its size in the viewfinder), or when you want to lock the brightness level. When the subject is close, keep the iris locked. Even when the subject moves away from you, the image will not darken. 1 SELECT MODE Set the Select Dial to “EXP”. “EXP.
RECORDING Advanced Features (Cont.) POWER DIAL SELECT DIAL AUTO MWB AUTO FOCUS EXP. WB SET WHITE BALANCE SELECT PRO ZOOM LEVER SET BUTTON WB PAUSE AUTO MWB T W White Balance Adjustment The white balance is usually adjusted automatically. However, when you want to shoot in various types of lighting, or when shooting a scene with changing tint, use this function. 1 SELECT MODE 4 ENTER SELECTION 2 ACCESS WHITE BALANCE DISPLAY To Return To Automatic White Balance . . .
AUTO MWB WHITE PAPER T AUTO MWB W AUTO WB FOCUS PAUSE EXP. SET AUTO MWB WB PRO SET BUTTON MWB Operation Set this function before shooting subjects under various types of lighting. MODE 1 SELECT Z In step 3 of the White Balance adjustment ( pg. 42), select “MWB ”. 2 SET MWB Hold a sheet of plain white paper in front of the subject. Adjust zoom or position yourself so that the white paper fills the screen. 3 ENTER SETTING Press and hold SET.
PLAYBACK Basic Connections POWER DIAL RELEASE BUTTON TO DC INPUT JACK AC OUTLET AC POWER ADAPTER/CHARGER LOCK LEVER MULTI JACK DOCKING STATION POWER CORD TO DC JACK Docking Station Attachment When you attach your camcorder to the optional Docking Station, you can add many interesting effects during playback. 1 CONFIRM POWER-OFF STATUS CAMCORDER IN DOCKING 2 PLACE STATION Make sure the camcorder’s power is off.
TV Playback * Please refer to your VCR and/or TV instruction manual(s) when connecting. NOTES: ● If feedback or howling occurs during TV Playback, move the Docking Station so the camcorder’s microphone is away from the TV, or turn down the TV’s volume. ● If RECORD/STANDBY (Pause) is engaged for 5 minutes, the Stop mode is automatically activated to protect the heads. ● During playback, if the camcorder is left on its side for an extended period, its surface will become very warm.
PLAYBACK Basic Connections (Cont.) VCR/TV Connection B MIC C c AV-OUT To AV OUT DC-IN 6V b A a CAM STAND AUDIO and VIDEO cable (ø3.5 DV TV or VCR) To AUDIO and VIDEO IN connectors CAMCORDER TO TV OR 1 CONNECT 6 START PLAYBACK Z VCR Connect as shown in the illustration. CAM STAND TO 2 ATTACH CAMCORDER Line up A with a , B with b and C with c . The CAM Stand has two sides. One side is used to hold the camcorder upright and the other side is used to hold the camcorder flat.
PLAYBACK Basic Playback You can watch what you’ve recorded in the viewfinder. AY PL OFF R EC 5S POWER LAMP REW RE SHOOT POWER DIAL PLAY /PAUSE OPERATION PANEL COVER 1 SELECT MODE Pull out the viewfinder and set the Power Dial to “PLAY”. 2 OPEN COVER Slide the camcorder’s Operation Panel cover as shown in the illustration. 3 REWIND TAPE Press REW. If you rewind all the way to the end of the tape, it stops automatically. 4 WATCH RECORDING 3 END PLAYBACK 5 Press PLAY.
PLAYBACK (Cont.) Playback Menu The Playback Menu allows you to set the following functions: Playback Sound (48 kHz, 32 kHz), Synchro Comp, Display and Time Code. The following procedure applies to all except Synchro Comp (Z pgs. 57–58). PLAYBACK MENU 4 8 kHz MODE 3 2 kHz MODE SYNCHRO D I SPLAY T I ME CODE POWER DIAL FULL SOUND SOUND 1 0.0 ON OFF I TEM ZOOM SW .
Playback Sound During playback, the camcorder detects the sound mode in which the recording was made, and plays the sound back. Select the type of sound to accompany your playback picture. (48 kHz is preset to “FULL SOUND” and 32 kHz is preset to “SOUND 1”.
PLAYBACK Advanced Features POWER DIAL PLAY BUTTON Normal playback REMOTE SENSOR ZOOM BUTTONS Press T T W SHIFT BUTTON LEFT/RIGHT/UP/ DOWN BUTTONS STOP BUTTON PAUSE BUTTON Press © (RIGHT) to move image RM-V708U (provided) Playback Zoom The recorded pictures can be magnified up to 10x at any time during playback. 1 FIND ‘ZOOM’ SCENE 4 END ZOOM 2 ACTIVATE ZOOM NOTES: Press PLAY to start playback, then press PAUSE when you find the scene you want to magnify. Press ZOOM on the remote control.
POWER DIAL PLAY BUTTON REMOTE SENSOR P . AE / E F F EC T SEL ECT OFF 1 2 B/W 3 4 5 C L AS S I C F I L M MONOTONE S EP I A STROBE V I DEO ECHO P.AE EFFECT SELECT SCREEN (Playback) T EFFECT BUTTON W EFFECT ON/OFF BUTTON RM-V708U (provided) Playback Program AE/Effects These effects allow you to be creative with the playback picture. You can use any one of the 5 effects. 1 START PLAYBACK PRODUCTION EFFECTS 2 ACCESS MENU Press PLAY.
EDITING Docking Station Refer to “Docking Station Attachment” on pages 44 and 45 for attachment procedures. Make sure the camcorder is attached to the Docking Station before beginning editing. Dubbing You can copy recorded scenes from the camcorder onto a videotape. Refer to your VCR’s instruction manual for details.
Brand Setting Before you can perform Automatic Dubbing, or control the VCR using the RM-V708U remote control, you must set the VCR brand. The remote control is capable of controlling basic VCR functions (PLAY, FF, REW, PAUSE, STOP). After you’ve set the brand, point the remote at the VCR’s sensor and press the appropriate button. *Some video decks cannot be controlled. There are two types of signals: A [ Operation Confirmation When the VCR does not operate . . .
EDITING (Cont.) Random Assemble Editing Using the RM-V708U remote control, you can use P.AE/Effects and make an original edited tape.
PROGRAM IN RM-V708U (provided) POWER DIAL REMOTE SENSOR : 1 2 3 4 5 6 7 8 T I ME CODE TOTAL T W FADER/WIPE BUTTON EFFECT BUTTON EDIT IN/OUT BUTTON ~ ~ ~ ~ ~ ~ ~ ~ OUT : : 00 : 00 RANDOM ASSEMBLE EDITING MENU PLAY BUTTON R.A.EDIT ON/OFF BUTTON CANCEL BUTTON 4 SET EDIT-IN POINT At the beginning of the scene, press EDIT IN/ OUT on the remote control. The Edit In position appears in the viewfinder and on the connected TV. 5 SET EDIT-OUT POINT At the end of the scene, press EDIT IN/OUT.
EDITING (Cont.) IN OUT 1 WH 00 : 25~02 : 05 P 2 P 07 : 18~08 : 31 OFF 3 OFF 03 : 33~05 : 53 4 09 : 30~13 : 15 : 5 15 : 55~ 6 ~ 7 ~ 8 ~ T I ME CODE 015 : 55 TOT AL 009 : 02 REW BUTTON STOP BUTTON B/W R.A.EDIT PROGRAM SCREEN EDIT BUTTON T W RM-V708U (provided) FADE/WIPE BUTTON EFFECT BUTTON EDIT IN/OUT BUTTON 9 PREPARE SOURCE TAPE Rewind the tape in the camcorder to the beginning of the scene you want to edit and press PAUSE.
VCR (Recording deck) REMOTE SENSOR PROGRAM 1 T W RM-V708U (provided) ON/OFF BUTTON IN 1 2 3 4 5 6 7 8 : T I ME CODE TOT AL ~ ~ ~ ~ ~ ~ ~ ~ OUT : : 00 : 00 R.A.EDIT PROGRAM SCREEN For More Accurate Editing Some VCRs make the transition from RECORD/STANDBY to RECORD mode faster than others. Even if you begin editing for the camcorder and the VCR at exactly the same time, you may lose scenes you wanted, or find that you’ve recorded scenes you didn’t want.
EDITING (Cont.) VCR (Recording deck) SET BUTTON MENU BUTTON POWER DIAL ZOOM LEVER STOP BUTTON PLAY BUTTON 4 8 kHz MODE 3 2 kHz MODE SYNCHRO D I SPLAY T I ME CODE END FULL SOUND SOUND 1 0.0 ON OFF 4 8 kHz MODE 3 2 kHz MODE SYNCHRO D I SPLAY T I ME CODE T W I TEM ZOOM SW . SET SET BUTTON END FU LL SOUND SOUND 1 –0.1 ON OFF I TEM ZOOM SW .
Audio Dubbing Using a tape recorded at 32 kHz, you can customize the soundtrack of a tape you’ve recorded. NOTE: Audio Dubbing is not possible on a tape recorded at 48 kHz. POWER DIAL EXT. MIC INPUT CONNECTOR REMOTE SENSOR DISPLAY BUTTON T W 6e AUDIO MONITOR BUTTON A.DUB BUTTON PLAY BUTTON STOP BUTTON PAUSE BUTTON AUDIO DUB STANDBY RM-V708U (provided) 1 FIND EDIT-IN POINT Play back the tape to locate the point where editing will start, then press PAUSE.
EDITING (Cont.) Insert Editing You can insert snapshots and other scenes in previously recorded footage. POWER DIAL REMOTE SENSOR RECORDING START/STOP BUTTON 6w T W DISPLAY BUTTON INSERT BUTTON 12:34 PLAY BUTTON PAUSE BUTTON REW(IND) BUTTON RM-V708U (provided) EDIT OUT POINT 1 FIND Z Confirm the time code at this point. ( pg. 49) 2 FIND EDIT IN POINT Press REW until the point is located, then press PAUSE.
TROUBLESHOOTING If, after following the steps in the chart below, the problem still exists, please consult your nearest JVC dealer or Technical Service Center. SYMPTOM POSSIBLE CAUSES CORRECTIVE ACTION 1. No power is supplied. 1. •The power is not connected properly. •The battery is dead. •The viewfinder hasn’t been pulled out. 1. •Connect the AC Adapter securely (Z pg. 12). •Replace the dead battery with a fully charged one (Z pg. 11). •Pull the viewfinder out. 2. Recording cannot be performed.
TROUBLESHOOTING (Cont.) SYMPTOM POSSIBLE CAUSES CORRECTIVE ACTION 13. Digital Zoom doesn’t work. 13. •10X optical zoom is selected. •The Video Echo effect is activated. •Picture Wipe or Dissolve are being used in a scene transition. •5-Second recording was done with the Power Dial set to “5S”, and with “5SD” selected in the System Menu. •Snapshot Dissolve was attempted during Digital Zoom. 13. • Turn off the Video Echo effect. • Wait until the Picture Wipe or Dissolve effects are completed.
SYMPTOM POSSIBLE CAUSES CORRECTIVE ACTION 18. The Picture Wipe function doesn’t work. 18. •The Slow (Slow Shutter) effect is activated. •The Squeeze or Cinema mode is selected in the Recording Menu. 18. •Make sure the Squeeze mode, Cinema mode, or Slow effect is not activated when preparing to use the Picture Wipe function. 19. Even when Slow (Slow Shutter) isn't selected, the image looks like it is activated. 19.
AFTER USE CASSETTE DOOR VIEWFINDER COVER BATTERY PACK CASSETTE HOLDER Audio/Video cable (ø3.5 DV TV or VCR) CAM STAND Cleaning The Camcorder Wipe gently with a soft cloth. 7 RESET VIEWFINDER Blow it with a blower brush, then wipe gently with lens cleaning paper. 8 CLOSE CASSETTE DOOR 1 CLEAN EXTERIOR 2 CLEAN LENS Close the viewfinder's cover and push the viewfinder back in.
CONTROLS, INDICATIONS AND CONNECTORS Main Unit 1 Battery Pack Remaining Power Indicator changes as follows according to the battery pack’s remaining power level: 2 (Lights) Fullly charged 3 2/3 Charge Remaining 1/3 Charge Remaining No Charge Remaining When the power is almost gone, the indicator blinks, then the unit shuts off. Replace the battery pack with a fully charged one. 4 5 0 ! % ^ 6 7 8 & @ 9 * # ( $ ) ew y t STOP BUTTON PLAY BUTTON PAUSE BUTTON 0 ! r FF BUTTON CAN.
CONTROLS, INDICATIONS AND CONNECTORS (Cont.) Viewfinder Indications p o i D T y t r u W 48kHz / FULL 1 2 3 45 678 F . AUTO 1 A PAUSE P 0 L PHOTO 3 0min REC 9 ! 6we # T AP E ! e 5 SD MODE SOUND 32 kHz DEC 25 ’ 9 6 0 0 : 0 0 : 0 0 AM 10 : 3 5 w q ) % 0 @ $ ^ & (* Recording And Playback No. 1 2 3 4 NAME & FUNCTION Select Dial Position GAIN UP Indicator Wide Mode (Z pg. 18) (Z pg. 20) (Z pg. 20) “Battery Low” Indicator No.
Docking Station 1 2 3 45 6 # $ %^ @ ! 098 & 7 ) (* 1 Fan 2 3 4 5 6 7 8 9 0 ! Comes on automatically when camcorder is attached; serves to cool the unit down. Take care not to interfere with the blades. EDIT Button ...................................... (Z pg. 56) CHARGE Indicator ........................... (Z pg. 44) PAUSE Button PLAY Button ..................................... (Z pg. 50) RELEASE Button ................................ (Z pg. 44) Lock Lever .....................................
CAUTIONS When using the AC Power Adapter/Charger in areas other than the USA n The provided AC Power Adapter/Charger features automatic voltage selection in the AC range from 110 V to 240 V. USING HOUSEHOLD AC PLUG ADAPTER In case of connecting the unit's power cord to an AC wall outlet other than American National Standard C73 series type use an AC plug adapter, called a "Siemens Plug", as shown. For this AC plug adapter, consult your nearest JVC dealer.
Cassettes To properly use and store your cassettes, be sure to read the following cautions: 1. During use . . . .... make sure the cassette bears the Mini DV mark. .... be aware that recording onto prerecorded tapes automatically erases the previously recorded video and audio signals. .... make sure the cassette is positioned properly when inserting. .... do not load and unload the cassette repeatedly without allowing the tape to run at all. This slackens the tape and can result in damage. ....
SPECIFICATIONS MAIN UNIT General Power Power consumption Format Signal format Video signal recording format Data compression rate Digital compression technology : : : : : : : Cassette Tape Speed Maximum recording time Continuous recoring time : : : : Fast-Forward/Rewind Time Pickup : : Zoom Lens diameter (Filter Diameter) Viewfinder White balance Iris Microphone Operating temperature Operating humidity Storage temperature Dimensions : : Weight During recording : : : : : : : : : DC 6 V (using
Battery Pack BN-V712U Power Dimensions Weight : 3.6 V/1.250mAh : 20 mm (W) x 20 mm (H) x 71 mm (D) (4/5" x 4/5" x 2–4/5") : Approx. 50 g Remote Control Unit RM-V708U Power Battery Life Effective distance Operating temperature Storage temperature Dimensions Weight : DC 3 V (Lithium Battery CR2025) : Approx. 1 year (depending on usage) : Approx. 5 m (front shaft) : 0°C — 40°C : –20°C — 50°C : 54 mm (W) x 86 mm (H) x 12 mm (D) (2–1/8" x 3–3/8" x 1/2") : Approx.
GLOSSARY OF TERMS Iris Works like the pupil of the human eye. In a well-lighted environment, the human pupil contracts to keep too much light from entering. In low lighting, the pupil dilates to allow more light in. Color temperature A measurement in Kelvin degrees which indicates the color contents of a light source; bluish light has a higher color temperature than reddish light.
INDEX A Animation .............................................. (Z pg. 22) Audio Dubbing ...................................... (Z pg. 59) Auto Focus ............................................ (Z pg. 39) B Battery ................................................... (Z pg. 10) Battery Low ........................................... (Z pg. 65) C Charging ................................................ (Z pg. 10) Charging While Docked ........................ (Z pg. 44) Cleaning The Camcorder .......
2 Cher client, Nous vous remercions pour l’achat de cette caméra vidéo numérique. Avant utilisation, veuillez lire les informations pour votre sécurité et les précautions de sécurité indiquées dans les pages suivantes pour assurer une utilisation sûre de cet appareil. Utilisation de ce manuel d’instructions • Toutes les sections principales et les sous-sections sont indiquées dans le sommaire (Z P. 9). • Des remarques apparaissent après la plupart des soussections. Bien les lire également.
PRÉCAUTIONS DE SÉCURITÉ ATTENTION: 3 A propos des batteries DANGER ! Ne pas démonter les batteries ni les exposer au feu ou à une chaleur excessive, car il y a risque d’explosion et d’incendie. AVERTISSEMENT ! Veillez à ne pas mettre les bornes de la batterie ni la batterie proprement dite au contact d’objets métalliques. Un court-circuit pourrait se produire et éventuellement déclencher un incendie. • Quand vous transportez la batterie, veillez à la protéger avec le capuchon.
4 CONSIGNES DE SECURITE IMPORTANTES 5. Ventilation L’énergie électrique peut effectuer de nombreuses fonctions utiles. Mais un usage incorrect peut causer une éventuelle électrocution ou des risques d’incendie. Cet appareil a été conçu et fabriqué pour garantir votre propre sécurité. Pour ne pas anéantir les sécurités incorporées, observez les règles de base suivantes pour son installation, utilisation et entretien. Des fentes et des ouvertures dans le coffret sont prévues pour la ventilation.
5 UTILISATION DEPANNAGE 1. Accessoires 1. Dépannage Pour éviter des blessures: • Ne pas placer ce produit sur un chariot, un support, un trépied ou une table instables. Il pourrait tomber, causant des blessures sérieuses à un enfant ou à un adulte, en endommageant sérieusement l’appareil. • Utiliser seulement avec un chariot, un support, un trépied ou une table recommandés par le fabricant ou vendus avec le produit.
6 A PROPOS DU DVC (DIGITAL VIDEO CAMERA) Le camescope numérique convertit les signaux audio et vidéo entrant sous forme numérique pour l’enregistrement. Un signal vidéo est composé d’un signal de luminance (Y) et de signaux de couleur (R-Y et B-Y). Ces signaux sont identifiés et enregistrés numériquement (Enregistrement à composantes numériques).
7 SOMMAIRE DES OPÉRATIONS Volet de logement de cassette Logement de cassette Commutateur d’ouverture/ éjection Attente PAUSE Témoin d’alimentation Couvercle du logement de la batterie AY PL OFF R EC 5S REC Touche de marche/ arrêt d’enregistrement RACCORDEMENT DE L’ALIMENTATION ENREGISTREMENT Insérez une batterie pleinement chargée. 1 2 Tirez le viseur et alignez le repère indiquant “STANDBY”. Le volet d’objectif s’ouvre automatiquement. Fermez le couvercle du logement de la batterie.
8 ACCESSOIRES FOURNIS Adaptateur secteur/ chargeur AA-V70U Etui à caméra souple Télécommande RM-V708U T W Cassette MiniDV 30 mn M-DV30ME Station d’arrimage Support à caméra Pile au lithium CR2025 Batterie BN-V712U Sangle Cordon d’alimentation Câble AUDIO et VIDEO (Phono station d’arrimage TV ou magnétoscope) Câble AUDIO et VIDEO (ø3,5 DV TV ou magnétoscope) Câble S-VIDEO Câble de montage Cordon CC
9 TABLE DES MATIÈRES A PROPOS DU DVC SOMMAIRE DES OPÉRATIONS ACCESSOIRES FOURNIS PRÉPARATIFS 6 7 8 10 Recharge de la batterie ............................................................... 10 Mise en place de la batterie.......................................................... 11 Utilisation en intérieur ................................................................ 12 Utilisation du support à caméra .....................................................
10 PRÉPARATIFS RECHARGE DE LA BATTERIE Vous pouvez recharger une batterie à la fois ou deux, l’une après l’autre. INSTALLEZ Témoin de charge 1 Témoin de charge 2 ENLEVEZ Batterie BN-V712U Rouge Cordon d’alimentation Prise CC Noir Témoin d’alimentation Repère de charge • Le repère de charge ne change pas automatiquement de position. Après la recharge, ou après avoir enlevé une batterie déchargée, réglez le repère sur la position appropriée.
11 REMARQUES: ● Si vous raccordez le cordon CC du camescope à l’adaptateur pendant la recharge de la batterie, l’alimentation est fournie au camescope et la recharge s’arrête. ● Quand vous utilisez l’adaptateur/chargeur secteur, veillez à raccorder le cordon d’alimentation fourni seulement. ● L’adaptateur/chargeur secteur est prévu pour charger les batteries BN-V712U seulement.
12 PRÉPARATIFS (suite) ADAPTATEUR SECTEUR/CHARGEUR Cordon d’alimentation secteur MIC AV-OUT DC-IN 6V Cordon CC SUPPORT À CAMERA Le connecteur est sous ce couvercle Utilisation en intérieur Utilisation du support à caméra Quand vous utilisez le camescope en intérieur, vous pouvez utiliser l’adaptateur au lieu de la batterie. Pendant l’enregistrement 1 2 ALIMENTEZ L’ADAPTATEUR SUR LE SECTEUR Raccordez le cordon d’alimentation à l’adaptateur secteur et à la prise secteur.
13 Insertion/retrait de la pile CR2025 (au lithium) de l'horloge Cette pile est nécessaire pour le fonctionnement de l’horloge et pour les réglages de la date et de l’heure. Couvercle du logement de la pile LE COUVERCLE DU 1 OUVREZ LOGEMENT DE LA PILE Tirez dans le sens indiqué sur l’illustration. 2 ENLEVEZ LA PILE USÉE Retirez le porte-pile comme indiqué, et tirez la pile vers le bas pour l’enlever du porte-pile.
14 PRÉPARATIFS (suite) Réglages de la date et de l’heure Si vous réglez la date et l’heure, elles seront automatiquement enregistrées séparément du signal vidéo. Même si la date et l’heure n’apparaissent pas pendant l’enregistrement, vous pouvez les afficher sur l’écran ou les retirer à tout moment pendant la lecture. Viseur T W Viseur O FF WIDE MODE 20 X ZOOM OFF DIS AGC GA I N UP TO FADER / W IPE MENU TO P.
15 Insertion/éjection d’une cassette Si vous avez déjà inséré une batterie complètement chargée, vous pouvez ouvrir le volet de logement de cassette sans alimentation externe. Logement de cassette Commutateur OPEN/EJECT Volet de logement de cassette PUSH Dirigez la fenêtre vers l’extérieur. LE VOLET DE LOGEMENT 1 OUVREZ DE CASSETTE Mettez le camescope sous tension, puis poussez le commutateur d’ouverture/éjection dans le sens de la flèche. Le volet de logement de cassette se libère.
16 PRÉPARATIFS (suite) Fixation de la sangle Réglage dioptrique La sangle fournie avec le camescope permet de bien prendre en main le camescope. Ne prenez jamais le camescope sans utiliser la sangle. Ajustez l’affichage dans le viseur pour qu’il soit bien net. Viseur AY PL OFF R E C 5S Molette d’alimentation Levier de réglage dioptrique 2 1 PAUSE 1 ATTACHEZ LA SANGLE Faites passer la sangle dans l’oeillet et tirez fermement pour qu’elle soit bien attachée.
17 Télécommande RM-V708U Vous pouvez utiliser la télécommande RM-V708U pour piloter les opérations quand le camescope est fixé sur la station d'arrimage. Touche de marche/arrêt d’enregistrement (RECORDING START/STOP) (Z p. 60) Connecteur d’entrée de télécommande (PAUSE IN) ( Z p. 54) Touches de zoom (ZOOM) ( Z p. 50) Touche d’affichage (DISPLAY) (Z p.
18 ENREGISTREMENT Fonctionnement automatique/manuel Le tableau suivant indique les fonctions qui peuvent être utilisées dans les modes automatiques et manuel. AUTO FOCUS EXP. SET WB PRO MOLETTE DE SELECTION Mode automatique Mode manuel Position de la molette de sélection Position de la molette de sélection AUTO FOCUS EXPOSURE WB PRO OUI OUI OUI OUI OUI OUI*1 OUI OUI OUI OUI OUI OUI OUI OUI OUI Mise au point (Z p.
19 Menus Le menu d’enregistrement vous permet de régler les fonctions suivantes: compression, grossissement zoom, stabilisateur numérique d’image, gain, fondu/volet, programme AE/effets, menu de réglage de la date et heure, et menu système. Les explications suivantes se rapportent au mode compression, grossissement zoom, stabilisateur et gain. Viseur Viseur O FF WIDE MODE 20 X ZOOM OFF DIS AGC GA I N UP TO F ADER / W IPE MENU TO P .
20 ENREGISTREMENT (suite) 10X 20X 100X OFF SQUEEZE CINEMA O FF WIDE MODE 2 0X ZOOM OFF DIS AGC GA I N UP TO FADER / W IPE MENU TO P . AE / EFFECT MENU TO DAT E / TIME MENU TO SYSTEM MENU END I TEM ZOOM SW . SET SET BUTTON A AGC OFF ON OFF WIDE MODE (Mode écran large) Ce mode d’enregistrement est compatible avec les téléviseurs écran large (16:9). Quand vous utilisez ce mode, reportez-vous au mode d’emploi du téléviseur écran large.
21 Viseur T W Viseur O FF WIDE MODE 2 0X ZOOM OFF DIS AGC GA I N UP TO FADER / W IPE MENU TO P . AE / EFFECT MENU TO DAT E / TIME MENU TO SYSTEM MENU END SCENE BEEP W IND CUT SOUND MODE I D No . I T EM ZOOM SW . SET SET BUTTON Touche de menu 07 I T EM ZOOM SW . SET SET BUTTON END Menu d’enregistrement 5S ON OFF 4 8kHz Menu système Levier de zoom Touche SET Manuel AUTO FOCUS EXP.
22 ENREGISTREMENT (suite) 5S 5SD ANIM. SCENE BEEP W IND CUT SOUND MODE I D No . END 5S ON OFF 4 8kHz ON OFF OFF AUTO 07 48 kHz 32 kHz I TEM ZOOM SW . SET SET BUTTON Ce nombre sera nécessaire dans le futur, quand le camescope sera raccordé à un ordinateur [01 à 99]. Sound (son) Beep (tonalité) Les signaux sonores peuvent être échantillonnés sur 48 kHz ou 32 kHz. Une tonalité retentit quand le camescope est mis sous tension ou hors tension, et au début et à la fin d’un enregistrement.
23 Enregistrement de base Vous devriez maintenant avoir fini les préparatifs nécessaires (Z p. 10 – 22). Réglez la molette de sélection sur “AUTO” et essayez de filmer d’abord sans utiliser les fonctions élaborées. AY PL Viseur OFF R E C 5S REC STANDBY Touche de marche/arrêt d’enregistrement Témoin d’alimentation Viseur PAUSE AY PL Pendant l’enregistrement AUTO OFF R EC FOCUS EXP.
24 ENREGISTREMENT (suite) 3 0min REC 1 min clignotant 2 min clignotant 29 min 3 min STOP PLAY /PAUSE Touche RE SHOOT Touche CAN. 0 min clignotant Indicateur de durée de bande restante Reprise d’une séquence Le temps restant sur la bande est automatiquement affiché dans le viseur (Z p. 66). Quand la bande est terminée, “TAPE END” apparaît dans le viseur.
25 ENREGISTREMENT Fonctions élaborées STANDBY Appuyez sur SNAPSHOT pendant l’enregistrement Touche SNAPSHOT Appuyez sur SNAPSHOT pendant l’attente d’enregistrement Photographie instantanée Utilisez le GR-DV1 comme un appareil de photo ordinaire et prenez une ou des photographies instantanées, les unes après les autres. 1 TIREZ LE VISEUR 2 PRENEZ UNE PHOTO Alignez le repère sur “STANDBY”. Le volet de l’objectif s’ouvre automatiquement. Appuyez sur SNAPSHOT.
26 ENREGISTREMENT Fonctions élaborées (suite) Levier de zoom Zone de zoom numérique D T Zone de zoom 10x W Affichage du zoom T Zoom en téléobjectif (T) W D T D T D T D T W W W W T Zoom en grand angle (W) W Zoom Sélectionnez un des trois facteurs d’agrandissement et rapprochez le sujet ( Z p. 20). Poussez simplement le levier de zoom dans un sens (téléobjectif “+”) ou dans l’autre (grand angle “–”). La vitesse du zoom est variable.
27 AY PL OFF R E C 5S Touche de marche/ arrêt d’enregistrement STANDBY Viseur REC 5 S MODE Fondu enchaîné dans le mode 5 secondes Sélectionnez “5SD” sur le menu système (Z p. 21). “5SD MODE” apparaît dans le viseur à l’étape 2 ci-dessous. Enregistrez un clip de 5 secondes. La dernière image du clip est stockée. Si vous enregistrez le clip suivant dans les 5 minutes, la scène précédente sera recouverte par la nouvelle. * Si vous mettez le camescope hors tension, l’image mémorisée est perdue.
28 ENREGISTREMENT Fonctions élaborées (suite) STANDBY Viseur AY PL OFF R E F . AUTO C F . AUTO ––– REC 5S PAUSE Au bout de 15 secondes Touche de marche/ arrêt d’enregistrement Pendant l’enregistrement Retardateur Une fois que vous avez réglé le camescope, vous (ou la personne qui utilise le camescope) pouvez entrer en scène et vous filmer lors d’un événement mémorable. 1 TIREZ LE VISEUR Alignez le repère sur “STANDBY”. Le volet de l’objectif s’ouvre automatiquement.
29 AY PL OFF R EC 5S AY PL OFF R EC 5S Touche de marche/ arrêt d’enregistrement STOP PLAY REW FF /PAUSE RE SHOOT CAN. PLAY /PAUSE Enregistrement à partir du milieu d’une cassette Si vous enlevez une cassette sur laquelle vous avez enregistré, ou que vous voulez poursuivre un enregistrement sur une cassette que vous venez de regarder (sans l’avoir auparavant éjectée du camescope) effectuez les opérations suivantes.
30 ENREGISTREMENT Fonctions élaborées (suite) Viseur T W Viseur O FF WIDE MODE 20 X ZOOM OFF DIS AGC GA I N UP TO FADER / W IPE MENU TO P . AE / EFFECT MENU TO DAT E / TIME MENU TO SYSTEM MENU END ON SCREEN D I SPLAY DATE / TIME I T EM ZOOM SW . SET SET BUTTON I T EM ZOOM SW . SET SET BUTTON END Menu de réglage de la date/heure Menu d’enregistrement Touche de menu OFF OFF DEC 2 5 ’ 96 PM 5 : 30 Levier de zoom Touche SET Manuel AUTO FOCUS EXP.
31 Viseur Viseur FADER / W I P E SEL EC T OFF 1 2 3 4 5 WH BK WH I T E F ADER B L ACK F ADER P D I SSOL VE CORNER W I PE W I NDOW W I PE FADER / W IPE SELECT T OFF W 1 2 3 4 5 WH BK I T EM ZOOM SW . WH I TE FADER BLACK FADER P D I SSOL VE CORNER W I PE W I NDOW W I PE I TEM ZOOM SW . Menu de fondu/volet Au bout de 2 secondes EFFECT AUTO FOCUS WH PAUSE EXP.
32 ENREGISTREMENT Fonctions élaborées (suite) FONDU EXEMPLE WH WHITE FADER Entrée en fondu Sortie en fondu VOLET SCROLL WIPE EXEMPLE Ouverture du volet Touche de marche/ arrêt d’enregistrement Fermeture du volet Fondus et volets (fondus effacés) Une scène apparaît progressivement à partir d’un écran noir ou blanc (entrée en fondu/ouverture de volet) ou disparaît en laissant un écran noir ou blanc (sortie en fondu/fermeture de volet). Sélectionnez le fondu ou le volet sur le menu de fondu/ volet ( Z p.
33 Fin de la scène précédente EXEMPLE P SCROLL WIPE La nouvelle scène remplace progressivement la scène précédente. En l’espace de 5 minutes . . . Touche de marche/arrêt d’enregistrement Ouverture du volet Fondu effacé/enchaîné d’images Combinez le volet et fondu enchaîné d’images pour obtenir des transitions professionnelles. Il y a 6 types de fondu effacé d’images et 1 type de fondu enchaîné. Sélectionnez l’effet de volet d'images sur le menu Fader/Wipe (Z p.31).
34 ENREGISTREMENT Fonctions élaborées (suite) Touche de marche/ arrêt d’enregistrement Transitions aléatoires ?R RANDOM FADER (Fondu au hasard): Lorsque vous choisissez cette fonction, le camescope sélectionne de façon aléatoire l’effet de transition utilisé (fondu et volet). WH BK B/W Le camescope choisit un des fondus/volets au hasard. 1 COMMENCEZ L’ENREGISTREMENT Appuyez sur la touche de marche /arrêt d’enregistrement. “ ? P ” apparaît dans le viseur. Le camescope sélectionne un effet au hasard.
35 T W O FF WIDE MODE 2 0X ZOOM OFF DIS AGC GA I N UP TO F ADER / W IPE MENU TO P . AE / EFFECT MENU TO DAT E / TIME MENU TO SYSTEM MENU F ADER / W I P E CUSTOM I ZE 1 2 3 4 5 I T EM ZOOM SW . SET SET BUTTON END WH BK END Menu d’enregistrement WH I T E F ADER B L ACK F ADER P D I SSOL VE CORNER W I PE W I NDOW W I PE I T EM ZOOM SW . SET SET BUTTON Personnalisation du fondu/volet Touche de menu Levier de zoom Touche SET AUTO FOCUS EXP.
36 ENREGISTREMENT Fonctions élaborées (Cont.) Viseur Viseur P . AE / E F F EC T SEL ECT OFF 1 1/250 SHUT T ER 1/250 TW I L I GH T 2 S EP I A 3 4 B/W B L ACK /WH ITE C L AS S I C F I L M 5 P . AE / EF F EC T SEL ECT OFF T 1 1/250 SHUTTER 1/250 TW I L I GH T 2 SEP I A 3 4 B/W B L ACK / WH I TE C L ASS I C F I L M 5 W I T EM ZOOM SW . I TEM ZOOM SW . Menu de programme AE/effets (réglage usine) Au bout de 2 sec. EFFECT PAUSE AUTO FOCUS EXP. SET WB PRO L’indicateur du mode sélectionné apparaît.
37 B/W MONOTONE (noir et blanc) u Comme dans les films anciens, le film est tourné en noir et blanc. Si vous utilisez cet effet avec la fonction écran large cinéma, l’atmosphère d’un classique du cinéma sera encore accentuée. SEPIA (Sépia) Effet de rémanence de l’image (image fantôme du sujet), ce qui crée une ambiance fantastique. u Les scènes enregistrées ont une teinte un peu brune, comme les anciennes photographies. Associez cet effet au mode Cinéma pour donner une tonalité ancienne à votre film.
38 ENREGISTREMENT Fonctions élaborées (suite) Viseur T W Viseur O FF WIDE MODE 20 X ZOOM OFF DIS AGC GA I N UP TO F ADER / W IPE MENU TO P . AE / EFFECT MENU TO DAT E / TIME MENU TO SYSTEM MENU END P . AE / EF F EC T CUSTOM I ZE 1 1/250 SHUT T ER1/250 2 TW I L I GH T 3 SEP I A 4 B/W MONOTONE 5 C L ASS I C F I L M I T EM ZOOM SW . SET SET BUTTON Menu d’enregistrement Touche de menu I TEM ZOOM SW . SET SET BUTTON END Menu Programme AE/effets personnalisè Levier de zoom Touche SET AUTO FOCUS EXP.
39 Plage de mise au point (la mise au point se fait au centre de l’écran) FOCUS Levier de zoom T Indicateur de mise au point manuelle W AY PL AUTO OFF R EC FOCUS 5S EXP. SET WB Touche SET PRO Molette d’alimentation Molette de sélection Réglage manuel de la mise au point Le camescope fait automatiquement la mise au point, dans la plupart des cas, de 10 cm à l’infini.
40 ENREGISTREMENT Fonctions élaborées (Suite) EXP. 0 Levier de zoom T Affichage de l’exposition W AY PL AUTO OFF R E C FOCUS 5S EXP. SET WB Touche SET PRO Molette d’alimentation Molette de sélection Commande d’exposition En principe, l’exposition est automatique. Cependant, lorsque le fond est trop lumineux ou trop sombre par rapport au sujet, réglez l’exposition manuellement. 1 SÉLECTIONNEZ LE MODE Réglez la molette de sélection sur “EXP”. “EXP” apparaît dans le viseur.
41 L Indicateur de verrouillage d’iris AY PL AUTO OFF R EC FOCUS 5S EXP. Touche SET SET WB PRO Molette d’alimentation Molette de sélection Verrouillage de l’iris Utilisez cette fonction pour filmer un sujet mobile, faire un zooming, lorsque la distance jusqu’au sujet change (sa taille change dans le viseur), ou que vous voulez verrouiller le niveau de luminosité. Quand le sujet est rapproché, laissez l’iris verrouillée. Même si le sujet s’éloigne de vous, l’image ne sera pas sombre.
42 ENREGISTREMENT Fonctions élaborées (suite) Molette d’alimentation Molette de sélection AUTO MWB AUTO FOCUS EXP. SET WB Sélection de la balance des blancs PRO Levier de zoom Touche SET WB PAUSE AUTO MWB T W Réglage de la balance des blancs En principe, la balance des blancs est réglée automatiquement. Cependant, si vous voulez filmer sous différents types d’éclairage, ou si vous filmez une scène qui change de teinte, utilisez cette fonction.
43 AUTO MWB Feuille blanche T AUTO MWB W AUTO WB FOCUS PAUSE EXP. SET AUTO MWB WB PRO Touche SET Réglage manuel de la balance des blancs Utilisez cette fonction pour filmer des sujets sous différents éclairages. LE MODE 1 SÉLECTIONNEZ Z A l’étape 3 du réglage de la balance des blancs ( p. 42), sélectionnez “MWB ”. 2 RÉGLEZ LA BALANCE Tenez une feuille de papier blanc devant le sujet. Ajustez le zoom ou déplacez-vous pour que le papier blanc remplisse l'écran.
44 LECTURE Raccordements de base Molette d’alimentation Touche de libération Prise secteur Adaptateur/chargeur secteur Levier de verrouillage Multiconnecteur Station d'arrimage Cordon d’alimentation Vers la prise CC Mise en place du camescope sur la station d'arrimage Si vous insérez le camescope sur la station d'arrimage, vous pourrez ajouter des effets intéressants lors de la lecture. QUE LE CAMESCOPE EST 1 VÉRIFIER HORS TENSION Assurez-vous que le camescope n’est pas sous tension.
45 Lecture sur un téléviseur * Veuillez vous référer au mode d’emploi du magnétoscope et/ou du téléviseur pour raccorder les appareils. REMARQUES: ● Si un hurlement ou une rétroaction acoustique se manifeste pendant la lecture sur un téléviseur, éloignez la station pour que le microphone du camescope soit à l’écart du téléviseur, ou réduisez le volume du téléviseur.
46 LECTURE Raccordement de base (suite) Raccordement à un téléviseur/magnétoscope B MIC C c AV-OUT à la sortie AV DC-IN 6V b A a Support à caméra Cordon audio et vidéo (téléviseur ou magnétoscope ø3,5 DV) Vers connecteurs d’entrée audio et vidéo LE CAMESCOPE AU 1 RACCORDEZ TÉLÉVISEUR OU AU MAGNÉTOSCOPE Raccordez le camescope comme indiqué sur l’illustration. LE CAMESCOPE DANS LE 2 INSÉREZ SUPPORT A CAMERA Alignez A sur a , B sur b et C sur c . Le support à caméra a deux côtés.
47 LECTURE Lecture de base Vous pouvez voir ce que vous avez enregistré dans le viseur. AY PL OFF R EC 5S Témoin d’alimentation REW RE SHOOT Molette d’alimentation PLAY /PAUSE Cache du panneau d'exploitation 1 SÉLECTIONNEZ LE MODE 2 OUVREZ LE COUVERCLE 3 REBOBINEZ LA BANDE Tirez le viseur et réglez la molette d’alimentation sur “PLAY”. Poussez le cache du panneau d’exploitation du camescope, comme indiqué sur l’illustration. Appuyez sur REW.
48 Lecture (suite) Menu de lecture Le menu de lecture vous permet de régler les fonctions suivantes: son (48 kHz, 32 kHz), Synchro Comp, Display et Time Code. Les instructions suivantes sont valables pour toutes ces fonctions sauf Synchro Comp ( Z p. 57 et 58). Menu de lecture 4 8 kHz MODE 3 2 kHz MODE SYNCHRO D I SPLAY T I ME CODE Molette d’alimentation FULL SOUND SOUND 1 SOUND 2 FULL SOUND SOUND 1 0.0 ON OFF ON OFF ON OFF I TEM ZOOM SW .
49 Son Pendant la lecture, le camescope détecte automatiquement le mode dans lequel le son a été enregistré et le reproduit dans le même mode. Sélectionnez le type de son qui doit accompagné l'image de lecture. (48 kHz est préréglé sur "FULL SOUND" et 32 kHz est préréglé sur "SOUND 1".
50 LECTURE Fonctions élaborées Molette d'alimentation Touche PLAY Lecture normale Capteur de rayons infrarouges Touches de zoom Appuyez sur T T W Touche SHIFT Touches gauche/droite/ haut/bas Touche STOP Appuyez sur © (droite) pour décaler l'image Touche PAUSE RM-V708U (fournie) Lecture avec zoom Les images enregistrées peuvent être agrandies 10 fois, quand vous le souhaitez pendant la lecture.
51 Molette d'alimentation Touche PLAY Capteur de télécommande P . AE / E F F EC T SEL ECT OFF 1 2 B/W 3 4 5 C L AS S I C F I L M MONOTONE S EP I A STROBE V I DEO ECHO Ecran de sélection de programme AE/effet (lecture) T W Touche d’effet (EFFECT) Touche de marche/ arrêt d’effet (EFFECT ON/OFF) RM-V708U (fournie) Lecture avec la fonction P.AE./EFFECT Ces effets vous permettent d'être créatif lors de la lecture. Vous pouvez utiliser un des 5 effets.
52 MONTAGE Station d’arrimage Reportez-vous à "Mise en place du camescope sur la station d’arrimage", pages 44 et 45, pour insérer le camescope sur la station. Assurez-vous que le camescope est rattaché à la station avant de commencer le montage. Copie Vous pouvez copier des scènes enregistrées du camescope sur une cassette vidéo. Reportez-vous au mode d'emploi du magnétoscope pour les détails.
53 Réglage de la marque Pour effectuer une copie automatique ou pour piloter le magnétoscope avec la télécommande RM-V708U, vous devez spécifier la marque du magnétoscope. Les fonctions de base du magnétoscope pourront alors être utilisées à partir de la télécommande (PLAY, FF, REW, PAUSE, STOP). Une fois que vous avez réglé la marque, dirigez la télécommande vers le capteur du magnétoscope et appuyez sur la touche appropriée. *Certains magnétoscopes ne peuvent pas être pilotés par la télécommande.
54 MONTAGE (suite) Montage par mémorisation de séquences Avec la télécommande RM-V708U, vous pouvez utiliser la fonction P.AE/EFFECT pour faire des montages originaux.
55 Programme IN RM-V708U (fournie) Molette d'alimentation Capteur de télécommande : 1 2 3 4 5 6 7 8 T I ME CODE TOTAL T W Touche FADER/WIPE Touche EFFECT Touche EDIT IN/OUT ~ ~ ~ ~ ~ ~ ~ ~ OUT : : 00 : 00 Menu de montage par mémorisation de séquences Touche PLAY Touche R.A. EDIT ON/OFF Touche CANCEL LE POINT D'ENTRÉE DE 4 DÉSIGNEZ MONTAGE Au début de la scène, appuyez sur EDIT IN/ OUT de la télécommande. La position EDIT IN apparaît dans le viseur et sur le téléviseur raccordé.
56 MONTAGE (suite) IN OUT 1 WH 00 : 25~02 : 05 P 2 P 07 : 18~08 : 31 OFF 3 OFF 03 : 33~05 : 53 4 09 : 30~13 : 15 : 5 15 : 55~ 6 ~ 7 ~ 8 ~ T I ME CODE 015 : 55 TOT AL 009 : 02 Touche REW Touche STOP B/W Ecran de programmation de montage R.A. Touche EDIT T W RM-V708U (fournie) Touche FADE/WIPE Touche EFFECT Touche EDIT IN/OUT 9 PRÉPAREZ LA CASSETTE SOURCE Rebobinez la bande dans le camescope jusqu'au début de la scène que vous voulez copier et appuyez sur PAUSE.
57 Magnétoscope Capteur de télécommande Programme 1 T W RM-V708U (fournie) Touche ON/OFF IN 1 2 3 4 5 6 7 8 : T I ME CODE TOT AL ~ ~ ~ ~ ~ ~ ~ ~ OUT : : 00 : 00 Ecran de programmation de montage par mémorisation de séquences Pour un montage encore plus précis Certains magnétoscopes passent plus rapidement du mode d'enregistrement au mode de pause que d'autres.
58 MONTAGE (suite) Magnétoscope Touche SET Touche de menu Molette d'alimentation Levier de zoom Touche STOP Touche PLAY 4 8 kHz MODE 3 2 kHz MODE SYNCHRO D I SPLAY T I ME CODE END FULL SOUND SOUND 1 0.0 ON OFF I TEM ZOOM SW . SET SET BUTTON T W 4 8 kHz MODE 3 2 kHz MODE SYNCHRO D I SPLAY T I ME CODE END FU LL SOUND SOUND 1 –0.1 ON OFF I TEM ZOOM SW . SET SET BUTTON Menu de lecture LE MODE DE 4 SÉLECTIONNEZ FONCTIONNEMENT Réglez la molette d'alimentation sur "PLAY" et appuyez sur PLAY.
59 Doublage audio Si vous utilisez une cassette enregistrée à 32 kHz, vous pouvez modifier la piste son de la piste que vous avez enregistrée. REMARQUE: Le doublage audio n'est pas possible sur une bande enregistrée à 48 kHz. Connecteur d'entrée de microphone externe Molette d'alimentation Capteur de télécommande Touche DISPLAY T W 6e Touche AUDIO MONITOR Touche A.
60 MONTAGE (suite) Insertion vidéo Vous pouvez insérer des photographies instantanées et d'autres scènes précédemment enregistrées. Molette d'alimentation Capteur de télécommande Touche de marche/arrêt d'enregistrement 6w T W Touche DISPLAY Touche INSERT 12:34 Touche PLAY Touche PAUSE Touche REW RM-V708U (fournie) LE POINT DE SORTIE DE 1 LOCALISEZ 4 COMMENCEZ L'ENREGISTREMENT MONTAGE Vérifiez le code de temps à ce point. ( Z p.
61 GUIDE DE DÉPANNAGE Si, après avoir passé en revue le tableau suivant, le problème persiste, consultez votre revendeur JVC ou un centre de service technique. SYMPTÔME CAUSES POSSIBLES SOLUTION 1. Pas d'alimentation. 1. • La source d'alimentation n'est pas raccordée correctement. • La batterie est déchargée. • Le viseur n'a pas été tiré. 1. • Raccordez l'adaptateur secteur correctement (Z p. 12). • Remplacez la batterie déchargée par une batterie pleinement chargée (Z p. 11). • Tirez le viseur.
62 GUIDE DE DÉPANNAGE (suite) SYMPTÔME CAUSES POSSIBLES SOLUTION 13. Le zoom numérique ne fonctionne pas. 13. • Le zoom optique 10x a été sélectionné. • L’écho vidéo a été mis en service. • Le volet ou fondu enchaîné d’images a été utilisé pour une transition de scène. • L’enregistrement 5 secondes a été effectué avec la molette d’alimentation réglée sur “5S”, mais “5DS” était sélectionné sur le menu système.
63 SYMPTÔME CAUSES POSSIBLES SOLUTION 18. La fonction de volet d’images ne peut pas être utilisée. 18. • L’obturation lente est activée. • Le mode de compression ou le mode cinéma est sélectionné dans le menu d'enregistrement. 18. • Assurez-vous que ni le mode de compression ni le mode cinéma ni l'obturation lente sont en service quand vous utilisez la fonction de volet d'images. 19. Bien que l'obturation lente ne soit pas sélectionnée, l'image donne l'impression qu'elle est activée. 19.
64 APRÈS UTILISATION Volet de la cassette Volet d'objectif Batterie Logement de la cassette Câble audio/vidéo (TV ou magnétoscope ø3,5 DV) SUPPORT À CAMERA Nettoyage du camescope 1 NETTOYEZ L'EXTÉRIEUR Essuyez-le avec précaution avec un chiffon doux. 2 NETTOYEZ L'OBJECTIF Nettoyez l'objectif avec une brosse soufflante, puis essuyez-le avec précaution avec du papier spécial objectif. 3 ENLEVEZ LA SOURCE D'ALIMENTATION Retirez la batterie ou débranchez le camescope de l'adaptateur/chargeur secteur.
65 COMMANDES, INDICATIONS ET CONNECTEURS Camescope 1 L’indicateur d'énergie restante dans la batterie change de la façon suivante selon la capacité restante: (S’allume) 2 Pleinement chargée 3 Chargée au 2/3 Chargée à 2/3 Déchargée Quand la batterie est presque complètement déchargée, l’indicateur clignote, puis le camescope se met hors tension. Remplacez alors la batterie par une chargée.
66 COMMANDES, INDICATIONS ET CONNECTEURS (suite) Indications dans le viseur p o i D T y t r u W 48kHz / FULL 1 2 3 45 678 F . AUTO 1 A PAUSE P 0 L PHOTO e q ) NOM ET FONCTION Position de la molette de sélection Indicateur de gain Mode écran large Indicateur de batterie faible (Z p. 18) (Z p. 20) (Z p. 20) Apparaît et clignote quand la charge de la batterie est faible. 5 6 7 Indicateur de stabilisateur numérique d’image ( Z p. 20) Indicateur de mode d’attente d’enregistrement (Z p.
67 Station d’arrimage 1 2 3 45 6 # $ %^ @ ! 098 & 7 ) (* 1 Ventilateur 2 3 4 5 6 7 8 9 0 ! Se met automatiquement en marche quand le camescope est rattaché à la station. Il sert à refroidir la station. Ne bouchez pas les ouvertures. Touche de montage (EDIT) ................. (Z p. 56) Indicateur de charge (CHARGE) ......... (Z p. 44) Touche de pause (PAUSE) Touche de lecture (PLAY) .................... (Z p. 50) Touche de libération (RELEASE) .......... (Z p. 44) Levier de verrouillage .............
68 Utilisation de l'adaptateur secteur/chargeur de batterie en dehors des Etats-Unis n L'adaptateur secteur/chargeur de batterie fourni dispose d'une sélection automatique de la tension secteur dans la plage de 110 à 240 V. UTILISATION DE L'ADAPTATEUR DE PRISE SECTEUR Lors du branchement du cordon d'alimentation de l'appareil à une prise secteur différente du standard national américain C73, utiliser un adaptateur de prise CA nommé "Siemens Plug", comme indiqué ci-dessous.
69 Cassettes Pour utiliser et ranger correctement vos cassettes, bien lire les précautions suivantes: 1. Pendant l’utilisation . . . .... bien s’assurer que la cassette porte la marque Mini DV. .... bien savoir que l’enregistrement sur des cassettes préenregistrées efface automatiquement les signaux vidéo et audio enregistrés précédemment. .... bien s’assurer que la cassette est positionnée correctement en l’introduisant. ....
70 SPÉCIFICATIONS CAMESCOPE Spécifications générales Alimentation Consommation Format Format du signal Format d'enregistrement du signal vidéo Taux de compression des données Technologie de compression des données : : : : : : : Cassette Vitesse de défilement Durée maximum d'enregistrement Durée d'enregistrement en continu : : : : Durée d'avance rapide/rebobinage Capteur : : Zoom Diamètre de l'objectif (Diamètre du filtre) Viseur Balance des blancs Iris Microphone Température de fonctionnement Humidi
71 Batterie BN-V712U Alimentation Dimensions Poids : 3,6 V/1,250 mAh : 20 mm (L) x 20 mm (H) x 71 mm (P) : Env. 50 g Télécommande RM-V708U Alimentation Autonomie de la pile Portée Température de fonctionnement Température d'entreposage Dimensions Poids : CC 3 V (pile au lithium CR2025) : Env. 1 an (selon la fréquence d'utilisation) : Env. 5 m (axe avant) : 0°C à 40°C : –20°C — 50°C : 54 mm (L) x 86 mm (H) x 12 mm (D) : Env.
72 LEXIQUE Adaptateur secteur Sert à recharger la batterie ou, si vous le raccordez directement au camescope, de source d'alimentation. Affichage sur écran Les données affichées dans le viseur peuvent apparaître sur un téléviseur raccordé. Ajustement dioptrique Permet d'adapter l'oculaire à votre vue de sorte que les indications et les images dans le viseur soient plus faciles à voir. Attente d'enregistrement Mettez ce mode en service en appuyant sur START/STOP pendant l'arrêt ou l'enregistrement.
73 INDEX A N 5SD ......................................................... (Z p. 27) Affichage de la date/heure ....................... (Z p. 14) Alimentation (secteur/batterie) ........... (Z p. 10, 12) Animation ................................................ (Z p. 22) Attente d'enregistrement ............................( Z p. 6) Autofocus ................................................ (Z p. 39) Nettoyage du camescope ......................... (Z p. 64) B Balance des blancs ......................
2 Estimado cliente: Le agradecemos la adquisición de la cámara de video de VHS compacto de JVC. Antes de utilizarla, lea la información y precauciones de seguridad contenidas en las siguientes páginas para utilizar su nueva videocámara con seguridad. Uso de este manual de instrucciones • Todas las secciones principales y subsecciones están listadas en el índice (Z p. 9). • Las notas aparecen al fin de la mayoría de las subsecciones. No deje de leerlas.
PRECAUCIONES DE SEGURIDAD PRECAUCION: 3 Acerca de las pilas: ¡PELIGRO! No intente desarmar las pilas, ni las exponga a la llama o calor excesivo ya que hay peligro de incendio o explosión. ¡ADVERTENCIA! No permita que los terminales de la pila, o ésta entren en contacto con metales, ya que ello puede resultar en cortocircuitos e iniciar un incendio. • Cuando transporte la cámara de video, asegúrese de que la tapa suministrada esté colocada en la pila.
4 INSTRUCCIONES DE SEGURIDAD IMPORTANTES La energía eléctrica cumple con muchas funciones útiles, pero el uso inadecuado de la misma puede resultar en la posibilidad de choques eléctricos o incendios. Este producto ha sido diseñado y fabricado para su seguridad personal. Para no desactivar los mecanismos de seguridad incorporados cumpla con las siguientes reglas básicas, para su instalación, utilización y reparación.
5 UTILIZACION REPARACION 1. Accesorios 1. Reparación Para evitar lesiones personales: • No coloque este producto sobre un carro, pedestal, trípode, soporte o mesa inestable, ya que puede caer causando graves lesiones a los niños o adultos, y graves daños al producto. • Utilice el carro, pedestal, trípode, soporte o mesa recomendado por el fabricante o vendido conjuntamente con el producto.
6 ACERCA DE LA CAMARA DE VIDEO DIGITAL La cámara de video digital convierte las señales entrantes de audio y de video en formato digital para grabarlas. Una señal de video está compuesta de una señal de luminancia (Y) y de señales de color (R-Y y B-Y). Estas señales son identificadas y grabadas digitalmente (grabación de componente digital). El convertidor A/D (analógico a digital), muestrea la señal Y a 13,5 MHz, y las R-Y y B-Y a 3,375 MHZ, y las cambia en señales cuánticas de 8 bits.
7 GUIA RAPIDA DE OPERACION TAPA DEL CASSETTE PORTACASSETTE CONMUTADOR DE ABERTURA/EYECCION ESPERA PAUSE LAMPARA DE ALIMENTACION TAPA DE LA PILA AY PL OFF R EC 5S REC BOTON DE INICIO/ PARADA DE GRABACION SUMINISTRO DE ALIMENTACION GRABACION Coloque una pila completamente cargada. 1 2 3 4 1 2 3 Abra la tapa de la pila en la dirección indicada por la flecha. Extraiga la tapa protectora de la pila e inserte la pila con el polo + – primero. Cierre el portapila.
8 ACCESORIOS SUMINISTRADOS Adaptador/cargador de CA AA-V70U Estuche blando para la cámara Mando a distancia RM-V708U T Cinta de cassette miniDV 30 min.
9 INDICE GUIA RAPIDA DE OPERACION ACERCA DE LA CAMARA DE VIDEO DIGITAL ACCESORIOS SUMINISTRADOS PREPARATIVOS 6 7 8 10 Cambio de la pila ...................................................................... 10 Colocación de la pila ................................................................... 11 Uso en interiores ...................................................................... 12 Uso del soporte de la cámara ........................................................
10 PREPARATIVOS Cambio de la pila Usted puede cambiar una pila de cada vez o dos consecutivamente. COLOCACION INDICADOR DE CARGA 1 INDICADOR DE CARGA 2 EXTRACCION PILA BN-V712U ROJO CORDON DE ALIMENTACION JACK DE CC NEGRO INDICADOR DE CARGA LUZ DE ALIMENTACION • El indicador de carga no se mueve por sí mismo. Después de cargar o extraer una pila descargada, asegúrese de mover el marcador a la posición predeterminada.
11 NOTAS: ● Si conecta el cordón de la cámara de CC al adaptador durante la carga de la pila, la electricidad es suministrada a la cámara y se detiene la carga. ● Cuando utilice el adaptador/cargador de CA, asegúrese de utilizar exclusivamente el cordón eléctrico suministrado. ● El adaptador/cargador de CA debe ser utilizado con la pila BN-V712U exclusivamente. ● Cuando carga la pila por primera vez o después de un largo período de almacenamiento, el indicador de carga puede no encenderse.
12 PREPARATIVOS (cont.) ADAPTADOR/CARGADOR DE CA CORDON DE ALIMENTACION MIC AV-OUT DC-IN 6V CORDON DE CC SOPORTE DE LA CAMARA El conector está debajo de esta cubierta. Uso en interiores Uso del soporte de la cámara Cuando utilice la cámara de video en interiores, podrá utilizar el adaptador de CA en lugar de la pila. Durante la grabación 1 ALIMENTACION DEL ADAPTADOR 2 ALIMENTACION DE LA CAMARA DE VIDEO Conecte el cordón de alimentación al adaptador de CA y al tomacorriente de CA.
13 Colocación/extracción de la pila de litio del reloj CR2025 Esta pila es necesaria para el funcionamiento del reloj y para efectuar los ajustes de fecha/hora. TAPA DEL PORTAPILA DE LA TAPA DEL 1 ABERTURA PORTAPILA Deslícela como se muestra en la ilustración. DE LA PILA 2 EXTRACCION AGOTADA Extraiga el portapila como se muestra y deslice la pila hacia abajo y hacia afuera del portapila. DE UNA PILA 3 INSERCION CARGADA Inserte la pila en el portapila con el extremo “+” hacia afuera.
14 PREPARATIVOS (cont.) Ajuste de fecha/hora Si usted ajusta la fecha y la hora previamente, los datos serán grabados automática e independientemente de la señal de video. Aunque la fecha y la hora no se visualicen durante la grabación, usted podrá llamar la indicación en la pantalla o borrarla desde la pantalla cuando quiera durante la reproducción. VISOR T W VISOR O FF WIDE MODE 20 X ZOOM OFF DIS AGC GA I N UP TO FADER / W IPE MENU TO P.
15 Colocación/extracción de un cassette Si ya ha instalado una pila completamente cargada, puede abrir el portacassette sin necesidad de alimentación externa. PORTACASSETTE TAPA DEL PORTACASSETTE CONMUTADOR OPEN/EJECT PUSH Asegúrese de que el lado con la ventanilla apunte hacia afuera. 1 ABERTURA DEL PORTACASSETTE Conecte la alimentación y deslice el conmutador OPEN/EJECT en la dirección indicada por la flecha. Se abre la cubierta del cassette.
16 PREPARATIVOS (cont.) Colocación de la correa para la mano Ajuste dióptrico La correa para la mano suministrada, le permite sujetar firmemente la cámara de video. Nunca sostenga la cámara de video sin utilizar la correa para la mano. Ajuste el visor para obtener una clara visión.
17 Unidad de mando a distancia RM-V708U Usted puede utilizar el RM-V708U para controlar la cámara de video cuando está conectada a la estación de anclaje. Botón inicio/parada de grabación (RECORDING START/STOP) (Z pg. 60) Conector entrada de pausa (PAUSE IN) (Z pg. 54) Botones del zoom (ZOOM) (Z pg. 50) Botón indicación (DISPLAY) (Z pg. 59) T W Botón cambio (SHIFT) (Z pg. 50) Botones de rebobinado/avance lento (SLOW) (Z pg. 45) Botones izquierda/derecha (LEFT/RIGHT) (Z pg.
18 GRABACION Operación completamente automática/manual La tabla siguiente muestra cuáles son las funciones disponibles en los modos de operación completamente automático y manual. AUTO FOCUS EXP. SET WB PRO DISCO SELECTOR MODO COMPLETAMENTE AUTOMATICO MODO MANUAL SELECCION DE LA POSICION DEL DISCO POSICION DEL DISCO SELECTOR AUTO FOCUS EXPOSURE WB Fotografía (Z pg. 25) Sí Sí Sí Sí Sí Escena (Z pg. 22)*2 Sí*1 Sí Sí Sí Sí Autodisparador (Z pg.
19 Menúes El menú de grabación le permite activar las siguientes funciones: Modo comprimido, Amplificación del zoom, Estabilizador de imagen digital, Ganancia, FADE/WIPE, P.AE/EFFECT, Menú de fecha/hora y menú de sistema. El procedimiento de selección siguiente se aplica al modo comprimido, amplificación de zoom, estabilización y Granancia. VISOR VISOR O FF WIDE MODE 20 X ZOOM OFF DIS AGC GA I N UP TO F ADER / W IPE MENU TO P . AE / EFFECT MENU TO DAT E / TIME MENU TO SYSTEM MENU END I T EM ZOOM SW .
20 GRABACION (cont.) 10X 20X 100X OFF SQUEEZE CINEMA O FF WIDE MODE 2 0X ZOOM OFF DIS AGC GA I N UP TO FADER / W IPE MENU TO P . AE / EFFECT MENU TO DAT E / TIME MENU TO SYSTEM MENU END I TEM ZOOM SW . SET SET BUTTON A AGC OFF ON OFF WIDE MODE (Modo pantalla ancha) Este modo de grabación es compatible con TV de pantalla ancha (formato 16:9). Para utilizar este modo consulte el manual de instrucciones del TV de pantalla ancha. SQUEEZE (Modo comprimido)–Para reproducción en TV con un formato de 16:9.
21 VISOR T W O FF WIDE MODE 2 0X ZOOM OFF DIS AGC GA I N UP TO FADER / W IPE MENU TO P . AE / EFFECT MENU TO DAT E / TIME MENU TO SYSTEM MENU END I T EM ZOOM SW . SET SET BUTTON VISOR SCENE BEEP W IND CUT SOUND MODE I D No . BOTON MENU 07 I T EM ZOOM SW . SET SET BUTTON END MENU DE GRABACION 5S ON OFF 4 8kHz MENU DE SISTEMA MANDO DEL ZOOM BOTON SET MANUAL AUTO FOCUS EXP.
22 GRABACION (cont.) 5S 5SD ANIM. SCENE BEEP W IND CUT SOUND MODE I D No . END 5S ON OFF 4 8kHz ON OFF OFF AUTO 07 48 kHz 32 kHz I TEM ZOOM SW . SET SET BUTTON Este número será necesario en el futuro cuando conecte la cámara de video a un computador [01 a 99]. SOUND (Sonido) BEEP (Pitido) Las señales de sonido pueden ser muestreadas a 48 o 32 kHz. Cuando se conecta o desconecta la alimentación suena un pitido y también al inicio y al fin de la grabación.
23 Grabación básica Para realizarla es necesario que usted haya efectuado los preparativos (Z pg. 10 a 22). Coloque el disco selector en “AUTO” e intente grabar de esta forma, antes de intentar utilizar funciones más avanzadas. AY PL VIEWFINDER OFF R EC 5S REC STANDBY LUZ DE ALIMENTACION BOTON DE INICIO/ PARADA DE GRABACION VISOR PAUSE AY PL DURANTE LA GRABACION AUTO OFF R E C FOCUS EXP.
24 GRABACION (cont.) 29 min 3 0min REC 1 min destella 0 min destella 2 min destella 3 min STOP PLAY /PAUSE BOTON RE SHOOT BOTON CAN. Indicador de cinta restante Refilmación de una escena El tiempo restante de la cinta es automáticamente monitoreado e indicado en el visor (Z pg. 66). Cuando la cinta termina, se visualizará “TAPE END” en el visor.
25 GRABACION Funciones avanzadas STANDBY PRESIONE EL BOTON DE FOTOGRAFIADO DURANTE LA GRABACION BOTON SNAPSHOT PRESIONE EL BOTON DE FOTOGRAFIADO DURANTE LA ACTIVACION DE GRABACION/ESPERA Fotografiado Utilice su cámara de video como una cámara normal y tome una o varias fotografías en sucesión. 1 TIRE DEL VISOR HACIA AFUERA Alinee la marca del mismo con “STANDBY”. El cubreobjetivo de abrirá automáticamente. 2 TOMA DE UNA FOTOGRAFIA Presione SNAPSHOT.
26 GRABACION Funciones avanzadas (cont.) Mando del zoom Zona del zoom digital D T Zona del zoom de 10 aumentos W INDICACION DEL ZOOM T APROXIMACION DE LA IMAGEN (T:Primer plano) W D T D T D T D T W W W W T ALEJAMIENTO DE LA IMAGEN (W: Granangular) W Zoom Seleccione cualquiera de los tres aumentos para “acercar” el sujeto (Z pg. 20). Simplemente deslice el mando del zoom (hacia “+”), para aproximar la imagen y hacia (“–”) para alejar la imagen.
27 AY PL OFF R E C 5S BOTON DE INICIO/ PARADA DE GRABACION STANDBY VISOR REC 5 S MODE Disolución en el modo de 5 segundos Seleccione “5SD” en el menú de sistema (Z pg. 21). La indicación “5SD MODE” aparece en el visor en el paso 2 de abajo. Grabe una escena durante 5 segundos y las imágenes serán almacenadas al fin de la misma. Si usted graba la próxima escena breve dentro de los 5 minutos, la escena anterior se disuelve al mismo tiempo que aparece la nueva escena.
28 GRABACION Funciones avanzadas (cont.) STANDBY VISOR AY PL OFF R E F . AUTO C F . AUTO ––– REC 5S PAUSE Después de 15 s. BOTON DE INICIO/ PAUSA DE GRABACION DURANTE LA GRABACION Autodisparador Una vez que la cámara de video está activada usted (o quienquiera que esté operando la cámara de video), podrá entrar en escena, colocando el toque final a una fotografía memorable. 1 TIRE DEL VISOR HACIA AFUERA Alinee la marca del mismo con “STANDBY”. El cubreobjetivo de abrirá automáticamente.
29 AY PL OFF R EC 5S AY PL OFF R EC 5S BOTON DE INICIO/ PARADA DE GRABACION STOP PLAY REW FF /PAUSE RE SHOOT CAN. PLAY /PAUSE Grabación a desde la mitad de la cinta Cuando extraiga una cinta en la cual está grabando o cuando reinicie la grabación de una cinta después de reproducir la grabación previamente realizada (sin retirar la cinta entre grabaciones), efectúe el siguiente procedimiento. 1 SELECCION DEL MODO 2 INICIO DE LA BUSQUEDA Coloque el disco de alimentación en “PLAY”.
30 GRABACION Funciones avanzadas (cont.) VISOR T W VISOR O FF WIDE MODE 20 X ZOOM OFF DIS AGC GA I N UP TO FADER / W IPE MENU TO P . AE / EFFECT MENU TO DAT E / TIME MENU TO SYSTEM MENU END ON SCREEN D I SPLAY DATE / TIME I T EM ZOOM SW . SET SET BUTTON END MENU DE GRABACION BOTON MENU OFF OFF DEC 2 5 ’ 96 PM 5 : 30 I T EM ZOOM SW . SET SET BUTTON MENU DE FECHA/HORA MANDO DEL ZOOM BOTON AJUSTE MANUAL AUTO FOCUS EXP.
31 VISOR VISOR FADER / W I P E SEL EC T OFF 1 2 3 4 5 WH BK WH I T E F ADER B L ACK F ADER P D I SSOL VE CORNER W I PE W I NDOW W I PE FADER / W IPE SELECT T OFF W 1 2 3 4 5 WH BK I T EM ZOOM SW . WH I TE FADER BLACK FADER P D I SSOL VE CORNER W I PE W I NDOW W I PE I TEM ZOOM SW . MENU DE FUNDIDOS/ REEMPLAZO DE IMAGEN Después de 2 s. EFFECT AUTO WH FOCUS PAUSE EXP.
32 GRABACION Funciones avanzadas (cont.) FUNDIDO FADER EJEMPLO WH WHITE (Fundido en pantalla blanca) Aparición gradual Desaparición gradual Reemplazo de imagen SCROLL WIPE (Reemplazo de imagen EJEMPLO por movimiento vertical) Aparición de la imagen desde pantalla negra BOTON DE INICIO/PARADA DE GRABACION Desaparición de imagen en pantalla negra Fundidos y reemplazo de imagen La escena aparece o desaparece gradualmente en una pantalla blanca o negra.
33 Fin de la escena anterior EJEMPLO P SCROLL WIPE (Reemplazo con movimiento vertical) La próxima escena aparece gradualmente sobre la escena anterior. Dentro de los 5 minutos . . . BOTON DE INICIO/ PARADA DE GRABACION Aparición por reemplazo con movimiento vertical Reemplazo (Picture Wipe)/disolución de imagen (dissolve) Combina las funciones de reemplazo y disolución de imagen, lográndose una transición con efecto profesional. Existen 6 efectos de reemplazo de imagen y 1 efecto de disolución.
34 GRABACION Funciones avanzadas (cont.) BOTON INICIO/PARADA DE GRABACION Variaciones aleatorias ?R RANDOM FADER (Fundido aleatorio): Cuando activa esta función, la cámara de video selecciona aleatoriamente el efecto utilizado para la transición de escena (efectos de fundido o reemplazo de imagen). WH BK B/W La cámara de video selecciona aleatoriamente un fundido/reemplazo de imagen. 1 INICIO DE LA GRABACION Presione inicio/parada de grabación. “ ? P ” aparece en el visor.
35 T W O FF WIDE MODE 2 0X ZOOM OFF DIS AGC GA I N UP TO F ADER / W IPE MENU TO P . AE / EFFECT MENU TO DAT E / TIME MENU TO SYSTEM MENU END I T EM ZOOM SW . SET SET BUTTON MENU DE GRABACION F ADER / W I P E CUSTOM I ZE 1 2 3 4 5 WH BK END WH I T E F ADER B L ACK F ADER P D I SSOL VE CORNER W I PE W I NDOW W I PE I T EM ZOOM SW . SET SET BUTTON PROGRAMACION DE FUNDIDOS/REEMPLAZO DE IMAGEN BOTON MENU MANDO DEL ZOOM BOTON SET AUTO FOCUS EXP.
36 GRABACION Funciones avanzadas (cont.) VISOR VISOR P . AE / E F F EC T SEL ECT OFF 1 1/250 SHUT T ER 1/250 TW I L I GH T 2 S EP I A 3 4 B/W B L ACK /WH ITE C L AS S I C F I L M 5 P . AE / EF F EC T SEL ECT T W OFF 1 1/250 SHUTTER 1/250 TW I L I GH T 2 SEP I A 3 4 B/W B L ACK / WH I TE C L ASS I C F I L M 5 I T EM ZOOM SW . I TEM ZOOM SW . MENU DE EFECTOS P.AE (AJUSTE DE FABRICA) Después de 2 s. EFFECT PAUSE AUTO FOCUS EXP.
37 B/W u MONOTONE (Blanco y negro) Al filmar con B/W su filmación será tal como las películas clásicas en blanco y negro. Si se lo utiliza conjuntamente con la función de cine, el efecto de “película clásica” será aumentado. SEPIA (Sepia) VIDEO ECHO (Eco de video) Agrega un “fantasma” al sujeto, produciendo un efecto de “fantasía” en la grabación. u Las escenas grabadas tendrán un tinte marrón como las fotografías viejas. Combine este efecto con el modo cine para que la filmación luzca clásica.
38 GRABACION Funciones avanzadas (cont.) VISOR T W VISOR O FF WIDE MODE 20 X ZOOM OFF DIS AGC GA I N UP TO F ADER / W IPE MENU TO P . AE / EFFECT MENU TO DAT E / TIME MENU TO SYSTEM MENU END P . AE / EF F EC T CUSTOM I ZE 1 1/250 SHUT T ER1/250 2 TW I L I GH T 3 SEP I A 4 B/W MONOTONE 5 C L ASS I C F I L M I T EM ZOOM SW . SET SET BUTTON END EFECTO P.AE MENU DE PROGRAMACION MENU DE GRABACION BOTON MENU I TEM ZOOM SW . SET SET BUTTON MANDO DEL ZOOM BOTON SET AUTO FOCUS EXP.
39 Zona de enfoque (El foco es ajustado en el centro de la pantalla) FOCUS MANDO DEL ZOOM T INDICADOR DE ENFOQUE MANUAL W AY PL AUTO OFF R EC FOCUS 5S EXP. SET WB BOTON SET PRO DISCO DE ALIMENTACION DISCO SELECTOR Ajuste del enfoque manual La cámara de video en la mayoría de los casos puede ajustar automáticamente el enfoque de 10 cm a infinito. Sin embargo, cuando el enfoque es difícil o cuando el sujeto no está en el centro del visor es necesario ajustar el enfoque manualmente.
40 GRABACION Funciones avanzadas (cont.) EXP. 0 MANDO DEL ZOOM T INDICACION DE EXPOSICION W AY PL AUTO OFF R E C FOCUS 5S EXP. WB SET BOTON SET PRO DISCO DE ALIMENTACION DISCO SELECTOR Control de exposición Generalmente la exposición se ajusta automáticamente. Sin embargo, cuando el fondo es demasiado brillante o demasiado oscuro en comparación con el sujeto, es necesario ajustar la exposición manualmente. 1 SELECCION DE MODO Coloque el disco selector en “EXP”.
41 L INDICADOR DE BLOQUEO DE IRIS AY PL AUTO OFF R EC FOCUS 5S EXP. BOTON SET SET WB PRO DISCO DE ALIMENTACION DISCO SELECTOR Bloqueo del iris Utilice esta función cuando filme un objeto en movimiento, cuando utilice el zoom, cuando la distancia al sujeto cambie (y por ello su tamaño en el visor), o cuando desee bloquear el nivel de brillo. Cuando el sujeto está cerca mantenga el iris bloqueado. Aunque el sujeto se mueva lejos de usted, la imagen no se oscurecerá.
42 GRABACION Funciones avanzadas (cont.) DISCO DE ALIMENTACION DISCO SELECTOR AUTO MWB AUTO FOCUS EXP. SET WB SELECCION DEL BALANCE DEL BLANCO PRO MANDO DEL ZOOM BOTON SET WB PAUSE AUTO MWB T W Ajuste del balance del blanco Usualmente el ajuste del balance del blanco es automático. Sin embargo, cuando desee filmar con diferentes tipos de iluminación o cuando filma una escena con tintes cambiantes, es necesario utilizar esta función.
43 AUTO MWB PAPEL BLANCO T AUTO MWB W AUTO WB FOCUS PAUSE EXP. SET AUTO MWB WB PRO BOTON SET Operación MWB Active esta función antes de filmar sujetos con diferentes tipos de iluminación. 1 SELECCION DE MODO Z Seleccione “MWB en el paso 3 del ajuste del balance del blanco ( pg. 42). MANUAL DE BALANCE DE 2 AJUSTE BLANCO Sostenga una hoja de papel blanco frente al sujeto. Ajuste el zoom o cambie de posición de tal manera que el papel blanco llene la pantalla.
44 REPRODUCCION Conexiones básicas HACIA EL JACK DE ENTRADA DE CC DISCO DE ALIMENTACION BOTON DE DESCONEXION TOMACORRIENTE DE CA ADAPTADOR/CARGADOR DE CA PALANCA DEL CERROJO JACK MULTIPLE ESTACION DE ANCLAJE CORDON DE ALIMENTACION HACIA EL JACK DE CC Conexión a la estación de anclaje Cuando usted conecta la cámara de video a la estación de anclaje opcional, podrá obtener muchos efectos interesantes durante la reproducción.
45 Reproducción en un TV * Para la conexión refiérase al manual de instrucciones de su VCR y/o TV. NOTAS: ● Si ocurre retroalimentación o aullidos durante la reproducción en un TV, posicione la estación de anclaje de tal manera que el micrófono de la cámara de video quede lejos del TV, o reduzca el volumen del mismo. ● Si el modo de pausa de grabación queda activado durante 5 minutos, el modo de parada se activa automáticamente para proteger las cabezas.
46 REPRODUCCION Conexiones básicas (cont.) Conexión a un VCR/TV B MIC C c AV-OUT Hacia AV OUT DC-IN 6V b A a SOPORTE DE LA CAMARA Cable de AUDIO y VIDEO (TV o VCR de ø3,5 DV) Hacia los conectores AUDIO y VIDEO IN DE LA CAMARA DE 1 CONEXION VIDEO AL TV O VCR DE LA SALIDA DEL VCR 5 CONEXION A LA ENTRADA DEL TV DE LA CAMARA DE 2 COLOCACION VIDEO EN EL SOPORTE PARA LA CAMARA 6 INICIO DE LAZREPRODUCCION Conéctela como se muestra en la ilustración. Alinee A con a , B con b y C con c .
47 REPRODUCCION Básica Usted puede ver lo que ha grabado en el visor. AY PL OFF R EC 5S LUZ DE ALIMENTACION REW RE SHOOT DISCO DE ALIMENTACION PLAY /PAUSE TAPA DE PANEL DE OPERACION 1 SELECCION DEL MODO Tire del visor y coloque el disco de alimentación en “PLAY”. 2 ABERTURA DE LA TAPA Deslice la tapa del panel de operación de la cámara de video como se muestra en la ilustración. 3 REBOBINADO DE LA CINTA Presione REW. Si rebobina la cinta hasta el fin, la misma se detiene automáticamente.
48 REPRODUCCION (cont.) Menú de reproducción El menú de reproducción le permite ajustar los siguientes parámetros: el sonido de reproducción (48 kHz, 32 kHz), Componente sincronizado, indicación y código de tiempo. El siguiente procedimiento se aplica a todos exceptuando el componente sincronizado ( Z pg. 57 y 58). MENU DE REPRODUCCION 4 8 kHz MODE 3 2 kHz MODE SYNCHRO D I SPLAY T I ME CODE DISCO DE ALIMENTACION FULL SOUND SOUND 1 SOUND 2 FULL SOUND SOUND 1 0.0 ON OFF ON OFF ON OFF I TEM ZOOM SW .
49 Sonido de reproducción Durante la reproducción la cámara de video detecta el modo de sonido en el cual se ha efectuado la grabación y reproduce el sonido. Seleccione el tipo de sonido que acompañará la reproducción de imagen de su grabación. (48 kHz preajustado en “FULL SOUND” y 32 kHz preajustado en “SOUND 1”). SONIDO DE REPRODUCCION INDICACION 48 KHz FULL SOUND Sonido estereofónico SOUND 1 El sonido “L” sale por ambos canales. SOUND 2 El sonido “R” sale por ambos canales.
50 REPRODUCCION Funciones avanzadas DISCO DE ALIMENTACION BOTON PLAY Reproducción normal SENSOR REMOTO BOTONES DEL ZOOM Presione T. T W BOTON SHIFT BOTONES LEFT/ RIGHT/UP/DOWN BOTON STOP Presione © (RIGHT) para mover la imagen BOTON PAUSE RM-V708U (suministrado) Reproducción con zoom Las imágenes pueden ser amplificadas en cualquier momento un máximo de 10 aumentos.
51 DISCO DE ALIMENTACION BOTON PLAY SENSOR REMOTO P . AE / E F F EC T SEL ECT OFF 1 2 B/W 3 4 5 C L AS S I C F I L M MONOTONE S EP I A STROBE V I DEO ECHO PANTALLA PARA SELECCION DE EFECTO P.AE (Reproducción) T W BOTON EFFECT BOTON EFFECT ON/OFF RM-V708U (suministrado) Programa AE/efectos para reproducción Estos efectos le permiten ser creativo con la imagen reproducida. Usted puede utilizar cualquiera de los 5 efectos.
52 EDICION Estación de anclaje Para los procedimientos de conexión refiérase a “Conexión de la estación de anclaje” en las páginas 44 y 45. Asegúrese de conectar la cámara de video a la estación de anclaje antes de comenzar la edición. Copia Usted puede copiar escenas grabadas con una cámara de video en una cinta de video. Por detalles refiérase al manual de instrucción de su VCR.
53 Ajuste de marca Antes de que pueda efectuar la copia automática, o controlar el VCR utilizando el mando a distancia RM-V708U es necesario ajustar la marca del VCR. El mando a distancia es capaz de controlar las funciones básicas del VCR (PLAY, FF, REW, PAUSE, STOP). Después de que haya ajustado la marca, apunte el mando a distancia al sensor del VCR y presione el botón apropiado. *Algunas platinas de video no pueden ser controladas.
54 EDICION (cont.) Edición de conjuntos aleatorios Utilizando el mando a distancia RM-V708U usted puede activar efectos P.AE y confeccionar una cinta editada en forma original.
55 PROGRAMA IN RM-V708U (suministrado) DISCO DE ALIMENTACION SENSOR REMOTO : 1 2 3 4 5 6 7 8 T I ME CODE TOTAL T W BOTON FADER/WIPE BOTON EFFECT BOTON EDIT IN/OUT ~ ~ ~ ~ ~ ~ ~ ~ OUT : : 00 : 00 MENU DE EDICION DE CONJUNTOS ALEATORIOS BOTON PLAY BOTON R.A. EDIT ON/OFFN BOTON CANCEL DEL PUNTO DE INSERCION 4 AJUSTE DE EDICION Al principio de la escena presione EDIT IN/OUT en el mando a distancia. La posición del punto de inserción de edición aparece en el visor y en el TV conectado.
56 EDICION (cont.) IN OUT 1 WH 00 : 25~02 : 05 P 2 P 07 : 18~08 : 31 OFF 3 OFF 03 : 33~05 : 53 4 09 : 30~13 : 15 : 5 15 : 55~ 6 ~ 7 ~ 8 ~ T I ME CODE 015 : 55 TOT AL 009 : 02 BOTON REW BOTON STOP B/W PANTALLA DE PROGRAMA DE EDICION R.A. BOTON EDIT T W RM-V708U (suministrado) BOTON FADE/WIPE BOTON EFFECT BOTON EDIT IN/OUT DE LA CINTA 9 PREPARACION FUENTE Rebobine la cinta colocada en la cámara de video hasta el principio de la escena que desea editar y presione PAUSE.
57 VCR (Platina de grabación) SENSOR REMOTO PROGRAMA 1 T W RM-V708U (suministrado) BOTON ON/OFF IN 1 2 3 4 5 6 7 8 : T I ME CODE TOT AL ~ ~ ~ ~ ~ ~ ~ ~ OUT : : 00 : 00 PANTALLA DE PROGRAMA DE EDICION R.A. Para una edición más precisa Algunos VCR efectúan la transición del modo de pausa de grabación al de grabación más rápido que otros.
58 EDICION (cont.) VCR (Platina de grabación) BOTON SET BOTON MENU DISCO DE ALIMENTACION MANDO DEL ZOOM BOTON STOP BOTON PLAY 4 8 kHz MODE 3 2 kHz MODE SYNCHRO D I SPLAY T I ME CODE END FULL SOUND SOUND 1 0.0 ON OFF 4 8 kHz MODE 3 2 kHz MODE SYNCHRO D I SPLAY T I ME CODE T W I TEM ZOOM SW . SET SET BUTTON END FU LL SOUND SOUND 1 –0.1 ON OFF I TEM ZOOM SW . SET SET BUTTON MENU DE REPRODUCCION DEL MODO DE 1 SELECCION OPERACION Coloque el disco de alimentación en “PLAY”, y presione PLAY.
59 Copia de audio Utilizando una cinta grabada en 32 kHz, usted puede confeccionar a su gusto la banda de sonido de una cinta que ha grabado. NOTA: La copia de audio no es posible en una cinta grabada en 48 kHz. DISCO DE ALIMENTACION CONECTOR DE ENTRADA DEL MICROFONO EXTERNO SENSOR REMOTO BOTON DE INDICACION T W 6e BOTON AUDIO MONITOR BOTON A.DUB BOTON PLAY BOTON STOP BOTON PAUSE ESPERA DE COPIA DE AUDIO RM-V708U (suministrado) DEL PUNTO DE 1 BUSQUEDA INSERCION DE EDICION Presione PAUSE.
60 EDICION (cont.) Edición por inserción Usted puede insertar fotografías y otras escenas en una película previamente grabada. DISCO DE ALIMENTACION SENSOR REMOTO BOTON DE INICIO/PARADA DE GRABACION 6w T W BOTON DISPLAY BOTON INSERT 12:34 BOTON PLAY BOTON PAUSE BOTON REW(IND) RM-V708U (suministrado) DEL PUNTO DE CORTE 1 BUSQUEDA 4 INICIO DE LA GRABACION DE EDICION Confirme el código de tiempo en este punto ( Z pg.
61 LOCALIZACION Y REPARACION DE AVERIAS Si después de seguir las indicaciones de la tabla de abajo el problema persiste, consulte a su agente más cercano de JVC o al Centro de Servicio Técnico. SINTOMA CAUSAS POSIBLES ACCION CORRECTIVA 1. No hay alimentación. 1. • La alimentación no está correctamente conectada. • La pila está agotada. • No se ha tirado hacia afuera del visor. 1. • Conecte firmemente el adaptador de CA (Z pg. 12). • Reemplace la pila agotada por una cargada (Z pg. 11).
62 LOCALIZACION Y REPARACION DE AVERIAS (cont.) SINTOMA CAUSAS POSIBLES ACCION CORRECTIVA 13. El zoom digital no funciona. 13. • Se ha seleccionado el zoom óptico de 10 aumentos. • El efecto de eco de video está activado. • Los efectos de reemplazo de imagen o disolución están siendo utilizados en la transición de una escena. • La grabación de 5 segundos fue realizada con el disco de alimentación colocado en “5S”, y con “5SD” seleccionado en el menú de sistema.
63 SINTOMA CAUSAS POSIBLES ACCION CORRECTIVA 18. La función de reemplazo de imagen no funciona. 18. • El efecto de obturación lenta está activado. • El modo de reducción o de cine es seleccionado en el menú de grabación. 18. • Asegúrese de que el modo de reducción, cine o efecto obturación lenta no estén activados cuando efectúa los preparativos para utilizar la función de reemplazo de imagen. 19. Aunque no se haya activado obturación lenta, la imagen luce como si la hubiese activado. 19.
64 DESPUES DE USAR LA CAMARA DE VIDEO PUERTA DEL CASSETTE CUBIERTA DEL VISOR PILA PORTACASSETTE Cable de audio/video (TV o VCR de ø3,5 DV) Soporte de la cámara Limpieza de la cámara de video Límpiela gentilmente con un paño suave. 7 RECOLOCACION DEL VISOR Sóplelo con un cepillo soplador y límpielo gentilmente con un papel para limpieza de objetivos.
65 CONTROLES, INDICACIONES Y CONECTORES Unidad principal 1 El indicador de la carga restante de la pila cambia de la siguiente manera de acuerdo con el nivel de carga de la misma: 2 (Se enciende) 3 Completamente cargada 2/3 de carga restante 1/3 de carga restante Descargada Cuando la carga está casi agotada, el indicador parpadea y la unidad de desconecta. Reemplace la pila por una cargada.
66 CONTROLES, INDICACIONES Y CONECTORES (cont.) Indicaciones del visor p o i D T y t r u W 48kHz / FULL 1 2 3 45 678 F . AUTO 1 A PAUSE P 0 L PHOTO e q ) NOMBRE Y FUNCION Posición del disco selector Indicador GAIN UP (aumento de ganancia) Modo pantalla ancha Indicador de “Battery Low” 6 7 (Z pg. 20) (Z pg. 20) Indicador del estabilizador de la imagen digital ( Z pg. 20) Indicador de espera de grabación (Z pg.
67 Estación de anclaje 1 2 3 45 6 # $ %^ @ ! 098 & 7 ) (* 1 Ventilador 2 3 4 5 6 7 8 9 0 ! Se activa automáticamente cuando se coloca la cámara de video y sirve para refrigerar la unidad. Tome precauciones para no obstruir las paletas. Botón de edición (EDIT) ................... (Z pg. 56) Indicación de carga (CHARGE) ......... (Z pg. 44) Botón de pausa (PAUSE) Botón de reproducción (PLAY) ......... (Z pg. 50) Botón de abertura (RELEASE) ............ (Z pg. 44) Palanca del cerrojo ..................
68 Cuando utilice el Adaptador/Cargador de C.A. en otras áreas que no sean los EE. UU. n El Adaptador/Cargador de C.A. posee selección automática de voltaje de C.A. que va de 110 a 240 V. UTILIZACION DEL ENCHUFE ADAPTADOR DE C.A. RESIDENCIAL Si conecta el cordón eléctrico en un enchufe de C.A. que pertenezca al Estándar Nacional Americano del tipo serie C73, utilice un adaptador de C.A. llamado “Siemens Plug”, como el mostrado. Para obtener este enchufe adaptador de C.A.
69 Cassettes Para utilizar y almacenar correctamente los cassettes, asegúrese de leer las siguientes precauciones: 1. Durante el uso . . . .... Asegúrese de que el cassette tenga la marca Mini DV. .... a grabación sobre cintas pregrabadas borra automáticamente el video previamente grabado y las señales de audio. .... asegúrese de que el cassette esté colocado correctamente al insertarlo. .... no coloque y extraiga el cassette repetidamente sin permitir que la cinta gire un poco.
70 ESPECIFICACIONES UNIDAD PRINCIPAL Generalidades Alimentación : 6 V CC (utilizando el adaptador de CA), 3,6 V CC (utilizando la pila) Consumo de energía : 6,2 W Formato : Formato DV (modo SD) Formato de señal : Estándar NTSC Formato de grabación de la señal de video : Grabación de componente digital Relación de compresión de datos : 25 Mbps Tecnología de compresión digital : DCT (Transformación discreta de coseno) y VLC (Codificación de Longitud Variable) Cassette : Cassette MINI DV Velocidad de la cin
71 Pila BN-V712U Capacidad Dimensiones Peso : 3,6 V/1.250 mA : 20 mm (W) x 20 mm (H) x 71 mm (D) : 50 gr. aprox. Mando a distancia RM-V708U Alimentación Vida útil de la pila Distancia efectiva Temperatura de funcionamiento Temperatura de almacenamiento Dimensiones Peso : 3 V CC (pilas de litio CR2025) : 1 año aprox. (dependiendo del uso) : 5 m aprox. (eje delantero) : 0 a 40°C : –20 a 50°C : 54 (A) x 86 (Alt.) x 12 (P) mm : 26 gr. aprox.
72 GLOSARIO DE TERMINOS Adaptador de CA Es utilizado para cargar la pila. Cuando se lo conecta directamente a la cámara puede ser utilizado como fuente de alimentación. Ajuste dióptrico Reacciona al grado de visión de sus ojos, facilitando el ver las indicaciones del visor y las imágenes. Balance del blanco Es un término que se refiere a la exactitud de la reproducción de color bajo diferentes tipos de iluminación.
73 INDICE A Ajuste de enfoque .................................. (Z pg. 39) Ajuste de fecha/hora .............................. (Z pg. 14) Ajuste de la marca de VCR ..................... (Z pg. 53) Ajuste dióptrico ..................................... (Z pg. 16) Alimentación (CA/Pila) ................... (Z pg. 10 y 12) Animación ............................................. (Z pg. 22) Aparición/desaparición de imagen por fundido ............................................ (Z pg.
MEMO
GR-DV1 DIGITAL CAMERA VI CAMARA DE GR- VICTOR COMPANY OF JAPAN, LIMITED M COPYRIGHT© 1996 VICTOR COMPANY OF JAPAN, LTD.