GR-DF420PAL.book Page 1 Tuesday, January 18, 2005 8:52 PM Dear Customer, Thank you for purchasing this digital video camera. Before use, please read the safety information and precautions contained in the pages 3 – 4 and 9 to ensure safe use of this product. ENGLISH DIGITAL VIDEO CAMERA GR-DF420 6 GETTING STARTED VIDEO RECORDING & PLAYBACK 17 ADVANCED FEATURES 25 REFERENCES 42 TERMS 51 Please visit our Homepage on the World Wide Web for Digital Video Camera: http://www.jvc.co.
MasterPage: Left GR-DF420PAL.book Page 2 Tuesday, January 18, 2005 8:52 PM 2 EN Major Features of this Camcorder Wipe/Fader Effects Backlight Compensation You can use the Wipe/Fader Effects to make pro-style scene transitions. (墌 pg. 36) Simply pressing the BACK LIGHT button brightens the image darkened by backlight. (墌 pg. 34) ● You can also select a spot metering area so that more precise exposure compensation is available. (墌 pg.
MasterPage: Start_Right GR-DF420PAL.book Page 3 Tuesday, January 18, 2005 8:52 PM EN SAFETY PRECAUTIONS IMPORTANT (for owners in the U.K.) Connection to the mains supply in the United Kingdom. DO NOT cut off the mains plug from this equipment. If the plug fitted is not suitable for the power points in your home or the cable is too short to reach a power point, then obtain an appropriate safety approved extension lead or consult your dealer.
MasterPage: Left GR-DF420PAL.book Page 4 Tuesday, January 18, 2005 8:52 PM 4 EN When the equipment is installed in a cabinet or on a shelf, make sure that it has sufficient space on all sides to allow for ventilation (10 cm or more on both sides, on top and at the rear). Do not block the ventilation holes. (If the ventilation holes are blocked by a newspaper, or cloth etc. the heat may not be able to get out.) No naked flame sources, such as lighted candles, should be placed on the apparatus.
MasterPage: TOC_Heading0_Right GR-DF420PAL.book Page 5 Tuesday, January 18, 2005 8:52 PM CONTENTS GETTING STARTED 6 ADVANCED FEATURES Index ................................................................. 6 Provided Accessories ..................................... 10 Power.............................................................. 12 Operation Mode .............................................. 14 Language Settings.......................................... 14 Date/Time Settings ....................
MasterPage: Left GR-DF420PAL.
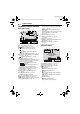
MasterPage: Start_Right GR-DF420PAL.book Page 7 Tuesday, January 18, 2005 8:52 PM Controls Indicators a Menu Button [MENU] (墌 pg. 25) T POWER/CHARGE Lamp (墌 pg. 12, 17) Data Battery Button [BATT. DATA] (墌 pg. 13) B Set Button [SET] (墌 pg. 25) C Fast-Forward Button [5] (墌 pg. 20) Right Button [>] (墌 pg. 25) D Stop Button [8] (墌 pg. 20) Backlight Compensation Button [BACK LIGHT] (墌 pg. 34) Down Button [ ] (墌 pg. 25) E Rewind Button [3] (墌 pg. 20) Quick Review Button [Q.REVIEW] (墌 pg.
MasterPage: Left GR-DF420PAL.book Page 8 Tuesday, January 18, 2005 8:52 PM 8 EN GETTING STARTED LCD Monitor/Viewfinder Indications During Video Recording 9 1 2 0 q we r t y 1h40m 15 x W T REC 3 4 5 6 7 BRIGHT SOUND 12 B I T 8 15:55 u i o f 50m p 1 0 . 11 . 05 10 : 00 d s a a Operation Mode (墌 pg. 14) B : Gain Up Mode (墌 pg. 26) C White Balance Indicator (墌 pg. 35) D : Spot Exposure Control Indicator (墌 pg. 34) : Backlight Compensation Indicator (墌 pg.
MasterPage: Start_Right GR-DF420PAL.book Page 9 Tuesday, January 18, 2005 8:52 PM GETTING STARTED F Battery Remaining Power Indicator (墌 pg. 44) G Date/Time (墌 pg. 29, 30) H VOLUME: Volume Level Indicator (墌 pg. 20) BRIGHT: Brightness Control Indicator (LCD monitor/Viewfinder) (墌 pg. 15) I Time Code (墌 pg. 29, 30) ® EN 9 ® ● Microsoft and Windows are either registered trademarks or trademarks of Microsoft Corporation in the United States and/or other countries.
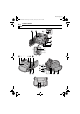
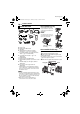
MasterPage: Left GR-DF420PAL.book Page 10 Tuesday, January 18, 2005 8:52 PM 10 EN GETTING STARTED Provided Accessories How To Attach The Lens Cap To protect the lens, attach the provided lens cap to the camcorder as shown in the illustration. NOTE: To confirm the lens cap is on correctly make sure the cap is flush to the camcorder. a b c d e f g h i j k l AC Adapter AP-V14E Power Cord Battery Pack BN-VF707U AV Cable Audio Extension Cable (for optional microphone, 墌 pg.
MasterPage: Start_Right GR-DF420PAL.book Page 11 Tuesday, January 18, 2005 8:52 PM GETTING STARTED EN How To Use The Audio Extension Cable How To Attach The Core Filter When using an optional external microphone, connect to the provided Audio extension cable (with a core filter attached), then connect the Audio extension cable to the camcorder. The core filter reduces interference. (See the right column.) Attach the core filters to the cables. The core filter reduces interference.
MasterPage: Left GR-DF420PAL.book Page 12 Tuesday, January 18, 2005 8:52 PM 12 EN GETTING STARTED To detach the battery pack Power This camcorder’s 2-way power supply system lets you choose the most appropriate source of power. Do not use provided power supply units with other equipment. Charging The Battery Pack BATT. RELEASE Open the cover. Slide the battery pack to the left while pressing BATT. RELEASE to detach it. Battery pack Approx. 1 hr. 30 min. BN-VF714U Approx. 2 hr. 40 min.
MasterPage: Start_Right GR-DF420PAL.book Page 13 Tuesday, January 18, 2005 8:52 PM GETTING STARTED EN 13 Using The Battery Pack Using AC Power Perform steps 2 – 3 in “Charging The Battery Pack”. Perform steps 4 – 5 in “Charging The Battery Pack”. Maximum continuous recording time NOTE: Viewfinder on BN-VF707U* 1 hr. 5 min. 1 hr. 25 min. BN-VF714U 2 hr. 20 min. 3 hr. BN-VF733U 5 hr. 25 min. 7 hr. 5 min.
MasterPage: Left GR-DF420PAL_04Start.fm Page 14 Friday, January 21, 2005 1:24 PM 14 EN GETTING STARTED Operation Mode Language Settings To turn on the camcorder, set the Power Switch to any operation mode except “OFF” while pressing down the Lock Button located on the switch. Power Switch Lock Button The language on the display can be changed. (墌 pg. 25, 29, 30) 1 Set the Power Switch to “M” while pressing down the Lock Button located on the switch. 2 Open the LCD monitor fully. (墌 pg.
MasterPage: Start_Right GR-DF420PAL_04Start.fm Page 15 Wednesday, January 19, 2005 4:13 PM GETTING STARTED 1 Adjust the velcro strip. 2 Pass your right hand through the loop and grasp the grip. 3 Adjust your thumb and fingers through the grip to easily operate the Recording Start/Stop Button, Power Switch and Power Zoom Lever. Be sure to fasten the velcro strip to your preference.
MasterPage: Left GR-DF420PAL.book Page 16 Tuesday, January 18, 2005 8:52 PM 16 EN GETTING STARTED 3 Close the cassette holder cover firmly until it Tripod Mounting locks into place. To attach the camcorder to a tripod, align the direction stud and screw to the mounting socket and stud hole on the camcorder. Then tighten the screw clockwise. ● Some tripods are not equipped with studs. To protect valuable recordings Slide the erase protection tab on the back of the tape in the direction of “SAVE”.
VIDEO RECORDING & PLAYBACK MasterPage: Video_Heading0_Right GR-DF420PAL.book Page 17 Tuesday, January 18, 2005 8:52 PM VIDEO RECORDING EN 17 NOTES: NOTE: Before continuing, perform the procedures listed below: ● Power (墌 pg. 12) ● Loading A Cassette (墌 pg. 16) Power Zoom Lever Power Switch Recording Start/Stop Button Lock Button POWER/CHARGE Lamp 1 Remove the lens cap. (墌 pg. 10) 2 Open the LCD monitor fully.
MasterPage: Left GR-DF420PAL.book Page 18 Tuesday, January 18, 2005 8:52 PM 18 EN VIDEO RECORDING LCD Monitor And Viewfinder Zooming While using the LCD monitor: Make sure the viewfinder is pushed back in. Pull on the end of the LCD monitor and open the LCD monitor fully. It can rotate 270° (90° downward, 180° upward). Produces the zoom in/out effect, or an instantaneous change in image magnification. While using the viewfinder: Make sure the LCD monitor is closed and locked.
MasterPage: Start_Right GR-DF420PAL.book Page 19 Tuesday, January 18, 2005 8:52 PM VIDEO RECORDING EN 19 ● When a tape is removed and re-inserted during shooting. ● When shooting using a partially recorded tape. ● When shooting on a blank portion located partway through the tape. ● When shooting again after shooting a scene then opening/closing the cassette holder cover. Journalistic Shooting In some situations, different shooting angles may provide more dramatic results.
MasterPage: Left GR-DF420PAL.book Page 20 Tuesday, January 18, 2005 8:52 PM 20 EN VIDEO PLAYBACK Still Playback Normal Playback MENU Power Switch 4/9/ VOL. +/– Lock Button Pauses during video playback. 1) Press 4/9 during playback. 2) To resume normal playback, press 4/9 again. ● If still playback continues for more than about 3 minutes, the camcorder’s Stop mode is automatically engaged. Shuttle Search 3 5 8/ Speaker 1 Load a cassette. (墌 pg.
MasterPage: Start_Right GR-DF420PAL.book Page 21 Tuesday, January 18, 2005 8:52 PM VIDEO PLAYBACK Blank Search EN 21 Connections To A TV Or VCR Helps you find where you should start recording in the middle of a tape to avoid time code interruption. (墌 pg. 19) Open the cover. To S connector 1 Load a cassette. (墌 pg. 16) 2 Set the Power Switch to “PLAY” while pressing down the Lock Button located on the switch. To AV connector 3 Press MENU. The Menu Screen appears. 4 Press MENU to select “t”.
MasterPage: Left GR-DF420PAL_05Video.fm Page 22 Wednesday, January 19, 2005 4:34 PM 22 EN VIDEO PLAYBACK NOTES: ● Set the video out select switch of the cable adapter as required: Y/C: When connecting to a TV or VCR which accepts Y/C signals and uses an S-Video cable. CVBS: When connecting to a TV or VCR which does not accept Y/C signals and uses an audio/ video cable. ● The S-Video cable is optional. Be sure to use the YTU94146A S-Video cable.
MasterPage: Start_Right GR-DF420PAL.book Page 23 Tuesday, January 18, 2005 8:52 PM VIDEO PLAYBACK Buttons And Functions EN 23 The following buttons are available when the camcorder’s Power Switch is set to “A” or “M”. o Zoom (T/W) Buttons Zoom in/out (墌 pg. 18, 24) (Also available with the Power Switch set to “PLAY”) p START/STOP Button Functions the same as the Recording Start/ Stop Button on the camcorder. q S.SHOT Button Functions the same as SNAPSHOT on the camcorder.
MasterPage: Left GR-DF420PAL.book Page 24 Tuesday, January 18, 2005 8:52 PM 24 EN VIDEO PLAYBACK Frame-By-Frame Playback During normal or still playback, press SLOW (IU) repeatedly for forward or SLOW (YI) repeatedly for reverse. Each time SLOW (YI or IU) is pressed, the frame is played back. Playback Zoom Magnifies the recorded image up to 47X at any time during video playback. 1) Press PLAY (U) to start video playback. Or perform normal playback of images.
ADVANCED FEATURES MasterPage: Start_Right GR-DF420PAL.book Page 25 Tuesday, January 18, 2005 8:52 PM MENUS FOR DETAILED ADJUSTMENT Changing The Menu Settings This camcorder is equipped with an easy-to-use, on-screen menu system that simplifies many of the more detailed camcorder settings. (墌 pg. 26 – 30) MENU Power Switch EN 25 Menus without Sub Menus v WIPE/FADER (墌 pg. 36) r PROGRAM AE (墌 pg. 37) p EXPOSURE (墌 pg. 33) u W. BALANCE (墌 pg. 35) 1) Press or to select the desired parameter.
MasterPage: Left GR-DF420PAL.book Page 26 Tuesday, January 18, 2005 8:52 PM 26 EN MENUS FOR DETAILED ADJUSTMENT Recording Menus CAMERA The “m CAMERA” settings are effective when the Power Switch is set to both “A” and “M”. However, the menu settings can be changed only when the Power Switch is set to “M”.
MasterPage: Start_Right GR-DF420PAL.book Page 27 Tuesday, January 18, 2005 8:52 PM MENUS FOR DETAILED ADJUSTMENT DIS OFF: Disables the function. [ON ]: To compensate for unstable images caused by camera-shake, particularly at high magnification. NOTES: ● Accurate stabilisation may not be possible if hand shake is excessive, or depending on the shooting condition. ● The “ ” indicator blinks or goes out if the Stabiliser cannot be used. ● Switch off this mode when recording with the camcorder on a tripod.
MasterPage: Left GR-DF420PAL.book Page 28 Tuesday, January 18, 2005 8:52 PM 28 EN MENUS FOR DETAILED ADJUSTMENT SYSTEM The “s SYSTEM” functions which are set when the Power Switch is set to “M” are also applied when the Power Switch is set to “PLAY”. [ ] = Factory-preset BEEP OFF: Even though not heard while shooting, shutter sound is recorded on the tape. BEEP: The beep sounds when the power is turned on or off, and at the beginning and end of recording. It also activates the shutter sound effect.
MasterPage: Start_Right GR-DF420PAL.book Page 29 Tuesday, January 18, 2005 8:52 PM MENUS FOR DETAILED ADJUSTMENT [ ] = Factory-preset BRIGHT 墌 pg. 15, “Brightness Adjustment Of The Display” ON SCREEN LCD: Keeps the camcorder’s display (except the date, time and time code) from appearing on the connected TV screen. [LCD/TV]: Makes the camcorder’s display appear on screen when the camcorder is connected to a TV. DATE/TIME OFF: The date/time does not appear. [AUTO]: Displays the date/time for approx.
MasterPage: Left GR-DF420PAL.book Page 30 Tuesday, January 18, 2005 8:52 PM 30 EN MENUS FOR DETAILED ADJUSTMENT VIDEO DISPLAY The “n” (VIDEO DISPLAY) settings are effective only for video playback except “BRIGHT” and “AUDIO LEV.”. ● The parameters (except “OFF” in ON SCREEN settings) are the same as in the description (CAMERA DISPLAY) on page 29. [ ] = Factory-preset BRIGHT 墌 pg.
MasterPage: Start_Right GR-DF420PAL.book Page 31 Tuesday, January 18, 2005 8:52 PM FEATURES FOR RECORDING Record a vacation or an important event in 5second clips to keep the action moving. This function is available only for video recording. 1 Set “5S” to “5S”. (墌 pg. 27) ● The “5S” indicator appears. 2 Press the Recording Start/Stop Button to start recording, and after 5 seconds the camcorder enters Record-Standby mode automatically.
MasterPage: Left GR-DF420PAL_06Advanced.fm Page 32 Wednesday, January 19, 2005 4:25 PM 32 EN FEATURES FOR RECORDING Snapshot (For Video Recording) This feature lets you record still images that look like photographs onto a tape. 1 Set the Power Switch to “M”. 2 Set “SNAP SHOT” to the desired mode. (墌 pg. 25, 26) The Snapshot indicator “ appears. ” 3 Press SNAPSHOT. ● There is the sound effect of a shutter closing. ● The “O” indication appears and a still image will be recorded for approx.
MasterPage: Start_Right GR-DF420PAL_06Advanced.fm Page 33 Wednesday, January 19, 2005 4:25 PM FEATURES FOR RECORDING Exposure Control ● When shooting using reverse lighting or when the background is too bright. ● When shooting on a reflective natural background such as at the beach or when skiing. ● When the background is overly dark or the subject is bright. 1 Set the Power Switch to “M”. 2 Set “p” to “MANUAL”. (墌 pg. 25) ● The exposure control indicator appears. 3 To brighten the image, press >.
MasterPage: Left GR-DF420PAL.book Page 34 Tuesday, January 18, 2005 8:52 PM 34 EN FEATURES FOR RECORDING Backlight Compensation Spot Exposure Control Backlight compensation brightens the subject quickly. With simple operation, backlight compensation feature brightens the dark subject portion by increasing the exposure. 1 Set the Power Switch to “M”. 2 Press BACK LIGHT so that the Backlight Compensation indicator “ ” appears.
MasterPage: Start_Right GR-DF420PAL.book Page 35 Tuesday, January 18, 2005 8:52 PM FEATURES FOR RECORDING The white balance refers to the correctness of colour reproduction under various lighting. If the white balance is correct, all other colours will be accurately reproduced. The white balance is usually adjusted automatically. However, more advanced camcorder operators control this function manually to achieve a more professional colour/ tint reproduction.
MasterPage: Left GR-DF420PAL.book Page 36 Tuesday, January 18, 2005 8:52 PM 36 EN FEATURES FOR RECORDING Wipe Or Fader Effects These effects let you make pro-style scene transitions. Use them to spice up the transition from one scene to the next. Wipe or Fader works when video recording is started or stopped. 1 Set the Power Switch to “M”. 2 Set “v” to the desired mode. (墌 pg. 25) ● The WIPE/FADER menu disappears and the effect is reserved. ● The selected effect indicator appears.
MasterPage: Start_Right GR-DF420PAL.book Page 37 Tuesday, January 18, 2005 8:52 PM Program AE With Special Effects 1 Set the Power Switch to “M”. 2 Set “r” to the desired mode. (墌 pg. 25) ● The PROGRAM AE menu disappears and the selected effect is activated. ● The selected effect indicator appears. To deactivate the selected effect Select “OFF” in step 2. The effect indicator disappears. NOTES: ● Program AE with special effects can be changed during recording or during Record-Standby.
MasterPage: Heading0_Left GR-DF420PAL_06Advanced.fm Page 38 Wednesday, January 19, 2005 4:19 PM 38 EN EDITING 1 Following the illustrations, connect the Dubbing To A VCR camcorder and the VCR’s input connectors. Open the cover. To S connector 2 Start playback on the camcorder. (墌 pg. 20) 3 At the point you want to start dubbing, start recording on the VCR. (Refer to the VCR’s instruction manual.) 4 To stop dubbing, stop recording on the VCR, then stop playback on the camcorder.
MasterPage: Start_Right GR-DF420PAL.book Page 39 Tuesday, January 18, 2005 8:52 PM EDITING Dubbing To A Video Unit Equipped With A DV Connector (Digital Dubbing) It is also possible to copy recorded scenes from the camcorder onto another video unit equipped with a DV connector. Since a digital signal is sent, there is little if any image or sound deterioration. EN 39 1 Make sure all units are turned off.
MasterPage: Left GR-DF420PAL.book Page 40 Tuesday, January 18, 2005 8:52 PM 40 EN EDITING Connection To A Personal Computer It is also possible to transfer still/moving images to a PC with a DV connector by using the software equipped with the PC or commercially available software. If you are using a Windows® XP, you can use Windows® Messenger to conduct video conferences over the Internet, using a camcorder. For details, refer to the help for the Windows® Messenger.
MasterPage: Start_Right GR-DF420PAL.book Page 41 Tuesday, January 18, 2005 8:52 PM EDITING The audio track can be customised only when recorded in the 12-BIT and SP modes. (墌 pg. 26) ● Use the provided remote control. Microphone Connector Speaker REW INSERT START/ STOP PAUSE PLAY STOP A.DUB Stereo Microphone 1 Play back the tape to locate the point where editing will start, then press PAUSE (9). 2 While holding A. DUB (D) on the remote control, press PAUSE (9). The “9D” and “MIC” indicators appear.
REFERENCES MasterPage: Heading0_Left GR-DF420PAL.book Page 42 Tuesday, January 18, 2005 8:52 PM 42 EN TROUBLESHOOTING If, after following the steps in the chart below, the problem still exists, please consult your nearest JVC dealer. The camcorder is a microcomputer-controlled device. External noise and interference (from a TV, a radio, etc.) might prevent it from functioning properly. In such cases, first disconnect its power supply unit (battery pack, AC Adapter, etc.
MasterPage: Start_Right GR-DF420PAL.book Page 43 Tuesday, January 18, 2005 8:52 PM TROUBLESHOOTING EN 43 The colour of Snapshot looks strange. “SET DATE/TIME!” appears. ● The light source or the subject does not include white. Or there are various different light sources behind the subject. HFind a white subject and compose your shot so that it also appears in the frame. (墌 pg. 32) ● The date/time is not set. HSet the date/time. (墌 pg.
MasterPage: Left GR-DF420PAL.book Page 44 Tuesday, January 18, 2005 8:52 PM 44 EN TROUBLESHOOTING Picture does not appear on the LCD monitor. ● The viewfinder is pulled out and “PRIORITY” is set to “FINDER”. HPush the viewfinder back in or set “PRIORITY” to “LCD”. (墌 pg. 18, 25, 28) ● The LCD monitor’s brightness setting is too dark. HAdjust the brightness of the LCD monitor. (墌 pg. 15) HIf the monitor is tilted upward 180 degrees, open the monitor fully. (墌 pg.
MasterPage: Start_Right GR-DF420PAL.book Page 45 Tuesday, January 18, 2005 8:52 PM TROUBLESHOOTING EN 45 LENS CAP Appears for 5 seconds after power is turned on if the lens cap is attached or when it is dark. A. DUB ERROR! Appears if Audio Dubbing is attempted on a blank portion of a tape. (墌 pg. 41) A. DUB ERROR! ● Appears if Audio Dubbing is attempted on a tape recorded in the LP mode. (墌 pg.
MasterPage: Heading0_Left GR-DF420PAL.book Page 46 Tuesday, January 18, 2005 8:52 PM 46 EN USER MAINTENANCE Cleaning The Camcorder Before cleaning, turn off the camcorder and remove the battery pack and AC Adapter. To clean the exterior Wipe gently with a soft cloth. Put the cloth in diluted mild soap and wring it well to wipe off heavy dirt. Then wipe again with a dry cloth. To clean the LCD monitor Wipe gently with a soft cloth. Be careful not to damage the monitor. Close the LCD monitor.
MasterPage: Start_Right GR-DF420PAL.book Page 47 Tuesday, January 18, 2005 8:52 PM CAUTIONS Battery Packs 47 NOTES: Terminals ... do not burn. ... do not short-circuit the terminals. When transporting, make sure the provided battery cap is attached to the battery. If the battery cap is misplaced, carry the battery in a plastic bag. ... do not modify or disassemble. ... do not expose the battery to temperatures exceeding 60°C, as this may cause the battery to overheat, explode or catch fire. ...
MasterPage: Left GR-DF420PAL.book Page 48 Tuesday, January 18, 2005 8:52 PM 48 EN CAUTIONS LCD Monitor ● To prevent damage to the LCD monitor, DO NOT ... push it strongly or apply any shocks. ... place the camcorder with the LCD monitor on the bottom. ● To prolong service life ... avoid rubbing it with coarse cloth. ● Be aware of the following phenomena for LCD monitor use. These are not malfunctions ...
MasterPage: Start_Right GR-DF420PAL.book Page 49 Tuesday, January 18, 2005 8:52 PM CAUTIONS EN 49 About moisture condensation ● You have observed that pouring a cold liquid into a glass will cause drops of water to form on the glass’ outer surface. This same phenomenon occurs on the head drum of a camcorder when it is moved from a cool place to a warm place, after heating a cold room, under extremely humid conditions or in a place directly subjected to the cool air from an air conditioner.
MasterPage: Heading0_Left GR-DF420PAL_08Spec.fm Page 50 Thursday, January 20, 2005 5:10 PM 50 EN SPECIFICATIONS Camcorder For General Power supply DC 11 V (Using AC Adapter) DC 7.2 V (Using battery pack) Power consumption Approx. 3.2 W (LCD monitor off, viewfinder on) Approx. 4.2 W (LCD monitor on, viewfinder off) Dimensions (W x H x D) 75 mm x 74 mm x 111 mm (with the LCD monitor closed and the viewfinder pushed back in) Weight Approx. 400 g (without battery, cassette and lens cap) Approx. 480 g (incl.
MasterPage: Start_Right GR-DF420PAL_09IX.fm Page 51 Tuesday, January 18, 2005 9:28 PM TERMS EN 51 A S AC Adapter .................................................... 13 Animation ....................................................... 27 Audio Dubbing ............................................... 41 Self Recording ............................................... 19 Slow-Motion Playback ................................... 23 Snapshot Mode .............................................. 26 Sound Mode .
MasterPage: BackCover GR-DF420PAL_10Cover4.