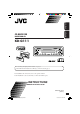
ENGLISH FRANÇAIS CD RECEIVER RECEPTEUR CD KD-G111 For canceling the display demonstration, see page 7. Pour annuler la démonstration des affichages, référez-vous à la page 7. For installation and connections, refer to the separate manual. Pour l’installation et les raccordements, se référer au manuel séparé. INSTRUCTIONS MANUEL D’INSTRUCTIONS GET0253-003A [EX/EU] Cover_KD-G111[EX_EU]f.
ENGLISH Thank you for purchasing a JVC product. Please read all instructions carefully before operation, to ensure your complete understanding and to obtain the best possible performance from the unit. IMPORTANT FOR LASER PRODUCTS 1. CLASS 1 LASER PRODUCT 2. CAUTION: Do not open the top cover. There are no user serviceable parts inside the unit; leave all servicing to qualified service personnel. 3. CAUTION: Visible and invisible laser radiation when open and interlock failed or defeated.
2 2 4 4 Sound adjustments ................ 12 Selecting preset sound modes (C-EQ: custom equalizer) .................. 12 KD-G111 ......... 5 General settings — PSM ......... 14 Parts identification................................. 5 Basic procedure ..................................... 14 Getting started....................... 6 Basic operations ........................... 6 Detaching the control panel.... 15 How to reset your unit ........................... How to forcibly eject a disc.........
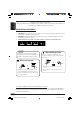
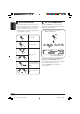
ENGLISH How to read this manual The following methods are used to made the explanations simple and easy-to-understand: • Some related tips and notes are explained in “More about this receiver” (see page 17). • Button operations are mainly explained with the illustrations as follows: How to use the MODE button If you press MODE, the receiver goes into functions mode, then the number buttons work as different function buttons. Ex.: When number button 2 works as MO (monaural) button. Press briefly.
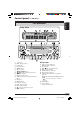
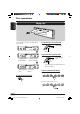
KD-G111 ENGLISH Control panel — Parts identification Display window 1 2 3 4 5 6 7 8 9 p q w e r t y u i +/– buttons DISP (display) button Loading slot Display window MODE button 0 (eject) button ¢/4 buttons (standby/on/attenuator) button SEL (select) button MO (monaural) button SSM (Strong-station Sequential Memory) button CD button FM/AM button RPT (repeat) button RND (random) button EQ (equalizer) button (control panel release) button Number buttons Display window o Tuner reception indicators MO (mo
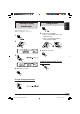
ENGLISH Getting started Basic operations To drop the volume in a moment (ATT) ~ To restore the sound, press it again. Ÿ To turn off the power You cannot select “CD” as the playback source if there is no disc in the loading slot. Caution on volume setting: ! Discs produce very little noise compared with other sources. Lower the volume before playing a disc to avoid damaging the speakers by the sudden increase of the output level. Volume level appears.
Setting the clock 1 If no operations are done for about 20 seconds, display demonstration starts. [Initial: DEMO ON]—see page 14. 1 2 ENGLISH Canceling the display demonstrations 2 Set the hour and minute. 1 Select “CLOCK H” (hour), then adjust the hour. 2 Select “CLOCK M” (minute), then adjust the minute. 3 Finish the procedure. 3 To check the current clock time when the power is turned off 4 Finish the procedure. To activate the display demonstration In step 3 above...
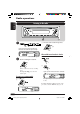
ENGLISH Radio operations Listening to the radio ~ 2 Select the desired station frequencies. Lights up when receiving an FM stereo broadcast with sufficient signal strength. Selected band appears. Ÿ When an FM stereo broadcast is hard to receive 1 Start searching for a station. 2 When a station is received, searching stops. To stop searching, press the same button again. Lights up when monaural mode is activated. To tune in to a station manually In step Ÿ above...
2 ENGLISH Storing stations in memory You can preset six stations for each band. FM station automatic presetting— SSM (Strong-station Sequential Memory) 1 Select the FM band (FM1 – FM3) you want to store into. 3 2 Preset number flashes for a while. 3 Listening to a preset station 1 2 Select the preset station (1 – 6) you “SSM” flashes, then disappears when automatic presetting is over. want. Local FM stations with the strongest signals are searched and stored automatically in the FM band.
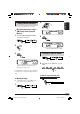
ENGLISH Disc operations Playing a disc All tracks will be played repeatedly until you stop playback. To fast-forward or reverse the track Fast-forwards. Reverses. To go to the next or previous tracks Total playing time of Total track number the inserted disc of the inserted disc To the following tracks. To the beginning of the current track, then the previous tracks.
You can lock a disc in the loading slot. To check the current clock time while listening to a disc ENGLISH Prohibiting disc ejection To cancel the prohibition, repeat the same procedure. Selecting the playback modes You can use only one of the following playback modes at a time. 1 2 Select your desired playback mode. Repeat play Mode Plays repeatedly TRK RPT: RPT OFF: The current track. • RPT lights up. Cancels repeat play. Mode Plays at random Ex.
ENGLISH Sound adjustments Selecting preset sound modes (C-EQ: custom equalizer) You can select a preset sound mode suitable to the music genre. ~ Ex.
You can adjust the sound characteristics to your preference. 1 Ex.: When “TRE” is selected Indication BAS*1 To do: Range Adjust the bass. –06 (min.) to +06 (max.) TRE*1 (treble) Adjust the treble. –06 (min.) to +06 (max.) FAD*2 (fader) Adjust the front and rear speaker balance. R06 (Rear only) to F06 (Front only) BAL (balance) Adjust the left and right speaker balance.
ENGLISH General settings — PSM Basic procedure 3 Adjust the PSM item selected. You can change PSM (Preferred Setting Mode) items listed on the table that follows. 1 4 Repeat steps 2 and 3 to adjust the other PSM items if necessary. 2 Select a PSM item. 5 Finish the procedure. Ex.
When detaching or attaching the control panel, be careful not to damage the connectors on the back of the control panel and on the panel holder. Attaching the control panel ENGLISH Detaching the control panel Detaching the control panel Before detaching the control panel, be sure to turn off the power. 15 EN14-19_KD-G111[EX_EU]f.
ENGLISH Maintenance How to clean the connectors Frequent detachment will deteriorate the connectors. To minimize this possibility, periodically wipe the connectors with a cotton swab or cloth moistened with alcohol, being careful not to damage the connectors. To keep discs clean A dirty disc may not play correctly. If a disc does become dirty, wipe it with a soft cloth in a straight line from center to edge. • Do not use any solvent (for example, conventional record cleaner, spray, thinner, benzine, etc.
Basic operations Turning off the power • If you turn off the power while listening to a disc, disc play will start from where playback has been stopped previously, next time you turn on the power. Tuner operations Storing stations in memory • During SSM search... – All previously stored stations are erased and stations are stored newly. – Received stations are preset in No. 1 (lowest frequency) to No. 6 (highest frequency). – When SSM is over, the station stored in No. 1 will be automatically tuned in.
ENGLISH Troubleshooting What appears to be trouble is not always serious. Check the following points before calling a service center. Symptoms FM/AM Disc playback Remedies The volume level is set to the minimum level. Adjust it to the optimum level. Connections are incorrect. Check the cords and connections. • The receiver does not work at all. The built-in microcomputer may have functioned incorrectly due to noise, etc. Reset the receiver (see page 2). • SSM automatic presetting does not work.
AUDIO AMPLIFIER SECTION Maximum Power Output: Front: 45 W per channel Rear: 45 W per channel Continuous Power Output (RMS): Front: 17 W per channel into 4 Ω, 40 Hz to 20 000 Hz at no more than 0.8% total harmonic distortion. Rear: 17 W per channel into 4 Ω, 40 Hz to 20 000 Hz at no more than 0.8% total harmonic distortion.
Having TROUBLE with operation? Please reset your unit Refer to page of How to reset your unit Vous avez des PROBLÈMES de fonctionnement? Réinitialisez votre appareil Référez-vous à la page intitulée Comment réinitialiser votre appareil EN, FR © 2004 Victor Company of Japan, Limited Rear_KD-G111[EX_EU]f.
KD-G111 Installation/Connection Manual Manuel d’installation/raccordement GET0253-010A 1004DTSMDTJEIN EN, FR [EX/EU] ENGLISH FRANÇAIS This receiver is designed to operate on 12 V DC, NEGATIVE ground electrical systems. If your vehicle does not have this system, a voltage inverter is required, which can be purchased at JVC IN-CAR ENTERTAINMENT dealers. Cet appareil est conçu pour fonctionner sur des sources de courant continu de 12 V à masse NEGATIVE.
ENGLISH FRANÇAIS ELECTRICAL CONNECTIONS RACCORDEMENTS ELECTRIQUES To prevent short circuits, we recommend that you disconnect the battery’s negative terminal and make all electrical connections before installing the receiver. • Be sure to ground this receiver to the car’s chassis again after installation. Pour éviter tout court-circuit, nous vous recommandons de débrancher la borne négative de la batterie et d’effectuer tous les raccordements électriques avant d’installer l’appareil.
РУCCKИЙ DEUTSCH ENGLISH CD RECEIVER CD-RECEIVER РЕСИВЕР С ПРОИГРЫВАТЕЛЕМ КОМПАКТ-ДИСКОВ KD-G111 For canceling the display demonstration, see page 7. Zum Abbrechen der Displaydemonstration siehe Seite 7. Информацию об отмене демонстрации функций дисплея см. на стр. 7. For installation and connections, refer to the separate manual. Für den Einbau und die Anschlüsse siehe das eigenständige Handbuch. Указания по установке и выполнению соединений приводятся в отдельной инструкции.
ENGLISH Thank you for purchasing a JVC product. Please read all instructions carefully before operation, to ensure your complete understanding and to obtain the best possible performance from the unit. IMPORTANT FOR LASER PRODUCTS 1. CLASS 1 LASER PRODUCT 2. CAUTION: Do not open the top cover. There are no user serviceable parts inside the unit; leave all servicing to qualified service personnel. 3. CAUTION: Visible and invisible laser radiation when open and interlock failed or defeated.
2 2 4 4 Sound adjustments ................ 12 Selecting preset sound modes (C-EQ: custom equalizer) .................. 12 KD-G111 ......... 5 General settings — PSM ......... 14 Parts identification................................. 5 Basic procedure ..................................... 14 Getting started....................... 6 Basic operations ........................... 6 Detaching the control panel.... 15 How to reset your unit ........................... How to forcibly eject a disc.........
ENGLISH How to read this manual The following methods are used to made the explanations simple and easy-to-understand: • Some related tips and notes are explained in “More about this receiver” (see page 17). • Button operations are mainly explained with the illustrations as follows: How to use the MODE button If you press MODE, the receiver goes into functions mode, then the number buttons work as different function buttons. Ex.: When number button 2 works as MO (monaural) button. Press briefly.
KD-G111 ENGLISH Control panel — Parts identification Display window 1 2 3 4 5 6 7 8 9 p q w e r t y u i +/– buttons DISP (display) button Loading slot Display window MODE button 0 (eject) button ¢/4 buttons (standby/on/attenuator) button SEL (select) button MO (monaural) button SSM (Strong-station Sequential Memory) button CD button FM/AM button RPT (repeat) button RND (random) button EQ (equalizer) button (control panel release) button Number buttons Display window o Tuner reception indicators MO (mo
ENGLISH Getting started Basic operations To drop the volume in a moment (ATT) ~ To restore the sound, press it again. Ÿ To turn off the power You cannot select “CD” as the playback source if there is no disc in the loading slot. Caution on volume setting: ! Discs produce very little noise compared with other sources. Lower the volume before playing a disc to avoid damaging the speakers by the sudden increase of the output level. Volume level appears.
Setting the clock 1 If no operations are done for about 20 seconds, display demonstration starts. [Initial: DEMO ON]—see page 14. 1 2 ENGLISH Canceling the display demonstrations 2 Set the hour and minute. 1 Select “CLOCK H” (hour), then adjust the hour. 2 Select “CLOCK M” (minute), then adjust the minute. 3 Finish the procedure. 3 To check the current clock time when the power is turned off 4 Finish the procedure. To activate the display demonstration In step 3 above...
ENGLISH Radio operations Listening to the radio ~ 2 Select the desired station frequencies. Lights up when receiving an FM stereo broadcast with sufficient signal strength. Selected band appears. Ÿ When an FM stereo broadcast is hard to receive 1 Start searching for a station. 2 When a station is received, searching stops. To stop searching, press the same button again. Lights up when monaural mode is activated. To tune in to a station manually In step Ÿ above...
2 ENGLISH Storing stations in memory You can preset six stations for each band. FM station automatic presetting— SSM (Strong-station Sequential Memory) 1 Select the FM band (FM1 – FM3) you want to store into. 3 2 Preset number flashes for a while. 3 Listening to a preset station 1 2 Select the preset station (1 – 6) you “SSM” flashes, then disappears when automatic presetting is over. want. Local FM stations with the strongest signals are searched and stored automatically in the FM band.
ENGLISH Disc operations Playing a disc All tracks will be played repeatedly until you stop playback. To fast-forward or reverse the track Fast-forwards. Reverses. To go to the next or previous tracks Total playing time of Total track number the inserted disc of the inserted disc To the following tracks. To the beginning of the current track, then the previous tracks.
You can lock a disc in the loading slot. To check the current clock time while listening to a disc ENGLISH Prohibiting disc ejection To cancel the prohibition, repeat the same procedure. Selecting the playback modes You can use only one of the following playback modes at a time. 1 2 Select your desired playback mode. Repeat play Mode Plays repeatedly TRK RPT: RPT OFF: The current track. • RPT lights up. Cancels repeat play. Mode Plays at random Ex.
ENGLISH Sound adjustments Selecting preset sound modes (C-EQ: custom equalizer) You can select a preset sound mode suitable to the music genre. ~ Ex.
You can adjust the sound characteristics to your preference. 1 Ex.: When “TRE” is selected Indication BAS*1 To do: Range Adjust the bass. –06 (min.) to +06 (max.) TRE*1 (treble) Adjust the treble. –06 (min.) to +06 (max.) FAD*2 (fader) Adjust the front and rear speaker balance. R06 (Rear only) to F06 (Front only) BAL (balance) Adjust the left and right speaker balance.
ENGLISH General settings — PSM Basic procedure 3 Adjust the PSM item selected. You can change PSM (Preferred Setting Mode) items listed on the table that follows. 1 4 Repeat steps 2 and 3 to adjust the other PSM items if necessary. 2 Select a PSM item. 5 Finish the procedure. Ex.
When detaching or attaching the control panel, be careful not to damage the connectors on the back of the control panel and on the panel holder. Attaching the control panel ENGLISH Detaching the control panel Detaching the control panel Before detaching the control panel, be sure to turn off the power. 15 EN14-19_KD-G111[EX_EU]f.
ENGLISH Maintenance How to clean the connectors Frequent detachment will deteriorate the connectors. To minimize this possibility, periodically wipe the connectors with a cotton swab or cloth moistened with alcohol, being careful not to damage the connectors. To keep discs clean A dirty disc may not play correctly. If a disc does become dirty, wipe it with a soft cloth in a straight line from center to edge. • Do not use any solvent (for example, conventional record cleaner, spray, thinner, benzine, etc.
Basic operations Turning off the power • If you turn off the power while listening to a disc, disc play will start from where playback has been stopped previously, next time you turn on the power. Tuner operations Storing stations in memory • During SSM search... – All previously stored stations are erased and stations are stored newly. – Received stations are preset in No. 1 (lowest frequency) to No. 6 (highest frequency). – When SSM is over, the station stored in No. 1 will be automatically tuned in.
ENGLISH Troubleshooting What appears to be trouble is not always serious. Check the following points before calling a service center. Symptoms FM/AM Disc playback Remedies The volume level is set to the minimum level. Adjust it to the optimum level. Connections are incorrect. Check the cords and connections. • The receiver does not work at all. The built-in microcomputer may have functioned incorrectly due to noise, etc. Reset the receiver (see page 2). • SSM automatic presetting does not work.
AUDIO AMPLIFIER SECTION Maximum Power Output: Front: 45 W per channel Rear: 45 W per channel Continuous Power Output (RMS): Front: 17 W per channel into 4 Ω, 40 Hz to 20 000 Hz at no more than 0.8% total harmonic distortion. Rear: 17 W per channel into 4 Ω, 40 Hz to 20 000 Hz at no more than 0.8% total harmonic distortion.
Having TROUBLE with operation? Please reset your unit Refer to page of How to reset your unit Haben Sie PROBLEME mit dem Betrieb? Bitte setzen Sie Ihr Gerät zurück Siehe Seite Zurücksetzen des Geräts Затруднения при эксплуатации? Пожалуйста, перезагрузите Ваше устройство Для получения информации о перезагрузке Вашего устройства обратитесь на соответствующую страницу EN, GE, RU © 2004 Victor Company of Japan, Limited Rear_KD-G111[EY]006A_1.
KD-G111 Installation/Connection Manual Einbau/Anschlußanleitung Руководство по установке/подключению GET0253-013A 1004DTSMDTJEIN EN, GE, RU [EY] ENGLISH DEUTSCH РУССКИЙ Dieses Gerät ist für einen Betrieb in elektrischen Anlagen mit 12 V Gleichstrom und (–) Erdung ausgelegt. Verfügt Ihr Fahrzeug nicht über diese Anlage, ist ein Spannungsinverter erforderlich, der bei JVC Autoradiohändler erworben werden kann.
Removing the receiver Ausbau des Geräts Удаление устройства Before removing the receiver, release the rear section. Vor dem Ausbau des Geräts den hinteren Teil freigeben. Перед удалением устройства освободите заднюю часть. Insert the two handles, then pull them as illustrated so that the receiver can be removed. Die beiden Handgriffe einsetzen und dann ziehen wie in der Abbildung gezeigt, so daß das Gerät entfernt werden kann.
ENGLISH A DEUTSCH If your car is equipped with the ISO connector / Wenn Ihr Auto mit ISOSteckern ausgestattet ist / Если Ваш автомобиль оборудован разъемами ISO • Connect the ISO connectors as illustrated. • Die ISO-Stecker wie abgebildet anschließen. • Подключите разъемы ISO, как показано на иллюстрации.
C Connecting the external amplifier / Anschließen des externen Verstärkers / Подключение внешнего усилителя You can connect an amplifier to upgrade your car stereo system. • Connect the remote lead (blue with white stripe) to the remote lead of the other equipment so that it can be controlled through this receiver. • Disconnect the speakers from this receiver, connect them to the amplifier. Leave the speaker leads of this receiver unused.
РУCCKИЙ ENGLISH CD RECEIVER РЕСИВЕР С ПРОИГРЫВАТЕЛЕМ КОМПАКТ-ДИСКОВ KD-G117 For installation and connections, refer to the separate manual. Указания по установке и выполнению соединений приводятся в отдельной инструкции.
ENGLISH Thank you for purchasing a JVC product. Please read all instructions carefully before operation, to ensure your complete understanding and to obtain the best possible performance from the unit. IMPORTANT FOR LASER PRODUCTS 1. CLASS 1 LASER PRODUCT 2. CAUTION: Do not open the top cover. There are no user serviceable parts inside the unit; leave all servicing to qualified service personnel. 3. CAUTION: Visible and invisible laser radiation when open and interlock failed or defeated.
2 2 4 4 Sound adjustments ................ 12 Selecting preset sound modes (C-EQ: custom equalizer) .................. 12 KD-G117 ......... 5 Parts identification................................. 5 General settings — PSM ......... 14 How to reset your unit ........................... How to forcibly eject a disc................... How to read this manual........................ How to use the MODE button ............... Control panel — Adjusting the sound ...............................
ENGLISH How to read this manual The following methods are used to made the explanations simple and easy-to-understand: • Some related tips and notes are explained in “More about this receiver” (see page 17). • Button operations are mainly explained with the illustrations as follows: How to use the MODE button If you press MODE, the receiver goes into functions mode, then the number buttons work as different function buttons. Ex.: When number button 2 works as MO (monaural) button. Press briefly.
KD-G117 ENGLISH Control panel — Parts identification Display window 1 2 3 4 5 6 7 8 9 p q w e r t y u i +/– buttons DISP (display) button Loading slot Display window MODE button 0 (eject) button ¢/4 buttons (standby/on/attenuator) button SEL (select) button MO (monaural) button SSM (Strong-station Sequential Memory) button CD button FM/AM button RPT (repeat) button RND (random) button EQ (equalizer) button (control panel release) button Number buttons Display window o Tuner reception indicators MO (mo
ENGLISH Getting started Basic operations To drop the volume in a moment (ATT) ~ To restore the sound, press it again. Ÿ To turn off the power You cannot select “CD” as the playback source if there is no disc in the loading slot. Caution on volume setting: Discs produce very little noise compared with other sources. Lower the volume before playing a disc to avoid damaging the speakers by the sudden increase of the output level. ! Volume level appears.
Setting the clock 1 If no operations are done for about 20 seconds, display demonstration starts. [Initial: DEMO ON]—see page 14. 1 2 ENGLISH Canceling the display demonstrations 2 Set the hour and minute. 1 Select “CLOCK H” (hour), then adjust the hour. 2 Select “CLOCK M” (minute), then adjust the minute. 3 Finish the procedure. 3 To check the current clock time when the power is turned off 4 Finish the procedure. To activate the display demonstration In step 3 above... 7 EN06-11_KD-G117[EE]f.
ENGLISH Radio operations Listening to the radio ~ 2 Select the desired station frequencies. Lights up when receiving an FM stereo broadcast with sufficient signal strength. When an FM stereo broadcast is hard to receive Selected band appears. Ÿ 1 Start searching for a station. 2 When a station is received, searching stops. To stop searching, press the same button again. Note: FM1 and FM2: 87.5 MHz – 108.0 MHz FM3: 65.00 MHz – 74.00 MHz To tune in to a station manually In step Ÿ above...
2 ENGLISH Storing stations in memory You can preset six stations for each band. FM station automatic presetting— SSM (Strong-station Sequential Memory) 1 Select the FM band (FM1 – FM3) you want to store into. 3 2 Preset number flashes for a while. 3 Listening to a preset station 1 2 Select the preset station (1 – 6) you “SSM” flashes, then disappears when automatic presetting is over. want. Local FM stations with the strongest signals are searched and stored automatically in the FM band.
ENGLISH Disc operations Playing a disc All tracks will be played repeatedly until you change the source or eject the disc. To fast-forward or reverse the track Fast-forwards. Reverses. To go to the next or previous tracks Total playing time of Total track number the inserted disc of the inserted disc To the following tracks. To the beginning of the current track, then the previous tracks.
You can lock a disc in the loading slot. To check the current clock time while listening to a disc ENGLISH Prohibiting disc ejection To cancel the prohibition, repeat the same procedure. Selecting the playback modes You can use only one of the following playback modes at a time. 1 2 Select your desired playback mode. Repeat play Mode Plays repeatedly TRK RPT: RPT OFF: The current track. • RPT lights up. Cancels. Mode Plays at random DISC RND: All tracks of the current disc. • RND lights up.
ENGLISH Sound adjustments Selecting preset sound modes (C-EQ: custom equalizer) You can select a preset sound mode suitable to the music genre. ~ Ex.
You can adjust the sound characteristics to your preference. 1 Ex.: When “TRE” is selected Indication To do: Range BAS*1 (bass) Adjust the bass. –06 (min.) to +06 (max.) TRE*1 (treble) Adjust the treble. –06 (min.) to +06 (max.) FAD*2 (fader) Adjust the front and rear speaker balance. R06 (Rear only) to F06 (Front only) BAL (balance) Adjust the left and right speaker balance.
ENGLISH General settings — PSM Basic procedure 3 Adjust the PSM item selected. You can change PSM (Preferred Setting Mode) items listed on the table that follows. 1 4 Repeat steps 2 and 3 to adjust the other PSM items if necessary. 5 Finish the procedure. 2 Select a PSM item. Ex.
When detaching or attaching the control panel, be careful not to damage the connectors on the back of the control panel and on the panel holder. Attaching the control panel ENGLISH Detaching the control panel Detaching the control panel Before detaching the control panel, be sure to turn off the power. 15 EN12-15_KD-G117[EE]f.
ENGLISH Maintenance How to clean the connectors Frequent detachment will deteriorate the connectors. To minimize this possibility, periodically wipe the connectors with a cotton swab or cloth moistened with alcohol, being careful not to damage the connectors. To keep discs clean A dirty disc may not play correctly. If a disc does become dirty, wipe it with a soft cloth in a straight line from center to edge. • Do not use any solvent (for example, conventional record cleaner, spray, thinner, benzine, etc.
Basic operations Turning off the power • If you turn off the power while listening to a disc, disc play will start from where playback has been stopped previously, next time you turn on the power. Tuner operations Storing stations in memory • During SSM search... – All previously stored stations are erased and stations are stored newly. – Received stations are preset in No. 1 (lowest frequency) to No. 6 (highest frequency). – When SSM is over, the station stored in No. 1 will be automatically tuned in.
ENGLISH Troubleshooting What appears to be trouble is not always serious. Check the following points before calling a service center. Symptoms FM/AM Disc playback Remedies The volume level is set to the minimum level. Adjust it to the optimum level. Connections are incorrect. Check the cords and connections. • This receiver does not work at all. The built-in microcomputer may have functioned incorrectly due to noise, etc. Reset the receiver (see page 2). • SSM automatic presetting does not work.
AUDIO AMPLIFIER SECTION Maximum Power Output: Front: 50 W per channel Rear: 50 W per channel Continuous Power Output (RMS): Front: 19 W per channel into 4 Ω, 40 Hz to 20 000 Hz at no more than 0.8% total harmonic distortion. Rear: 19 W per channel into 4 Ω, 40 Hz to 20 000 Hz at no more than 0.8% total harmonic distortion.
Having TROUBLE with operation? Please reset your unit Refer to page of How to reset your unit Затруднения при эксплуатации? Пожалуйста, перезагрузите Ваше устройство Для получения информации о перезагрузке Вашего устройства обратитесь на соответствующую страницу EN, RU © 2004 Victor Company of Japan, Limited Rear_KD-G117[EE]f.
KD-G117 Installation/Connection Manual Руководство по установке/подключению GET0254-002A 1004DTSMDTJEIN EN, RU [EE] ENGLISH РУССКИЙ Это устройство разработано для эксплуатации на 12 В постоянного напряжения с минусом на массе. Если Ваш автомобиль не имеет этой системы, требуется инвертор напряжения, который может быть приобретен у дилера автомобилнего специалиста JVC. This receiver is designed to operate on 12 V DC, NEGATIVE ground electrical systems.
ENGLISH РУССКИЙ ELECTRICAL CONNECTIONS ЭЛЕКТРИЧЕСКИЕ ПОДКЛЮЧЕНИЯ To prevent short circuits, we recommend that you disconnect the battery’s negative terminal and make all electrical connections before installing the receiver. • Be sure to ground this receiver to the car’s chassis again after installation. Для предотвращения коротких замыканий мы рекомендуем Вам отсоединить отрицательный разъем аккумулятора и осуществить все подключения перед установкой устройства.