FS-X5(C)_Cover1.fm Page 1 Tuesday, April 8, 2003 10:58 AM COMPACT COMPONENT SYSTEM SYSTEME DE COMPOSANTS COMPACT FS-X5 Consists of CA-FSX5 and SP-FSX5 Se compose de CA-FSX5 et de SP-FSX5 SP-FSX5 CA-FSX5 INSTRUCTIONS MANUEL D’INSTRUCTIONS SP-FSX5 For Customer Use: Enter below the Model No. and Serial No. which are located either on the rear, bottom or side of the cabinet. Retain this information for future reference. Model No. Serial No.
FS-X5(C)_E.book Page 1 Friday, April 4, 2003 1:28 PM Warnings, Cautions and Others / Mises en garde, précautions et indications diverses (For U.S.A) CAUTION RISK OF ELECTRIC SHOCK DO NOT OPEN CAUTION: TO REDUCE THE RISK OF ELECTRIC SHOCK DO NOT REMOVE COVER (OR BACK) NO USER SERVICEABLE PARTS INSIDE REFER SERVICING TO QUALIFIED SERVICE PERSONNEL.
FS-X5(C)_E.book Page 2 Friday, April 4, 2003 1:28 PM For Canada/pour le Canada For Canada/pour Le Canada CAUTION: TO PREVENT ELECTRIC SHOCK, MATCH WIDE BLADE OF PLUG TO WIDE SLOT, FULLY INSERT. THIS DIGITAL APPARATUS DOES NOT EXCEED THE CLASS B LIMITS FOR RADIO NOISE EMISSIONS FROM DIGITAL APPARATUS AS SET OUT IN THE INTERFERENCE-CAUSING EQUIPMENT STANDARD ENTITLED “DIGITAL APPARATUS,” ICES-003 OF THE DEPARTMENT OF COMMUNICATIONS.
FS-X5(C)_E.book Page 3 Friday, April 4, 2003 1:28 PM CAUTION ■ About the Internal Cooling Fan This unit includes an internal cooling fan, so as to allow for high-power operation within a small space. This fan comes on when the sound level is set high, and may also come on even at low sound levels if the internal temperature rises.
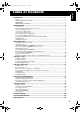
FS-X5(C)_E.book Page 1 Friday, April 4, 2003 1:28 PM English Table of Contents Introduction ........................................................................................................ 2 Features ...................................................................................................................................... 2 How This Manual Is Organized ................................................................................................. 2 WARNINGS ...........................
English FS-X5(C)_E.book Page 2 Friday, April 4, 2003 1:28 PM Introduction Thank you for purchasing the JVC Compact Component System. We hope it will be a valued addition to your home, giving you years of enjoyment. Be sure to read this instruction manual carefully before operating your new stereo system. In it you will find all the information you need to set up and use the system. If you have a query that is not answered by the manual, please contact your dealer.
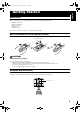
FS-X5(C)_E.book Page 3 Friday, April 4, 2003 1:28 PM English Getting Started Accessories Make sure that you have all of the following items, which are supplied with the System. FM Wire Antenna (1) AM Loop Antenna (1) Remote Control (1) Batteries (2) Speaker Cords (4) If any of these items are missing, contact your dealer immediately. How To Put Batteries In the Remote Control Match the polarity (+ and –) on the batteries with the + and – markings in the battery compartment.
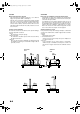
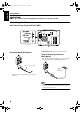
English FS-X5(C)_E.book Page 4 Friday, April 4, 2003 1:28 PM Getting Started CAUTION: • Make all connections before plugging the System into an AC power outlet. Connecting the FM Antenna Rear Panel of the Center Unit (CA-FSX5) (on the side panel) Using the Supplied Wire Antenna If reception is poor, connect the outdoor antenna. Using the Coaxial Type Connector (Not Supplied) A 75-ohm antenna with coaxial type connector should be connected to the FM 75-ohm COAXIAL terminal.
Getting Started Connecting the AM Antenna Rear Panel of the Center Unit (CA-FSX5) AM loop antenna (Supplied) Attach the AM loop to its base by snapping the tabs on the loop into the slot in the base. Outdoor single vinyl-covered wire (not supplied) Turn the loop until you have the best reception. • If the AM loop antenna wire is covered with vinyl, remove the vinyl by twisting it as shown in the diagram.
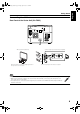
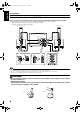
English FS-X5(C)_E.book Page 6 Friday, April 4, 2003 1:28 PM Getting Started Connecting the Speakers (SP-FSX5) These speakers are exclusively for this system. Using with other devices will damage the speakers. Connect the speaker cords between the speaker terminals of the Unit and those of the Speakers. • When inserting the speaker wire lead, open the speaker terminal. • Connect each speaker cord as shown below.
Getting Started Connecting an External Equipment Connect signal cords (not supplied) between the System’s LINE IN/OUT terminals and the output/input terminals of the external MD recorder, tape deck, etc. (For the details of connection, please refer to the user’s manual of the external equipment.) You can then listen to the external source through the System or record the System’s CD player or tuner to the external unit.
FS-X5(C)_E.book Page 8 Friday, April 4, 2003 1:28 PM English Basic Operations STANDBY/ON CD lamp (Inside) DISPLAY CD 6 A.P. off DIMMER LINE FM/AM AHB PRO BASS/TREBLE VOLUME +,_ AHB PRO Source indicator FADE MUTING Source selector STANDBY/ON indicator VOLUME +,_ STANDBY/ON PHONES Display Turning the Power On and Off Changing the Source Turning the System On The System has four sound sources, CD, FM, AM and LINE. Select one of sources you want to listen.
Basic Operations Adjusting the Brightness (DIMMER - at Power On) You can adjust the brightness of the display. When the System is Turned On At power on, each time you press the DIMMER button on the Remote Control, the brightness changes as follows: DIMMER OFF = DIMMER 1 = DIMMER 2 = (back to the beginning) DIMMER OFF : Bright DIMMER 1 : Dark (CD lamp also becomes dark.) DIMMER 2 : Darker (CD lamp goes out.
English FS-X5(C)_E.book Page 10 Friday, April 4, 2003 1:28 PM Basic Operations Tone Control (BASS/TREBLE) You can control the tone by changing the bass (low frequency) and treble (high frequency). On the Remote Control 1 Press the BASS/TREBLE button. Each time you press the button, the Tone Control mode changes as follows. BASS = TREBLE = Normal display = (back to the beginning) 2 While “BASS” or “TREBLE” appears on the display, press the VOLUME + or button to adjust the bass or treble level.
FS-X5(C)_E.book Page 11 Friday, April 4, 2003 1:28 PM English Using the Tuner Numeric Keys 5 3 ∞ SET 2 FM/AM FM/PLAY MODE Multi-control button FM mode indicator Source selector ¢ 4 Band display, Preset channel, Frequency display * When the System is in use, the display shows other items as well. For simplicity, we show here only the items described in this section. You can listen to FM and AM stations. Stations can be tuned in manually, automatically, or from preset memory storage.
English FS-X5(C)_E.book Page 12 Friday, April 4, 2003 1:28 PM Using the Tuner CAUTION: Presetting Stations You can preset up to 30 FM stations and up to 15 AM stations. • Preset numbers may have been set to factory test frequencies prior to shipment. This is not a malfunction. You can preset the stations you want into memory by following one of the presetting methods below.
FS-X5(C)_E.book Page 13 Friday, April 4, 2003 1:28 PM English Using the CD Player CD DOOR 0 Numeric Keys CANCEL 5 3 ∞ SET 2 CD 6 7 CD door REPEAT FM/PLAY MODE 0 CD 6 ¢ Source selector 7 Disc indicator 4 Repeat indicator Play mode indicator * When the System is in use, the display shows other items as well. For simplicity, we show here only the items described in this section. You can use Normal, Random, Program or Repeat Play.
English FS-X5(C)_E.book Page 14 Friday, April 4, 2003 1:28 PM Using the CD Player ❑ You can insert a CD while listening to the other source. • However, while the CD door is operating (opening or closing), the other source will be muted. CAUTION: • DO NOT try to open or close the CD door by hands as it will be damaged. To Unload a CD Take out the CD as shown below.
Using the CD Player 5 Press the Numeric Keys to enter the track number you want to program (See page 10). The program order number will be assigned from “1”, if nothing is programmed yet. Example: Track number • If the total playback time of the programmed tracks exceeds 1 hour and 40 minutes, “--:--” will appear on the display. • If you try to program the 33rd track, “MEMORY FULL” appears on the display for about 2 seconds.
English FS-X5(C)_E.book Page 16 Friday, April 4, 2003 1:28 PM Using the CD Player Repeating Tracks CD DOOR LOCK You can repeat all tracks or individual track, as many times as you like. You can prevent unwanted CD ejection by locking the CD door. The CD Player works normally except CD ejection operation. During playback or in Stop mode, press the REPEAT button on the Remote Control. Each time you press the button, the Repeat mode and Repeat indicator change as follows.
FS-X5(C)_E.book Page 17 Friday, April 4, 2003 1:28 PM English Using External Equipments SET 2 3 LINE Source selector Listening to External Equipment You can listen to the external equipment such as MD recorder, tape deck or other auxiliary. ❑ First make sure that the external equipment is properly connected to the System. (See page 7). 1 2 Set the VOLUME control to the minimum position. Changing the Equipment’s Name You can change the equipment’s name according to the equipment to be used.
English FS-X5(C)_E.book Page 18 Friday, April 4, 2003 1:28 PM Using External Equipments Recording the System’s Source to External Equipment You can record the System’s source to external equipment which is connected to the LINE OUT or OPTICAL DIGITAL OUT terminal of the System, such as tape deck or MD recorder, etc.
FS-X5(C)_E.book Page 19 Friday, April 4, 2003 1:28 PM English Using the Timers STANDBY/ON CANCEL SET 3 2 CLOCK/TIMER SLEEP DAILY indicator Clock indicator SLEEP indicator * When the System is in use, the display shows other items as well. For simplicity, we show here only the items described in this section. The timers let you control listening functions automatically. Two types of timers are available: DAILY Timer Use this timer to set wake up everyday to music from any source, including melodies.
English FS-X5(C)_E.book Page 20 Friday, April 4, 2003 1:28 PM Using the Timers 3 Press the SET button. Example: The minute digits of the time indication blink on the display. • To return to the hour setting, press the CANCEL button. 4 5 Alternates Press the 3 or 2 button to set the minute. Press the SET button. “ADJUST OK!” appears on the display. The Clock indicator ( ) remains lit. Then, the selected time is set and the seconds start counting from 0.
Using the Timers 2. Press the 3 or 2 button to set the minute, then press the SET button. On the Remote Control 1 Press the CLOCK/TIMER button repeatedly until “ON (time)” appears on the display. At this time, “DAILY” indicator blinks on the display. Each time you press the button, the display changes as follows.
English FS-X5(C)_E.book Page 22 Friday, April 4, 2003 1:28 PM Using the Timers 5 Setting the volume level. Press the 3 or 2 button to select the volume level (VOLUME 1-50), then press the SET button. 6 Select the FADE function. 7 Press the SET button. Press the 3 or 2 button to select either “FADE” (fades in at power on) or “NoFADE” (does not fade in). The timer setting is completed, and the “DAILY” indicator stops blinking and remains lit.
Using the Timers Setting the SLEEP Timer Timer Priority Use the Sleep Timer to turn the System off after a certain number of minutes when it is playing. By setting the Sleep Timer, you can fall asleep to music and know that your System will turn off by itself rather than play all night. • You can only set the Sleep Timer when the System is on. The timer that will turn off earlier has the priority. You will see the priority from the following examples.
English FS-X5(C)_E.book Page 24 Friday, April 4, 2003 1:28 PM Troubleshooting • If you are having a problem with your System, check this list for a possible solution before calling for service. • If you cannot solve the problem from the hints given here “ERROR!” appears on the display, or the System has been physically damaged, call a qualified person, such as your dealer, for service. Symptom No sound is heard. Poor radio reception Stereo effect is lost in FM broadcast. The CD skips.
Care And Maintenance Handle your CDs carefully, and they will last a long time. Compact Discs • Only CDs bearing these marks can be used with this System. However, continued use of irregular shape CDs (heart-shape, octagonal, etc.) can damage the System. - DO NOT wipe it with a hard cloth. - DO NOT wipe it strong. - DO NOT wipe it with thinner or benzine. - DO NOT apply any volatile substance such as insecticides to it. - DO NOT allow any rubber or plastic to remain in contact with it for a long time.
FS-X5(C)_E.book Page 26 Friday, April 4, 2003 1:28 PM English Specifications CA-FSX5 Amplifier Output Power Main :60 W (30 W + 30 W) at 4 Ω (1 kHz 10% THD) Sub :60 W (30 W + 30 W) at 4 Ω (80 Hz 10% THD) Input Sensitivity/Impedance (1 kHz) LINE IN :210 mV/51 kΩ (LEVEL 1) 520 mV/51 kΩ (LEVEL 2) Output Sensitivity/Impedance (1 kHz) LINE OUT :600 mV/5.1 kΩ OPTICAL DIGITAL OUT :–23 dBm - –15 dBm Speaker terminals :MIN.
FS-X5(C)_F.book Page 26 Friday, April 4, 2003 1:29 PM Caractéristiques Français CA-FSX5 Amplificateur Puissanc Principal :60 W (30 W + 30 W) à 4 Ω (1 kHz 10% THD) Secondaire :60 W (30 W + 30 W) à 4 Ω (80 Hz 10% THD) Sensibilité/Impédance d’entrée (1 kHz) LINE IN :210 mV/51 kΩ (LEVEL 1) 520 mV/51 kΩ (LEVEL 2) Sensibilité/Impédance de sortie (1 kHz) LINE OUT :600 mV/5,1 kΩ OPTICAL DIGITAL OUT :–23 dBm - –15 dBm Bornes des haut-parleurs :4 Ω min.