
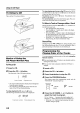
Manual

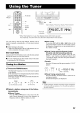
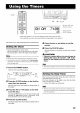

Usingthe Timers
1 Setting the ON time (Example: AM 10:15).
1. Press the TIMER button on the Unit for more than
two seconds.
The Timer indicator lights up and the hour digit of the
current ON time blinks on the display.
• When the clock is not set, "CLOCK" and "ADJUST"
appear alternately on the display. Set the clock first.
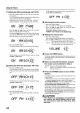
\ 1 f !,,
ON -RH 7F00
/ I I I\ •
Press the I=.t_l or I<< button on the Unit to set the
hour you want the Unit to come on.
Pressing the I=.t_lbutton moves the time forwards and
pressing the I<< button moves it backwards. Hold
down the button to move the time rapidly.
\ 1 I f/
ON - RH10 I-O0
i i I ix e
2. Press the TIMER button.
The minute digits of the ON time blink on the display.
\ ! /
ON RHIO'-O0 -
i le\
Set the minute you want the Unit to come on, using
the I=.t_l or I<< button.
\ ! /
ON Rtq10.'-15
2 Setting the OFF time (Example: PM 1:30).
1. Press the TIMER button.
The hour digit of the OFF time blinks on the display.
(The same time as the ON time will be automatically
set.)
\1 I!l
OFF-RtqlO:-15
/1 I _ \ •
Set the hour you want the Unit to be turned off, using
the I=.t_l or I<< button.
\!1f/
OFF-PH 1 z-15
/ l I ix e
2. Press the TIMER button.
The minute digits of the OFF time blink on the dis-
play.
\ f /
oFF I
Set the minute you want the Unit to be turned off, us-
ing the _-1,.t and I<< buttons.
\f/
OFFPM 1-,N:
3 Selecting the music source.
1. Press the TIMER button.
The "TUNER" or "CD" blinks on the display.
2. Press the I_,_1 or I.<4 button to select the music
source you want to listen to.
The display changes as shown below.
TUNER_CD_(back to the beginning)
4 Setting the volume level.
1. Press the TIMER button.
The current volume setting blinks on the display.
2. Press the I_1 or I.<4 button to select the volume level.
-- :The current volume level will be used.
0 to 50 :When the timer is turned on, the Volume will
be automatically set to the selected level.
\I/
UOLUtqE -15-
/ le\
5 Press the TIMER button.
The timer setting is completed and the display returns to
the display before you set the Timer. The Timer indica-
tor remains lit.
6
Before turning off the System, prepare
the music source selected in step 3.
TUNER: Tune in to the desired station.
CD: Insert a CD. (Playback will start from the first
track at Timer on.)
7 Press the POWER button to turn off the
System.
In standby mode, you can see the Timer indicator (_) )
on the display.
• When the timer turns on, the Timer indicator starts blink-
ing and the prepared source in step 6 will be played.
To cancel the timer, press the TIMER button. The
Timer indicator (_) ) goes out on the display.
To re-activate the cancelled timer, press the TIM-
ER button to light the Timer indicator (_) ).
At this time, you can see the current timer settings. Each
setting appears on the display for two seconds in the or-
der of ON time, OFF time, music source and volume.
To change the timer setting, repeat the setting pro-
cedure from the beginning.
CAUTION:
• If the System is unplugged, or a power fail-
ure occurs, the timer setting will be lost.
You will need to reset the clock first, then
the timer.
18