Geschirrspüler Lave-vaisselle Afwasmachine Dishwasher JSI 3741 Gebrauchsanweisung Mode d’emploi Gebruiksaanwijzing Instruction booklet
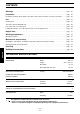
CONTENTS Warnings . . . . . . . . . . . . . . . . . . . . . . . . . . . . . . . . . . . . . . . . . . . . . . . . . . . . . . . . . . . . . . . . . . . . . . .page 45 Installation . . . . . . . . . . . . . . . . . . . . . . . . . . . . . . . . . . . . . . . . . . . . . . . . . . . . . . . . . . . . . . . . . . . . . .page 46 Positioning, levelling, water supply connections, water outlet connection, electrical connections . . . . . .page 46 Use . . . . . . . . . . . . . . . . . . . . . . . . . . . . . . . .
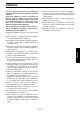
WARNINGS It is most important that this instruction book should be retained with the appliance for future reference. Should the appliance be sold or transferred to another owner, or should you move house and leave the appliance, always ensure that the book is left with the appliance in order that the new owner can get to know the functioning of the appliance and the relevant warnings. ■ Unplug the appliance and turn off the water after use.
INSTALLATION For making the connection itself, the coupling nut fitted to the machine's supply hose is designed to screw onto either a 3/4 inch gas thread spout, or to a purpose made quick-coupling tap such as the PressBlock. Remove all packaging before positioning the machine. Positioning If possible, position the machine next to a water tap and a drain. The dishwasher features fill and drain hoses which can be turned either to the left or the right to suit the installation.
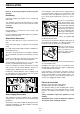
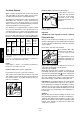
USE Control panel 1 2 3 2 3 4 5 6 7 8 1 «Mains-on» indicator light 6 Programme marker (●) This comes on when the ON/OFF button (2) is depressed, indicating that the appliance is switched on. 7 Programme selector knob 9 This allows you to select the required washing programme. Turn the knob clockwise until the number of the programme required is opposite the mark on the knob.
Levels 4 and 5 (adjustment on the machine) The Water Softener Water contains varying amounts of lime and mineral salts depending on the area in which you live: these are deposited on the dishes leaving white marks. 1 2 The higher the content of these salts, the harder your water will be. The «hardness» level is measured on 2 equivalent scales: German degrees or French degrees. Contact your local Water Authority to find the exact water hardness level for your area.
Rinse Aid D The use of this liquid ensures thorough rinsing, spot and streak free drying, making the water run quickly off the dishes for sparkling results. It is automatically added during the hot rinse. The dispenser, which is positioned inside the door, holds about 110 ml of rinse aid, which is sufficient for 16-40 dishwashing programmes, depending upon the dosage setting.
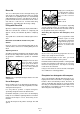
The two rear rows of prongs on the lower basket can be easily lowered to allow you to load pots, pans and bowls. To lower the prongs: slightly pull them upward and let them drop down (see picture); to bring them back to the standing position, just pull them up again. Loading your Machine Before placing dishes in the machine, remove any scraps of food from the plates (small bones, toothpicks, fish bones, scraps of meat and vegetables, fruit skins etc.
Adjusting the Height of the Upper Basket If washing very large plates (over 27 cm and up to 31 cm in diameter) you can load them in the lower basket after moving the upper basket to the higher position as follows: A Move the front runner stops (A) of the upper basket outward and slide the basket out. Refit the basket in the higher position and replace the stops (A) in their original position.
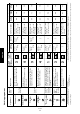
PTP05GB 52 Crockery, cutlery, or delicate crockery Crockery, cutlery Pots - Pans Crockery 2 Partial load to be completed later. This programme does not require any detergent.
Press this button to obtain a cold water prewash and wash at 45°C. Operating Sequence 1 Check that the filters are clean (see cleaning instructions) 2 Check that there is salt and rinse aid SO104 3 Load the dishes Remove larger scraps of food. 7 Start the machine Pull the lower basket out and arrange the saucepans, plates and cutlery in it. Insert the plug into the wall socket. Open the water tap. Pull the upper basket out and arrange the plates, saucers, glasses and cups etc. in it.
MAINTENANCE AND CLEANING Check that the spray arm nozzles are not obstructed. To remove the bottom spray arm, release it from its securing catches and pull it out. Cleaning the Central Filters (After each wash) Inspect the central filters (B) and (C) and remove any scraps of food with a brush, under running water. Clean the external surfaces of the machine and control panel with a soft damp cloth. If necessary use only neutral detergents.
SERVICING Certain problems are due to lack of simple maintenance or oversights and can be solved easily without having to call out an engineer. The machine is noisy The machine will not start The door has not been properly closed. ■ The plug is not properly inserted in the power socket. ■ There is no current at the socket. Check the fuse. The water tap is shut. ■ The water supply has been cut off. ■ The inlet hose is kinked. ■ The water inlet hose filter is clogged. The drain hose is kinked.
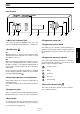
BUILDING-IN Building-in features Fitting the panel to the door This dishwasher is designed to be fitted under a kitchen counter or sink. In either case, it is essential that the recess dimensions indicated in the picture are followed. No further openings for venting of the dishwasher are required, but only to let the water inlet and drain hoses and power supply cable pass through.
Securing under a counter Levelling Secure the dishwasher to the counter on the front part by means of two 4,2x13 screws provided (see fig. - point A). A Make sure that the dishwasher door closes properly, without rubbing on sides. Otherwise level the machine by slightly screwing or unscrewing the two front feet until perfect closure of the door is reached. Kitchen plinth adjustment To allow correct opening of the door it is sometimes necessary to cut the kitchen plinth. Refer to the cutting table below.
Total Chlorine free 152996 33/1 D F NL GB 2/0397