
Installation Sheet

ELECTRICAL CONNECTION INSTRUCTIONS
Step 1. Provide electrical service according to your local electrical code to the wiring box located
on the plaster frame. Supply wire insulation must be rated for at least 90°C.
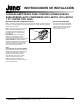
Step 2. Remove wiring box cover. Remove the
appropriate knock-out(s) to accommodate the
type of electrical service to be used/allowed by
your local electrical code (Fig. 8):
Metal Conduit. Remove appropriate round
knock-out(s) and connect conduit to wiring
box with proper connectors (not supplied.)
Non-Metallic Cable. Remove appropriate
knock-out(s) from top of wiring box and insert
cable, pushing it past the cable grip. No other
connector is required.
Step 3.
J-Box with Quick Connectors: Strip supply
wire 3/8˝, insert each supply wire into appropriate
junction box connector. Connect black fixture
wire to hot, white fixture wire to neutral and
green fixture wire to ground.
Step 4. Place all wiring and connections back
in wiring box and replace cover.
JUNO TYPE IC20 LEDT24, IC23 LEDT24 & IC1 LEDT24
NEW CONSTRUCTION RECESSED HOUSING FOR SELF
CONTAINED LED TRIMS
TRIM INSTALLATION
This housing is only intended to be used with
trims marked on the housing. For instructions
on how to install the trim, refer to the
instructions supplied with the trim.
Figure 8
Metal Conduit
Non-Metallic
Cable
2 of 2
1300 S. Wolf Road • Des Plaines, IL 60018 • Phone 800-323-5068 • Visit us at www.acuitybrands.com/juno-recessed
©2017 Acuity Brands Lighting, Inc Rev 07/17 P5951
INSTALLATION INSTRUCTIONS