
Installation Sheet

TYPE IC FOR
INSULATED CEILINGS
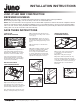
Juno Type IC fixtures are designed for direct
contact with insulating materials which are
approved for this application (Fig. 1). Fixtures
may also be used in non-insulated ceilings.
Juno Air-Loc LED housings are supplied
with pre-installed gaskets for energy savings
and to comply with energy code air leakage
requirements per ASTM E283.
INSTALLATION INTO
JOIST CONSTRUCTION
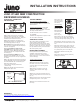
Step 1. Extend bar hangers to fit between
joists. Bar hanger foot is contoured to easily
align with bottom of joist (Fig. 2). Position fixture
by hammering Real-Nails
®
into joists (Fig. 3).
(Note: Bar hanger may be shortened to fit 12”
framing or smaller by breaking at score lines).
SAVE THESE INSTRUCTIONS
JUNO IC1LED NEW CONSTRUCTION
RECESSED HOUSINGS
WARNING: For your safety, read and understand instructions completely before starting installation.
Before wiring to power supply, turn off electricity at the fuse or circuit breaker box.
NOTE: Juno recessed fixtures are designed to meet the latest NEC requirements and are listed in full compliance with the
relevant UL standard(s). Before attempting installation of any recessed lighting fixture, check your local electrical building
code. This code sets the wiring standards and installation requirements for your locality and should be understood before
starting work. Use of non-Juno trims voids Juno warranty.
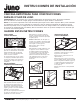
Step 2. Slide fixture along bar hangers into
desired location. Use locking screws or slot to
secure (Fig. 4).
Relocating Fixture – Nail can be removed
with hammer claw to allow easy repositioning
of fixture without damaging bar hanger or nail
(Fig. 5).
Step 3. Follow steps 1-4 under Electrical
Connection.
Step 4. When installing in drywall, cut a hole
measuring 4-1/2” diameter. After installing
drywall, adjust inner housing height
(if necessary) to match the bottom surface
of ceiling by pulling down on inner housing,
which is retained by springs. The housing is
adjustable for ceilings up to 1-1/2” thick.
Figure 3
Figure 4
Figure 5
Figure 2
Figure 1
INSTALLATION INTO
SUSPENDED CEILING
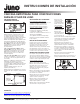
Step 1. Locate center of proposed opening
on ceiling tile and cut a hole measuring
4-1/2” diameter.
Step 2. Place ceiling tile in T-bar grid.
Step 3. Place fixture into position and snap
bar hanger foot with integral T-bar notch onto
T-bars (Fig. 6). Additional holes are provided for
securing with wire or screws if desired (Fig. 7).
Step 4. Follow Steps 1-4 under Electrical
Connection.
Figure 6
Figure 7
1 of 2
1300 S. Wolf Road • Des Plaines, IL 60018 • Phone 800-323-5068 • Visit us at www.acuitybrands.com/juno-recessed
©2017 Acuity Brands Lighting, Inc Rev 3/17 P5911
INSTALLATION INSTRUCTIONS