30" Bluetooth soundbar speaker with wireless subwoofer and Dolby Model: SBB-A5521 Please read this instruction manual carefully and keep it for future reference
CAUTION RISK OF ELECTRIC SHOCK DO NOT OPEN CAUTION: TO REDUCE THE ELECTRIC SHOCK, DO NOT REMOVE THE COVER (OR BACK). NO USER SERVICEABLE PART INSIDE, REFER SERVICING TO QUALIFIED SERVICE PERSONNEL. DANGEROUS VOLTAGE:The lighting flash with arrowhead symbol within an equilateral triangle is intended to alert the user to the presence of uninsulated “dangerous voltage” within the product’s enclosure that may be of sufficient magnitude to constitute a risk of electric shock to persons.
washbowl, kitchen sink, laundry tub, in a wet basement, or near a swimming pool. 6. Clean only with dry cloth The appliance should be cleaned only as recommended by the manufacturer. 7. Do not block any ventilation openings. Install in accordance with the manufacturer’s instructions. Slots and openings in the cabinet and in the back or bottom are provided for ventilation, to ensure reliable operation of the product and to protect it from overheating. These openings must not be blocked or covered.
moisture, does not operate normally, or has been dropped. 15. Power source This product should be operated only from the type of power source indicated on the marking label. If you are not sure of the type of power supply to your home, consult your appliance dealer or local power company. For products intended to operate from battery power, or other source, refer to the operation instructions. 16.
23. Damage requiring service Unplug this product from the wall outlet and refer service to qualified service personnel under the following conditions. a)When the power- supply cord or plug is damaged. b)If liquid has been spilled or objects have fallen into the product. c)If the product has been exposed to rain or water. d)If the product does not operate normally by following the operating instructions.
FCC STATEMENT: This device complies with part 15 of the FCC Rules. Operation is subject to the following two conditions: (1)This device may not cause harmful interference, and (2)This device must accept any interference received, including interference that may cause undesired operation. The antenna(s) used for this transmitter must be installed to provide a separation distance of at least 20 cm from all persons and must not be co-located or operating in conjunction with any other antenna or transmitter.
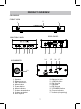
PRODUCT OVERVIEW SOUNDBAR FRONT VIEW 2 1 1 REAR PANEL CONTROL PANEL 3 4 5 6 7 8 9 14 SUBWOOFER 10 15 11 16 12 17 13 1. Speaker 2. Remote sensor 3. SB PAIR button 4. Mode button 5. Power button 6. Mode indicator 7. Volume down button 8. Volume up button 9. AUX IN jack 10. Optical In jack 11. LINE IN jacks 12. DC IN jack 13. Speaker 14. DC IN jack 15. STANDBY button 16. Power indicator 17.
REMOTE CONTROL 1. 1 6 (Power On/Off) Button 2. AUX Button 3. LINE IN Button 2 AUX 3 LINE IN OPTICAL 7 8 9 10 4 11 4. (Previous) Button 5. Sound Mode (MUSIC, TALK, MOVIE, STANDARD) 6. (Mute) Button 7. (Bluetooth)Button 8. OPTICAL Button MUSIC TALK 5 9. MOVIE Sound Mode STANDARD VOL 12 (Mode Switch) Button 10. (Next) Button 11. Play/Pause Button 12. (Volume Down/Up) Button BATTERY INSTALLATION OF REMOTE CONTROL First time use Remove and discard the insulation film as Fig.1.
BATTERY PRECAUTIONS Follow these precautions when using a battery in this device: 1. Use only the size and type of battery specified. 2. Be sure to follow the correct polarity when installing the battery as indicated in the battery compartment, a reversed battery may cause damage to the device. 3. Do not mix different types of batteries together ( e.g: Alkaline and Carbon -zinc ) or old batteries with fresh ones. 4.
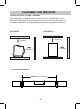
PLACEMENT AND MOUNTING 1. Placing the device on a table - Ventilation When placing the soundbar and the subwoofer on an entertainment center, bookshelf, or any type of enclosed space, be sure to allow enough space for ventilation. Otherwise, the heat generated will produce potential heat hazard. SUBWOOFER SOUNDBAR 2-3inches 2-3inches 2-3inches 2-3inches 2. The Installation Distance 5000mm(19.
2.1 Mounting to a wooden wall 19. 7 in che s (screws not included) A. Mark the position of the mounting screws on the wall using a pencil. B. Drill the screws directly into the marks that you have made on the wall and leave approx. 0.3 inches length to hook the sound bar. C. Put the sound bar onto the mounting screws. Make sure they are firm and stable. 2.2 Mounting to a brick wall 19. 7 in che s (screws and plastic fixing plug are not included) A.
GENERAL OPERATION 1.Connect the DC 16V,1.8A Adapter to the DC IN jack on the Unit. Plug the Adapter into the AC outlet with AC100~240V;50/60Hz. The mode indicator on the Unit will light up and turn RED. 2. Connect the DC 16V, 1.8A Adapter to the DC IN jack on the subwoofer. Plug the Adapter into the AC outlet with AC100~240V;50/60Hz. 3. Press and hold the button on the unit or press the button on remote control to power on the unit. Press the STANDBY button on the subwoofer to power on. 4.
GENERAL OPERATION 6. During Playback: ~ Press the + or - button on the unit or remote control repeatedly to adjust volume. ~ Press the button on remote control to turn off sound, the mode indicator on the unit will blink, press the button again to resume. ~ Press the MUSIC button on remote control to turn to MUSIC sound effect mode. ~ Press the TALK button on remote control to turn to TALK sound effect mode. ~ Press the MOVIE button on remote control to turn to MOVIE sound effect mode.
BLUETOOTH OPERATION 1. Press the button on the soundbar repeatedly until the indicator turns blue, or press the button on remote control to switch to the Bluetooth mode, the the indicator on front of soundbar will turn Blue and blink. 2. Power on external Bluetooth enabled device and enter Bluetooth mode and try searching the soundbar. 3. When atune analog 07 appears, select it and make connection. 4. After successful paired, the indicator will be solid blue. 5.
AUX IN OPERATION An external Audio player(such as mobile phone, MP3 player etc.) can be connected to this soundbar and listen through the speakers. 1. Plug one end of the AUX IN cable into the AUX IN jack on the soundbar. 2. Plug another end of the AUX IN cable into the headphone jack or AUX OUT jack on the external audio player. Rear View MP3 Player Mobile Phone ................................... ................................... .....................................................................
LINE IN OPERATION An external Audio/Video device(such as Set-Top Box, DVD player etc.) can be connected to this soundbar and listen through the speakers. 1. Plug one end of the LINE IN cable into the LINE IN jack(L&R) on soundbar. 2. Plug the other end of the LINE IN cable into the LINE OUT jack(L&R) on Set-Top Box or DVD player etc. LINE OUT jack of Set-Top Box /DVD player etc. red white Rear View L R 3.
OPTICAL IN OPERATION 1. Connect the OPTICAL OUT jack from the external audio player (such as TV, DVD player etc.) to the OPTICAL IN jack on the rear of the soundbar with the optical connection cable as illustated below:(For PCM format only) Rear View TV or DVD player etc. Optical Connection Cable OPTICAL OUT 2. Press the button on soundbar repeatedly or press the OPTICAL button on remote control to switch to the OPTICAL IN mode, the indicator on top of soundbar will turn Indigo(blue+green). 3.
TROUBLESHOOTING SYMPTOM No power POSSIBLE CAUSE POSSIBLE SOLUTION The Adapter is not connected Connect the Adapter to the wall outlet Soundbar is in power off mode Press the or press the button on soundbar button on remote control to power on No sound or low sound Volume level in minimum position Raise the volume level by pressing the + Button on soundbar Or press VOL + button on remote control The paired/connected device is not in playback mode Play music/movie in the paired/ connected device
SPECIFICATIONS Power input ...........................................................................AC 100~240V, 50/60Hz Power output .......................................................................DC 16V 1.8A Audio output of the unit.................................................................................2 x 15 W Audio output of the subwoofer.............................................................................30W Bluetooth effective working range in open area.......................