ultra-rugged field pc owner’s manual
ActiveSync, Excel, Hotmail, Internet Explorer, Microsoft, MSN, Outlook, PowerPoint, Visual Studio, Windows, Windows Media, Windows Mobile, Windows Mobile Device Center, Windows Vista, and the Windows logo are trademarks or registered trademarks of Microsoft Corporation in the United States and/or other countries. ® The Bluetooth word mark is owned by the Bluetooth SIG, Inc. and any use of such marks by Juniper Systems, Inc. is under license.
Contents 1 Getting Started 5 The Anatomy of the Field PC Getting Started 6 7 2 Communicating with a Desktop Computer 11 3 Using the Hardware 15 Communicating with a Desktop PC Using the Hardware Powering Off, Suspending, Resetting, and Restoring Factory Defaults Using the Stylus Using the Touchscreen 12 16 18 20 20 4 Programs and Settings 23 5 Bluetooth® Wireless Communications 37 6 Wi-Fi Connections 45 Understanding the Today Screen Entering Information Recognizing Status Icons Recognizi
7 Care and Maintenance 49 8 Service Information 53 A Product Specifications and Warnings 55 B Certifications and Regulatory Information 59 Caring for Your Field PC Repairing the Field PC Preparing for a Service Center Call Product Specifications Battery Warnings Equipment Warnings Regulatory Information Limited Product Warranty Index Field PC Owner’s Manual 50 54 54 56 57 58 60 62 65
1 Getting Started 6 The Anatomy of the Field PC 7 Getting Started
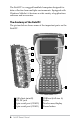
The Field PC is a rugged handheld computer designed for data collection from multiple environments. Equipped with Windows Mobile 6 it features a wide variety of applications software and accessories. The Anatomy of the Field PC The picture below shows some of the important parts on the Field PC.
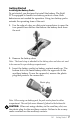
Getting Started Installing the Battery Packs To get started, you first need to install the battery. The Field PC is equipped to handle two battery packs at a time. Both batteries are not needed for operation. Using two battery packs extends the operating time of the unit. 1. Use the edge of a key or a flat point screwdriver to open the two quarter turn latches that release the battery door from the unit. 2. Remove the battery door.
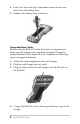
4. Insert the tab on the top of the battery door into the case slots Close the battery door. 5. Reattach the battery door of the unit. Charge the Battery Packs Before using the Field PC for the first time, it is important to make sure the batteries are completely charged. Charge the battery/batteries while inside the unit. Complete the following steps to charge the batteries: 1. Attach the outlet adapter into the wall charger. 2. Plug the wall charger into an outlet. 3.
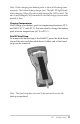
Note: When charging two battery packs in the unit the charge time increases. The bottom battery charges first. The left LED light blinks while charging. When the unit is fully charged the LED is solid. The unit is not damaged if left connected to the wall charger for extended periods of time. Charging Temperatures Only charge your battery pack in temperatures between 32° F and 104° F (0° C and 40° C). For best results, charge the battery pack at room temperature (68° F or 20° C).
Field PC Owner’s Manual
2 Communicating with a Desktop Computer 12 Communicating with a Desktop Computer
The Field PC can connect to a Desktop PC using either ActiveSync® (for computers with Windows® 2000 and Windows® XP), or Windows Mobile® Device Center (for computers with Windows Vista™). Communicating with a Desktop PC Install ActiveSync® on a Desktop Computer (Windows® 2000 and Windows® XP) Note: If you have Windows Vista™, see Install Windows Mobile Device® Center. 1. Insert the Getting Started Disc into your desktop computer. A window appears on the display. 2. Select your language. 3.
Install Windows Mobile® Device Center on a Desktop Computer (Windows Vista™) To install the Windows Mobile® Device Center on a desktop PC with Windows Vista™ complete the following steps: 1. Connect your device to your desktop PC. 2. Download the Windows Mobile® Device Center Installer to your PC by clicking on the download link that appears in the pop-up window. 3. Select “Run this program from its current location” and click OK. 4. Follow the instructions on the screen.
Field PC Owner’s Manual
3 Using the Hardware 16 Using the Hardware 18 Powering Off, Suspending, Resetting, and Restoring Factory Defaults 20 Using the Stylus 20 Using the Touchscreen
Using the Hardware This chapter discusses the hardware components of the Field PC. Specifically, you will learn about: Keyboard functions Suspending, powering off, and resetting the device Using the stylus Using the touchscreen Keyboard Features Pictured below is a diagram of the Field PC keyboard.
Specialized Keyboard Keys Sticky Keys The Shift, Alt, Ctrl, and 2nd keys are called sticky keys. Each sticky key has three modes: Next Key, ON, and OFF. The colored backlights indicate when a sticky key is on. The sticky key mode is determined as follows: By default all sticky keys are OFF. Pressing the sticky key once toggles the mode only for the Next Key pressed. For example, with shift mode OFF (lower case), pressing SHIFT then K displays an upper case K.
Communication Ports The Field PC has the following communication ports located at the top of the case: Two 9 pin serial port (COM 1 and COM 2) USB A (host) port USB B mini (client) port Powering Off, Suspending, Resetting, and Restoring Factory Defaults The Power button allows you to suspend, power off, or reset the device. A series of keyboard actions also lets you restore the hard drive, settings, and icons to their original factory defaults. Below are instructions for each action.
Note: The device cannot be powered off while it is plugged into the wall charger. 3. Tap Power Off. A warning dialog appears. Tap OK. To power on your Field PC, hold down the Power button until you see the screen light up. Note: The Battery Settings screen will appear when you power on your Field PC. Suspending the Device Suspending the Field PC is different from powering it off.
Restoring the Device to its Factory Settings Follow the steps below to restore user storage, settings, and icons on your Field PC to their original factory defaults. ! CAUTION: Restoring the Field PC to its original factory state will permanently erase data saved, any software you installed, and any changes you made on the Field PC, including settings changes.
Protecting the Touchscreen The touchscreen is sealed to protect your device against water and dust. To protect your touchscreen, we recommend that you apply a touchscreen protector. ! CAUTION: If the screen protector is not replaced as often as the screen protector packaging directs the touchscreen may be damaged. Calibrating the Touchscreen If the touchscreen is not responding accurately to stylus taps, try calibrating the touchscreen manually using the following steps: 1. Tap Start > Settings.
Field PC Owner’s Manual
4 Programs and Settings 24 Understanding the Today Screen 25 Entering Information 26 Recognizing Status Icons 27 Recognizing Soft Keys 27 Adjusting the Backlight 28 Performing Common Tasks on the TK-6000 31 Using On-Device Help 32 Backing Up Data 35 Connecting to a Desktop Computer 36 Information for Software Developers
The Field PC runs Windows Mobile® 6 giving you the power, security, and seamless connectivity of the Windows Mobile operating system. This chapter explains how to use Windows Mobile® 6 functions. Understanding the Today Screen The Today screen is the default screen you see when your device powers on. From the Today screen you can view or select Today’s date Owner information Messages Tasks Upcoming appointments The Today screen also allows you to lock or unlock your device.
To access the Start menu, tap the Start menu icon in the top left corner of your screen or press the Start menu button on the keyboard. The Start menu appears, giving you links to programs, settings, and menus. Entering Information At the bottom of the display is a data entry icon. Tapping on the icon allows you to enter information via the touchscreen using the stylus. Specifically, you can choose to: Select alphanumeric characters from the on-screen Keyboard utility (the default input method).
2. The input method menu appears. Tap the input method you want from the list of options. 3. Using the selected input method, enter your text. Recognizing Status Icons Status icons show the status of operations on the Field PC. Status icons and their functions are listed in the following chart. Icon Name Charge indicator Speaker Function Tells you when the device is charging. Tap to control volume. Remaining battery Tap to see how much battery capacity power remains in both battery packs.
Recognizing Soft Keys These context-sensitive keys appear as words, buttons, or tabs on the menu bar. Tap on these keys to perform actions or open menus. The (right and left soft keys) located at the top of the keyboard can be used to select the soft keys. Adjusting the Backlight Dimming or turning off the display backlight saves battery power when the device is running. To dim or turn off the backlight, follow these steps: 1. Tap Start > Settings > System > Backlight. 2. Select the Brightness tab.
The Backlight Enabled checkbox applies when the device is running on battery power. To completely disable the backlight when on battery power, uncheck this checkbox. Adjusting the Backlight Timer By default, the display backlight is set to turn off after one minute of inactivity. To adjust the time when the backlight turns off, follow these steps: 1. Tap Start > Settings > System > Backlight. The Backlight window appears. To change the timer for external power, tap the External Power tab. 2.
To create a different name, follow these steps: 1. Tap Start > Settings > Systems tab. 2. Tap About. 3. Select the Device ID tab at the bottom of the screen. 4. Type in a new device name. Exploring Files To explore files stored on the Field PC, follow these steps: 1. Tap Start > Programs > File Explorer. The File Explore window appears. 2. If the drive does not already appear, tap on the drop-down menu in the top left to select it.
3. Navigate the file directory by tapping on the folders and files. To go up a level, tap on the Up soft key at the bottom of the screen. 4. Use the Menu soft key at the bottom of the screen to manipulate files. Applications and Task Manager Close Running Programs The Task Manager can be used to close unused programs to free memory on the device. It is recommended to close any programs not used.
2. Select the program(s) to close. 3. Tap End Task. Switching Between Running Programs To switch between programs running on the Field PC, follow these steps within the applications manager: 1. Select the program to switch to. 2. Tap the Menu soft key and then Switch To. The program comes to the forefront.
Option 2: Choose Search at the bottom of the screen. Search allows searching for specific topics within set boundaries. Option 3: To access help about a certain program on the device, open the program first, then tap Start > Help. The help menu items that appear are directly related to the application program. Note: If more assistance is needed than a help file provides, visit Microsoft’s website at www.microsoft.com/mobile. Backing Up Data The Field PC is designed to protect important data.
3. A new window opens, showing the file directory for the Field PC. 4. Select the files on the Field PC to copy. 5. Copy the files by choosing Edit > Copy or by right-clicking and choosing Copy. 6. Paste the files onto the desktop computer. Using Windows Mobile® Device Center (Windows Vista™) 1. For Windows Vista™, re-establish a Windows Mobile® Device Center connection. 2. In the window on the desktop computer, click File Management.
3. A new window opens, showing the file directory for the Field PC. 4. Select the files on the Field PC to copy. 5. Copy the files by choosing Edit > Copy or by right-clicking and choosing Copy. 6. Paste the files onto the desktop computer. Copying Data To copy data from one directory to another (this includes to and from storage), follow these steps: 1. Select Start > Programs > File Explorer. 2. The drop-down menu in the top left is a list of file directories.
3. Highlight the files to copy and tap on Menu in the lower right. 4. Tap the stylus on the Edit option. 5. Choose Copy from the sub menu. 6. Select the file directory to copy to. 7. To paste, tap the Menu soft key and choose Edit > Paste. 8. The files are now in both directories. A USB drive can be inserted in the USB Host (Full size A) and used as a storage device.
Connecting to a PC Re-establishing an ActiveSync® Connection To re-establish an ActiveSync® connection, follow these steps: Note: The unit can charge while connected. 1. Plug USB Client end (mini B) of the USB communications cable into the Field PC. 2. Plug the USB Host end (full size A) into the desktop computer. ActiveSync® automatically establishes a connection between the Field PC and the desktop computer. 3. Follow the instructions on the desktop computer screen. Note: Microsoft ActiveSync® version 4.
5 Bluetooth® Wireless Communications 38 Bluetooth® Drivers and Profiles
This chapter explains how to setup a Bluetooth Partnership on the Field PC. Bluetooth® Drivers and Profiles Microsoft® Bluetooth drivers are loaded onto the Field PC at the factory. These drivers support the following profiles: serial port, file transfer, audio/visual control, dial up networking, object push, human interface device, and advanced audio distribution.
3. Select the Turn on Bluetooth checkbox, and then select the checkbox to Make this device discoverable to other devices. Create a Bluetooth Partnership A partnership is created between the Field PC and another device that uses Bluetooth wireless technology to help exchange information securely. Follow the steps below to create a partnership: 1. Make sure the two devices are turned on, discoverable, and within at least 30 feet of one another. 2. Tap Start > Settings and then tap the Connections tab. 3.
5. If the Bluetooth device has an assigned passkey, enter the number. If the device has not already been assigned a passkey but requires one, enter an alphanumeric passkey on the Field PC between 1 and 16 characters. Tap Next. Note: If you are unsure whether your device requires a passkey and whether one has already been assigned to your Bluetooth device, see the user documentation that came with the Bluetooth device.
An incoming COM port means that the other device is initiating the communication with the Field PC. For example, a desktop computer might initiate a Bluetooth ActiveSync connection with the device via the virtual COM port. For more details about setting up outgoing and incoming COM Ports, read the following sections. Set up an Outgoing Bluetooth COM Port Use this option if you want to assign the virtual COM port as an outgoing COM port (i.e.
4. The Add a Device screen appears. Tap on the name of the device you want to set up as an outgoing port. 5. Select a numbered COM port from the list of ports that appear. If the port cannot be created, it is in use. Select a different numbered port. 6. Important: Deselect the Secure Connection option below the list of COM ports, as shown above. Deselecting this option ensures that the device disconnects its Bluetooth connection only when you tell it to. 7. Tap Finish.
example, assume you have set up a virtual COM port between the Field PC and the GPS receiver and that you assigned the outgoing COM port as COM 6. To assign the COM port in your navigation program, you would then follow these steps: 1. Locate the place in the navigation program where the COM port is chosen. 2. Select COM Port 6 as the COM port for the Bluetooth GPS receiver. Set Up an Incoming Bluetooth COM Port Use this option if you want to assign the virtual COM port as an Incoming COM port (i.e.
Field PC Owner’s Manual
6 Wi-Fi Connections 46 Wi-Fi Connections
Wi-Fi Connections When the Field PC is connected through Wi-Fi, the icon appears in the tool bar. Connecting to Wi-Fi Network Many times when entering an access point a screen pops up asking if the network connects to the network or a private or corporate network. Choose the correct network and tap Connect. The choice will be stored in the Connection Manager for future use. To actively look for a network connection complete the following steps: 1.
3. When the Field PC completes the scan, a list of available networks and their strengths appears in Start > Settings > Connections tab > Wi-Fi Note: Click on this icon when you need help. 4. Tap on the desired network to connect. Note: If the network is password protected a window will appear for the password to be inserted.
Managing Connections To adjust the Wi-Fi settings access the Managing Connections window go to Start > Settings > Connections tab > Connections.
7 Care and Maintenance 50 Caring for your Field PC
This chapter explains how to store, clean, and protect your Field PC and battery pack. Caring for Your Field PC Storing your Field PC and Battery Pack When the Field PC is not being charged and is suspended, it draws a small amount of power. This power draw is used to maintain the memory (RAM) of the Field PC in the same state it was when it was suspended. We recommend charging the Field PC each night or weekend when it is in suspend mode.
Taking your Field PC out of Extended Storage While storing the battery pack, it naturally discharges slightly while being inactive. When you are ready to use your Field PC after storing it for an extended period of time, complete the following steps: 1. Insert the battery pack(s). 2. Turn on the Field PC. 3. Enter 10% on the Battery Settings pop up screen. 4. Tap on the Accept button to save the new setting. 5.
Cleaning the Case To clean the case, we commonly recommend that you use warm water, mild detergent, and a toothbrush. Note: This method can also be used when cleaning the keyboard. Do not use the brush on the display, it could be scratched. This product must not be disposed of with municipal waste. It is your responsibility to dispose of your waste equipment by handing it over to a designated collection point for the recycling of waste electrical and electronic equipment.
8 Service Information 54 Repairing the Field PC 54 Preparing for a Service Center Call
This chapter teaches you how to return and prepare your Field PC for repair. It also shows you where to find information you need when making a call to a service center. Repairing the Field PC If the Field PC is in need of repair, call your service center for a Return Materials Authorization number (RMA). Important: Do not attempt to service the device yourself. This action voids the warranty. Preparing for a Service Center Call When you contact a service center, you are asked to identify your device.
A Product Specifications and Warnings 56 Product Specifications 57 Battery Warnings 58 Equipment Warnings
Product Specifications Operating System Microsoft® Windows Mobile® 6 Processor Memory Primary Storage Display Intel® XScale® PXA270, 624 MHz 128 MB RAM 512 MB 3.5” (89 mm) QVGA active matrix color TFT transflective LCD with LED backlight; 240 x 320 pixels Touchscreen Sealed, resistive, pressure sensitive, enable/disable Micro SD Card Slots Micro SD header 3.
Power Wireless Communications Internal Clock Enunciators ! Voltage +12 VDC; Range 10–20 VDC; Current: Max 12 V @ 850 mA; reverse polarity protection; over voltage protection; auto shut off Integrated Bluetooth and Wi-Fi Battery-backed real time clock External power/charge LED and notification LED; other enunciators on system tray Battery Warnings WARNING! This device comes with a lithium ion rechargeable battery pack.
Avoid dropping the battery. If the battery is dropped, especially on a hard surface, and the user suspects damage, take it to a service center for inspection. Improper battery use may result in a fire, explosion or other hazard. The device shall only be connected to products that bear the USB-IF logo or have completed the USB-IF compliance program.
B Certifications and Regulatory Information 60 Regulatory Information 62 Limited Product Warranty
Regulatory Information This device complies with Part 15 of the FCC Rules. Operation of this equipment is subject to the following two conditions: 1. The device may not cause harmful interference. 2. This device must accept any interference received, including interference that may cause undesired operation. This equipment has been tested and found to comply with the limits for a Class B digital device, pursuant to Part 15 of the FCC Rules.
Industry Canada This Class B digital apparatus complies with Canadian ICES-003. Operation is subject to the following two conditions: (1) this device may not cause interference, and (2) this device must accept any interference, including interference that may cause undesired operation of the device. CE marking Products bearing the CE marking comply with the 2004/108/EC (EMC Directive), 1999/5/EC (R&TTE Directive), 2006/95/EC (Low Voltage Directive) issued by the Commission of the European Community.
Restrictions apply to the operation of the 802.11b/g radio in this device. This equipment may be used indoors on channels 1 to 13. Outdoor operation is permitted on channels 1 to 8, as transmit power in the band 2454 to 2483.5 MHz is limited to 10 mW. The latest requirements may be found at: http://www. art-telecom.fr Limited Product Warranty Juniper Systems, Inc.
(iv) the product has been used in environmental conditions outside of those specified for the product, (v) the product has been subject to any modification, alteration, or change by or on behalf of customer (except and unless modified, changed or altered by JS or under direct supervision of JS), (vi) the defect or malfunction results from misuse or accident, (vii) the serial number on the product has been tampered with or removed, or (viii) the product has been opened or tampered with in any way.
Limitation of Liability To the fullest extent allowed by law, the obligation of JS shall be limited to the repair or replacement of the product. JS shall in no event be liable for special, incidental, or consequential, indirect, special or punitive damages of any kind, or for loss of revenue or profits, loss of business, loss of information or data, or other financial loss arising out of or in connection with the sale, installation, maintenance, use, performance, failure, or interruption of any product.
Index
A ActiveSync 12 Backing up Data 32 Creating a connection 12 Re-establishing Connection 35 Applications Manager 30 Viewing Memory Allocation 31 B Backing Up Data 32 To Desktop Computer 32 Backlight 27 Timer 28 Battery Capacity.
Creating a Name 28 D Data Entry Block Recognizer 25 Keyboard Utility 25 Letter Recognizer 25 Transcriber 25 E Equipment Warnings 58 European Union 61 Exploring Files 29 G Getting Started Disc 12 H Hand Strap 9 I Industry Canada 61 K Keyboard 16 Diagram 16 L Limitation of Liability 64 M Microsoft Website 32 O On-device Help 31 P Power Button 18 Powering Off 18 Resetting the Device 19 Restoring Factory State 20 Suspending 19 Product Specifications 56 R Index 67
Regulatory Information 60 Repairing 54 Return Materials Authorization (RMA) 54 S Service Center Call 54 Soft Keys 27 Software Developers Kit 36 Speaker. See Status Icons Start Menu 24 Status Icons 26 Sticky Keys 17 Stylus 20 T Task Manager 30 Close Unused Programs 30 Switching Between Running Programs 31 Today Screen 24 Touch Screen 20.