owner’s manual
© Copyright May 2012 Juniper Systems, Inc. All rights reserved. Information is subject to change without notice. Juniper Systems is a registered trademarks of Juniper Systems, Inc. Mesa Rugged Notepad and Mesa Mobile Dock are recognized trademarks of Juniper Systems, Inc.
Contents 1 Getting Started The Anatomy of the Mesa Performing Initial Tasks 6 9 2 Hardware Components Navigating Around Your Mesa Home Screen and Windows Start Menu Display and Touchscreen Keypad Features Power Management LED Activity Indicators SD Cards Connector Module Audio Features 16 17 18 20 24 26 26 27 28 3 Programs and Settings The Home Screen On-Screen Keyboard Suspend, Reset, Power Off, and Restore the Mesa Subdued Lighting (Tactical) Mode Communicating with a Desktop Computer Getting Start
6 Geo Models GPS Camera 7 3G Data Modem Set up a Data Account with a Wireless Provider Install the SIM Card Set up the Cell Modem Wireless Safety Maintenance of Your Modem 8 Storage, Maintenance and Recycling Storing the Mesa and Battery Pack(s) Protecting the Touchscreen Cleaning the Mesa Recycling the Mesa and Batteries 9 Warranty and Repair Information Limited Product Warranty Extended Warranties Repairing the Mesa A Specifications Mesa Rugged Notepad Specifications 56 61 66 66 68 69 70 72 73 73 7
1 Getting Started The Anatomy of the Mesa Performing Initial Tasks
Mesa Rugged Notepad The Mesa Rugged Notepad™ from Juniper Systems is designed for collecting data in rugged environments. Features include: Microsoft® Windows® Embedded Handheld 6.5.3 Large daylight readable VGA display Large on-screen buttons for touch-friendly operation Rugged environmentally sealed design Bluetooth® wireless technology Wi-Fi 802.11b/g, U.S. and international Dual battery option for long operating life 3.
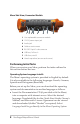
Mesa Back View: Battery Compartments, Card Slots 1 6 7 8 2 3 4 5 9 1 Camera lens (Geo model) 2 Battery door with quarter turn latches 3 Battery compartment #2 (battery pack installed) 4 Mobile Dock connections 5 Connector protector 6 SIM card slot 7 SD card slot 8 Battery compartment #1 9 External accessory mount (4 on back) Ch 1 Getting Started 7
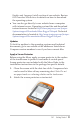
Mesa Side View, Connector Module 1 2 3 4 5 6 7 8 1 User replaceable connector module 2 12V DC power input jack 3 Audio jack 4 Cable restraint mount 5 RS-232C 9-pin D-sub connector 6 USB host, full size A 7 USB client, mini B 8 Hand strap tether (one on each corner) Performing Initial Tasks When you receive your Mesa, perform the tasks outlined in this section before first use. Operating System Language Installs The Mesa’s operating system is provided in English by default.
Updates and Language Installs section of our website. Review Full Download Instructions for details on how to download the operating system. You can also go directly to our website from a computer with internet access. Operating system files and download instructions are located at http://www.junipersys.com/JuniperSystems/support/Downloads/Mesa-Rugged-Notepad. Technical documentation is located at http://www.junipersys.com/JuniperSystems/support/Documentation/Mesa-Rugged-Notepad.
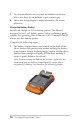
3. Use the installation card to push air bubbles out (it may take a few days for air bubbles to get worked out). 4. Never use sharp objects to adjust or remove the screen protector. Charge the Battery Pack(s) Install and charge the Li-Ion battery pack(s). The Mesa is designed to use 1 or 2 battery packs. Using two battery packs extends the operating time of the unit. Geo 3G models should always use two battery packs. Complete the following steps: 1.
2. Place the Li-Ion battery pack(s) in the compartment(s). Make sure the connectors on the battery pack(s) line up with the connectors inside the compartment(s). 3. Replace the door(s) and tighten the latches. ! CAUTION: The Mesa is not totally sealed against water and dust when battery doors are not installed and properly latched. 4. Plug the AC wall power charger that came with the Mesa into a wall socket. Plug the other end into the DC power jack on the Mesa.
Perform Set Up 1. The Mesa powers on and begins the startup process. A progress indicator is shown on the screen. 2. Follow the on-screen instructions. 3. The Clock and Alarms control panel is shown. Adjust the time zone, date and time if necessary and tap OK. 4. Tap on the screen again to complete the set up process. 5. The Home screen appears. 6. Charge the battery pack(s) at room temperature (68° F or 20° C) for 2 to 3 hours if you are using one pack and 4 to 6 hours if you are using 2 packs.
Adjust the Hand Strap A hand strap is included with the Mesa. It is attached to the left side of the Mesa along with a stylus, leaving your right hand free to operate the Mesa. Put your hand between the strap and the Mesa from the front and adjust the hand strap to fit securely against the back of your hand. You can move the hand strap to different locations to meet your needs. There are four hand strap tethers (one on each corner).
Review the Manual Once you have attached a screen protector, charged the battery pack(s), and adjusted the hand strap the Mesa is ready to use. Review the rest of this manual to learn about the functionality of the Mesa.
2 Hardware Components Navigating Around Your Mesa Home Screen and Windows Start Menu Display and Touchscreen Keypad Features Power Management LED Activity Indicators SD Cards Connector Module Audio Features
Mesa Hardware Components This chapter discusses the Mesa Rugged Notepad hardware features and usage. Navigating Around Your Mesa Using Gestures and Making Selections The Windows® Embedded Handheld operating system enhances the Mesa’s ability to recognize touch gestures, making it easy to use a finger to navigate. The Mesa buttons can also be used. Navigation options vary depending on the screen you are on. Here is a partial list of options: Vertical and Horizontal Movement 1.
Home Screen and Windows Start Menu There are two screens you need to be aware of as you read this manual and use the Mesa: the Home screen and Windows Start menu. The Home screen is your main control center for the Mesa. The content varies based on which model you have and can be customized. It is automatically shown when the Mesa is turned on. You can get to it from any other screen by pressing and releasing the Home screen button.
Display and Touchscreen The Mesa has a bright color display and touchscreen with a diagonal viewing area of 5.7 inches (145 mm). It is easy to view outdoors and sealed against water and dust. Adjusting Display Settings To adjust the default display settings including the text size, alignment and orientation, go to the Screen control panel, Start > Settings> System > Screen. There are also shortcuts to some of the settings described in the text that follows.
Disabling and Enabling the Touchscreen You can disable the touchscreen. This is useful when you are running an application and you want to see the screen, but you want to avoid accidental touchscreen activation. The touchscreen can also be disabled for cleaning purposes. Methods to disable and enable the touchscreen: Press and hold the screen orientation button Press and hold the power button Button menu. Select Disable TS. .
The display has a minimum brightness setting that it dims to when the Mesa is not in use. Power is conserved, yet the display is still partially visible. Adjust the dim time interval and setting as needed. To use the Mesa, tap on the display to bring the display backlight back up to the brightness setting. Note: The Mesa can be set up in subdued lighting (tactical) mode. Refer to Chapter 3 for instructions.
Buttons and their functions: Button Press and Release Press and Hold Camera (Geo models) or Task Manager Pictures and Videos (Std) Notes Record Audio Note (press and hold to record, press to stop) Screen Brightness Down Screen Brightness Up Home Screen Start/Windows Screen Left Soft Key No Function Rotate Screen Action Touchscreen Disable/ Enable Done/OK Left Up Down Right Enter Done/OK Right Soft Key No Funct
Follow these steps to reassign button functions: 1. From the Home screen, tap Getting Started . If Getting Started is not on your Home screen, go to Start > Settings > Personal > Buttons. Select Configure Buttons from the list. A list of default button assignments is displayed. 2. Scroll to the bottom of the screen. Select the shortcut to Settings > Personal > Buttons. 3. A list of reassignable buttons is shown in 1. Select a button. Select the button you want to reassign.
4. Select the down arrow button shown in 2. Assign a program. 5. A list of programs is shown. Select the program you want to reassign to the selected button. Tap OK.
Power Management The Mesa uses 1 or 2 Li-Ion rechargeable battery packs. ! CAUTION: Only use batteries designed for the Mesa from an approved vendor. Use of non-approved batteries may void your product warranty. Battery Life Battery life on a full charge is generally up to eight hours per pack (this can vary significantly depending on the application, backlight usage, and radio usage). Battery packs last approximately 300-500 charging cycles. This is impacted by the use conditions, environment, etc.
following is shown: Go to the Advanced set up screen to select how long the Mesa should stay on when it is not in use. As mentioned under “Adjusting the Backlight,” dimming the display backlight saves battery power. Radios can also use a lot of power. You can conserve power by disabling them when not in use from the Home screen or Start > Settings > Connections. Viewing Battery Status You can view the status of the battery pack(s) from the Home screen if the battery gadget is enabled.
Charging Errors Charging errors are caused by the following: Battery pack(s) is too hot to charge Battery pack(s) is too cold to charge Cannot charge for unknown reason If you have a charging error, make sure the battery pack(s) is inserted correctly, the battery door(s) is closed properly, and you are within the charging temperature range.
4. An image on the battery compartment label shows the correct location and orientation for the card. Push the SD card into the slot to insert it. To remove an SD card, push it into the slot then release it to eject the card. 5. Replace the battery pack and attach the battery door. 6. Resume the Mesa if it was suspended in step 1. Connector Module The Mesa has the following jacks and connectors: Power input jack, 12 VDC for power input and battery charging Microphone/Speaker jack: 3.
Audio Features The Mesa has a speaker, microphone, and audio jack. To adjust audio settings, select the top title bar, then the speaker icon from the horizontal-scrolling list that appears. You can also go to Start > Settings > System > Audio. The Audio control panel appears. Speaker The speaker sound is loud and clear. Listen to audio notes, video sound, and music files. Microphone Use the microphone to record audio notes or add sound to a video when using the camera function (Geo units).
3 Programs and Settings The Home Screen On-screen Keyboard Suspend, Reset, Power Off, Restore the Mesa Subdued Lighting (Tactical) Mode Communicating with a Desktop Computer Getting Started Screen and Online Help Information for Software Developers
Mesa Programs and Settings This chapter discusses the Mesa Rugged Notepad programs and settings. The Home Screen The Home screen is your main control center for the Mesa. View vital system information and quickly access functions and applications that are frequently used. The default home screen for a basic unit is shown below. If you have a Geo model or a cellular modem, different functions are shown. You can customize the Home screen.
larger, touchable icons in a horizontal-scrolling bar. Select a function to view the settings and adjust them as desired. Title Bar Pop Up Status Icon Bar Dashboard The dashboard consists of a background image and up to six dashboard gadgets that serve as functional indicators and control buttons. In most situations, tap on a gadget to turn a function on/off. Tap and hold to go to a control panel or launch an application. You can switch between two color schemes and select which gadgets are shown.
A list of available dashboard gadgets is shown. Tap on your selection. The dashboard icon changes when you make a selection. If “None” is selected, the space becomes blank. Dashboard Gadget Functions Wi-Fi: Shows the state of the Wi-Fi radio and provides the name of the wireless network that it is attached to. Bluetooth® wireless technology: Shows the state of the Bluetooth radio. Battery Status: Shows the status of the current battery pack(s). Email: Shows the current number of unread email messages.
Gadget Color Indicators Wi-Fi, Bluetooth, GPS and 3G data modem gadgets indicate status using these colors: Gray: Off or inactive Yellow: Partial state (getting satellite fix, etc.) Green: Active and available Blue: Notification state (on or connected) Red: Error state, powering up or down, no GPS fix, or unavailable (3G data modem is red when power is changing from on/off. Wi-Fi is red when an access point is available, but not connected.
You can customize which application shortcuts are shown. Tap and hold on the shortcut you want to change to bring up a list of available applications. Tap on your selection. The icon on the home screen changes to the icon associated with the new application. Tile Bar Touchable tiles (or soft keys) are shown in the tile bar at the bottom of each screen.
Tile examples: Start Lock Close Edit Navigate back Delete Menu Keyboard On-Screen Keyboard To activate the on-screen keyboard, select the keyboard tile located at the bottom of active applications like Notes that use keyboard input. The default keyboard is Mega Keys, featuring large keys and increased functionality. To view and select other options including Block Recognizer, Letter Recognizer, Transcriber and Mega Keys Night, press and hold the keyboard tile .
Mega Keys (and Mega Keys Night) Keyboard Features: Pressing on a character with a finger or stylus highlights it. Releasing the key prints the character on the screen. If you accidentally press the wrong character and have not released the key yet, you can slide to the correct character before releasing the key. There are four main keyboard screens: lowercase, uppercase, numeric, and symbols.
Suspend, Reset, Power Off, and Restore the Mesa Use the power button and the power menu to suspend, reset, power off or restore the Mesa. To access the Power Button menu, press and hold the power button. Suspending and Resuming the Mesa We recommend suspending your Mesa if you plan to turn it off for less than two weeks. While it is suspended, you should attach it to a wall charger when it is not in use. Suspending the Mesa is different from powering it off.
Resetting the Mesa It can be helpful to reset the Mesa when it is unresponsive, slow, or programs won’t launch. You may be asked to perform a reset when an application is installed. ! CAUTION: Be aware that during a reset, applications are terminated and unsaved work may be lost. Follow these steps to reset your Mesa: 1. Save your open files and close any running programs. 2. Press and hold the power button appears. until the Power menu 3. Choose Reset.
! CAUTION: Restoring the Mesa to its original factory state permanently erases data saved on the Mesa, any software you installed, and any changes you made to the Mesa, including changes to settings. 1. Reset the Mesa (press and release the power button choose Reset). and 2. As soon as the screen goes blank, press and hold the + + buttons simultaneously. The first tick mark on the screen lights up and the Mesa looks to see if these keys are being pressed.
You can also subdue the keypad and display brightness through the Backlight control panel, Start > Settings> System > Backlight. Adjust the sliders as needed. Changes affect all operations. Communicating with a Desktop Computer The Mesa can connect to a desktop or laptop computer allowing you to synchronize information and download software and files. Installing the Software Install free synchronization software from Microsoft on your desktop computer. 1.
Establishing a Partnership 1. Plug the USB Client end (mini B) of the USB communications cable into the Mesa. 2. Plug the USB Host end (full size A) of the USB communications cable into your desktop computer. 3. Establish an ActiveSync® or Windows Mobile® Device Center partnership by following the instructions on the desktop computer screen. 4. Once a partnership is established, the synchronization software automatically opens. Follow the steps on the screen.
Online Help Online help is available from Getting Started. Tap on Online help & how-to from the list: You must be connected to the internet to access online help. Select from the help topics. Information for Software Developers For Mesa SDK information, go to our website: http://www. junipersys.com/index.php/Juniper-Systems/support/Developers/MesaRugged-Notepad.
4 Bluetooth Wireless Communication Creating a Partnership Microsoft Bluetooth Control Panel Serial Device (COM) Control Panel
Bluetooth® Wireless Communication The Mesa has built-in Bluetooth® wireless technology, allowing you to connect it to other wireless devices with Bluetooth technology. Minimum performance between similar objects in an unobstructed environment is approximately 100 feet (30 meters). The Mesa provides simple configuration options for the following types of Bluetooth devices: 1. Devices such as headphones, keyboards, and modems (to connect to the internet with an external cell phone). 2.
The gadget on the Home screen turns green. 4. Tap and hold the Bluetooth icon to bring up the dialog box shown below.
If the Bluetooth gadget is not on your Home screen, you can get to the desired control panel by selecting Getting Started and either Set up a Bluetooth device or Set up a Bluetooth COM Port. You can also go to Start > Settings > Connections. Note: If the Bluetooth radio is turned on and then the Mesa is suspended, wireless Bluetooth turns off to save battery power. When the Mesa resumes (turns on), the radio turns on automatically.
3. A passcode screen is shown. a. If the device has an assigned passcode, enter the number and press Next. b. If a passcode is required but has not been assigned, enter an alphanumeric passcode between 1 and 16 characters in length. Press Next. c. If a passcode is not required, leave the box blank and press Next. Note: If you are unsure whether the device requires a passcode and whether one has already been assigned to the device, see the user documentation that came with the device. 4.
Serial Device (COM) Control Panel To set up a Bluetooth COM port, follow these steps: 1. Select the GPS, Barcode scanner (COM) option. The following Bluetooth COM configuration screen is shown. Select Discover Devices. 2. A list of discovered devices is shown. Select the device you want to connect to from the list and tap Connect. A COM port is automatically assigned for the device. You can change it to another COM port.
3. The Mesa automatically tries to discover the PIN. You might be required to enter a PIN. 4. You should now be connected to the COM device.
Mesa Rugged Notepad Owner’s Manual
5 Wi-Fi Wireless Communication Connecting to a Wi-Fi Network
Wi-Fi Wireless Communication The Mesa has built-in Wi-Fi wireless communication to connect to the Internet or a work network Connecting to a Wi-Fi Network To use Wi-Fi, you need to be in range of an access point to make a connection. To actively look for a network connection complete the following steps: 1. From the Home screen, turn Wi-Fi on by tapping the Wi-Fi gadget . The Mesa automatically starts scanning the area for available Wi-Fi networks.
networks and their strengths appears on the Wi-Fi Wireless screen. 3. Tap on the network you want to connect to. If you want to add a new network, select Add New from the top of the list. 4. Configuration and authentication set up screens are shown. Depending on the network you are connecting to, you may need to make some selections from pull down lists and enter information like a passkey. Some information may not be required or will appear automatically.
Wi-Fi Dialog Box Whenever Wi-Fi is turned on, the following dialog box might pop up indicating the Wi-Fi networks the Mesa has located. You can select a new network and set it up without going to the Wi-Fi control panel. Through the menu button, you can disable this dialog box from popping up in the future. Adjusting Wi-Fi Settings To add a new Wi-Fi network or edit settings, select the Menu soft key and make a selection from the pull-down list.
6 Geo Models GPS Camera
Mesa Geo Model The Mesa Geo model has GPS with 2 to 5 meter accuracy and a 3.2MP camera. Juniper Geotagging™ gives the Mesa the ability to embed and emboss photos with the date, time and GPS position. A 3G Data Modem is an optional feature. GPS To use GPS, tap on the GPS status gadget to turn it on. The GPS starts looking for satellites to use for a fix.
11/12 SV The number of satellites currently in view followed by the number of satellites used for the current position. 3Diff The type of fix you have. Three satellites are required for a 2D fix while 4 are required for a 3D fix. 3Diff means SBAS (WAAS/EGNOS/MSAS) signal is being used for GPS solution. PDOP A measure of accuracy. The lower the number, the more accurate the fix is. Note: When you suspend the Mesa, the receiver is in a low power mode to retain its almanac.
GPS Intermediate Driver GPS Receiver Access for Multiple Programs The GPS Intermediate Driver (GPSID) is used to allow more than one program to use data from the GPS receiver. The GPS Settings control panel controls how the GPSID is used. Internal GPS is on COM7 and communicates at 38400 baud. These settings are found on the Hardware page of the GPS Settings control panel. If another GPS receiver is to be used, this is where you connect that GPS receiver so that the GPSID can access it.
Compass Gadget Functions Compass gadget is turned off. Waypoint tool. Tap it to mark a waypoint. No GPS fix. Arrow keys show your current heading or bearing This flag indicates that you are close to the waypoint. Information about how many feet away you are, the elevation, and degrees is also shown. Navigation Settings You can also enter a known waypoint. Tap and hold the to see the following dialogue box: compass gadget Enter the desired latitude and longitude (WGS84) using one of these formats: DD MM SS.
Navigation Options Select the Options soft key to set, clear, or mark a waypoint, set up a breadcrumb trail, change the units of measurement, or turn the power on or off. Set: Take the coordinates in the “Change” boxes and set these as the new waypoint. Clear: Clear the waypoint (goes back to the blue flag). Mark: Take the current GPS coordinate and set this as the new waypoint. Units: Displays units in either feet/miles for U.S. or meters/ km for metric.
current direction of travel. This is a GPS Compass and movement is needed to obtain direction information. If movement is too slow, this data cannot be determined and the stationary icon is displayed. Breadcrumb: This is an independent function from everything else in this gadget. Setting this logs points at specific time intervals into the GPSTrack.gpx file. There are three files created, 2 for waypoints and 1 for the breadcrumbing. Waypoint information is saved in both the GPSLoc.gpx and GPSLoc.csv.
Take a picture by pressing the camera button . To view your photo library select the Thumbnails soft key.
Geotagging When pictures are geotagged, the date, time, latitude, longitude, file name, and notes can be included with the pictures with the emboss and embed options. Follow these steps: 1. Turn on GPS by tapping the GPS gadget screen and waiting for a fix. on the Home 2. Select the Menu soft key Select Geotag from the menu. The following Emboss Options screen is shown: Select the information you want to emboss, the position, and the color.
3. From the Embed Options screen, select Embed GPS to build the GPS information into a jpg file. This allows you to put the image into programs like Google Earth, sort images by location, etc. Information does not appear on the image. To embed a note with the jpg file, select Embed User Note. Once you take the photo the following screen is shown, allowing you to add a note up to 140 characters long: Videos Select Video from the Menu soft key. Adjust settings as desired.
7 3G Data Modem Set up an Account with a Wireless Provider Install the SIM Card Set up the Cell Modem Wireless Safety Maintenance of Your Modem
3G Data Modem The 3G data modem is an option for Mesa Geo models, adding Wide Area Network data modem capability to the Mesa. The modem is installed at the factory. The modem is a cellular data modem, type GSM/UMTS. It is five band modem compatible. The modem operates in different modes depending on the wireless provider and the signal strength. Data speeds will vary anywhere from 10 or 20 Kbps when using GPRS to over 1 Mbps when using HSDPA.
3. Remove the battery pack. ! CAUTION: The Mesa is not totally sealed against water and dust when battery doors are not installed and properly latched. 4. An image on the battery compartment label shows the correct location and orientation for the SIM card. Push the card into the slot until it catches. To the right of the slot is a latch to help hold the card in place. Slide it to the left over the right end of the card towards the lock icon. To remove the SIM card, slide the latch to the right.
Set up the Cell Modem Tap on the 3G modem gadget . After about 30 seconds it turns green, indicating that the modem is available. Once it is available, configure it to make a connection. Tap and hold the modem gadget to open the Connections control panel.
Select “Automatically configure connection.” The name of your carrier appears. Tap Next. A progress is shown: on the next screen while your internet settings are configured. You can now access the internet. Open Internet Explorer to test your setup. Connection Problems If the connection fails to automatically configure, there might not be a signal where you are located. You can try repeating the set up process.
Maintenance of Your Modem Your cell modem is the product of advanced engineering, design, and craftsmanship and should be treated with care. The suggestions below will help you to enjoy this product for many years. Do not attempt to disassemble the cell modem. There are no user serviceable parts inside. Do not place the cell modem alongside computer discs, credit or travel cards, or other magnetic media. The modem may affect the information contained on discs or cards.
8 Storage, Maintenance and Recycling Storing the Mesa and Battery Packs Protecting the Touchscreen Cleaning the Mesa Recycling the Mesa and Batteries
Storage, Maintenance and Recycling Follow the instructions in this chapter to properly maintain and recycle the Mesa. Storing the Mesa and Battery Pack(s) When the Mesa is not being charged and is suspended, it draws a small amount of power. This power draw is used to maintain the memory (RAM) of the Mesa in the same state it was when it was suspended. We recommend charging the Mesa each night or weekend when it is in suspend mode.
Protecting the Touchscreen Protect the touchscreen from impact, pressure, or abrasive substances that could damage it. To further protect the touchscreen, apply one of the screen protectors that came with the Mesa. To apply a screen protector, follow the directions that come with it in the package. ! CAUTION: Be sure to replace the screen protector as often as the screen protector instructions recommend. Cleaning the Mesa Touchscreen 1.
! CAUTION: Do not direct a high pressure stream of water at the device to clean it. This action could break the seal, causing water to get inside the device and voiding the warranty. Safe Cleaners to Use The Mesa can be cleaned safely with the following cleaners: ! Windex® (S.C. Johnson & Son, Inc.
9 Warranty and Repair Information Limited Product Warranty Extended Warranties Repairing the Mesa
Limited Product Warranty Juniper Systems, Inc. (“JS”) warrants that the Mesa Rugged Notepad shall be free from defects in materials and workmanship, under normal intended use, for a period of 12 months from the date of shipment.
This warranty is exclusive and JS will not assume and hereby expressly disclaims any further warranties, whether express or implied, including, without limitation, any warranty as to merchantability, fitness for a particular purpose, noninfringement or any warranties arising from the course of performance, dealing, or usage of trade. JS specifically makes no warranties as to the suitability of its products for any particular application.
interruption of any product. Any responsibility and/or liability of JS shall, in connection with a warranted product, be limited in the maximum amount to the original purchase price. Warranty Repairs To obtain warranty repair or service on the Mesa, submit a repair order on our website at http://www.junipersys.com/JuniperSystems/support/Repairs or contact an authorized repair center within the applicable warranty period.
Extended warranties apply only to the Mesa, not battery packs, media containing the Mesa programs, desktop computer programs, user documentation, and accessories. Parts that are excessively worn are not covered under all warranty plans. These may include, but are not limited to, the keyboard elastomer and switch matrix, hand straps, touchscreens, and connector modules. Warranty Information Warranty information for the Mesa Rugged Notepad is located on our website at http://www.junipersys.
Clear, highly-detailed description of the repair or upgrade Credit Card/ Purchase Order number and billing address (for a repair or upgrade that is not covered by the standard warranty or an extended warranty policy) System Information for your Mesa When you contact a repair center you need some unique system ID information for your Mesa (serial number, model number, etc.). Tap Start > Settings > System > System Information to view the following menu. Select System ID.
A Specifications
Mesa Rugged Notepad Specifications FEATURE Operating System Processor Memory Primary Data Storage SD Card Slot Physical Features SPECIFICATION ® Microsoft Windows Embedded Handheld 6.5.3 (completely compatible with Microsoft® Windows Mobile® 6.5.3) English, French, German, Spanish, Brazilian Portuguese Marvell XScale 806 Mhz Processor 256 MB RAM 4 GB Flash Storage SD/SDHC slot, full sized, user accessible Dimensions, standard: 5.3” x 7.
FEATURE Display SPECIFICATION 5.7” (145 mm) color VGA LCD 640 x 480 pixel resolution LED backlight Outdoor viewable Portrait or landscape orientation Touchscreen Keyboard Batteries Connector I/O Module Resistive technology for use with finger or stylus Touchscreen disable function 15 control buttons (6 reassignable) Function keys Five-way directional button Backlight On-screen keyboard Rechargeable Li-Ion battery pack 7.
FEATURE Wireless Connectivity Audio SPECIFICATION Bluetooth® wireless technology 2.0 +EDR Class 1, Wi-Fi 802.11b/g, U.S. and international Activity Indicators Temperature Specifications Dust and Water Sealing Shock Resistance Environmental Warranties Speaker, forward facing, loud, clear Microphone, low noise 3.
FEATURE Software Included SPECIFICATION ActiveSync Adobe Reader LE Alarms Calculator Calendar Contacts E-Mail File Explorer Getting Started Help Internet Explorer Internet Sharing Juniper Home screen, customizable with selectable dashboard gadgets and program shortcuts Juniper On-Screen Keyboards, Mega Keys and Mega Keys Night Messaging Microsoft MyPhone ® Microsoft Office 2010 Excel Mobile ® Microsoft Office 2010 OneNote Mobile ® Microsoft Office 2010
FEATURE Configurations Camera (Geo models) GPS (Geo models) SPECIFICATION Standard U.S. (4GB storage, U.S. Wi-Fi, Bluetooth) Standard International (4GB storage, International Wi-Fi, Bluetooth) Geo U.S. (4GB storage, U.S. Wi-Fi, Bluetooth, Camera, GPS) Geo International (4GB storage, International Wi-Fi, Bluetooth, Camera, GPS) Geo 3G U.S. (4GB storage, U.S.
FEATURE 3G Data Modem (Geo model option) Certifications and Standards Standard Accessories Optional Accessories SPECIFICATION Factory installed option Five band GSM/GPRS/EDGE, 850/900/1800/1900/2100 MHz data speeds Does not support voice calls Communicates on GSM-based networks FCC Class B CE Marking (applicable EMC, R&TTE, and LVD directives) Industry Canada EN60950 Safety Bluetooth SIG qualification USB client IP67 Designed to MIL-STD 810G Li-Ion battery(s) Hand
Mesa Rugged Notepad Owner’s Manual
B Warnings and Regulatory Information Product Warnings Mesa Certifications and Standards
Product Warnings Follow the warnings listed below to use the Mesa and accessories safely. ! Battery Warnings WARNING! This device comes with a lithium ion rechargeable battery pack. To reduce the risk of fire or burns, do not disassemble, crush, puncture, short external contacts, or expose the battery pack to fire. Do not disassemble or open, crush, bend or deform, puncture or shred.
Improper battery use may result in a fire, explosion or other hazard. ! Wall Charger Warnings WARNING! To reduce the risk of personal injury, electrical shock, fire or damage to the equipment: Plug the wall charger into an electrical outlet that is easily accessible at all times. Do not place anything on the wall charger cord or any of the other cables. Arrange them so that no one may accidentally step on or trip over them. Do not pull on a cord or cable.
In compliance with the FCC rules, 47 CFR 15.105(b), the user must be notified that this equipment has been tested and found to comply with the limits for a Class B digital device, pursuant to part 15 of the FCC Rules. These limits are designed to provide reasonable protection against harmful interference in a residential installation.
! General Safety CAUTION: This device has been evaluated for use in close proximity to the body. Use only accessories approved by Juniper Systems. The use of third party accessories may not comply with FCC and international RF exposure requirements. To comply with FCC and other national RF exposure requirements do not co-locate this device with other transmitters. This device operates in compliance with the FCC radio frequency exposure limits for an uncontrolled environment.
EN 60950 (IEC 60950) Product Safety ETSI EN 300 328 Radio ETSI EN 301 489-1, -7, -17 EMC for Radio Equipment ETSI EN 301 511 GSM ETSI EN 300 440 GPS The telecommunication functions of this device may be used in the following EU and EFTA countries: Austria, Belgium, Bulgaria, Cyprus, Czech Republic, Denmark, Estonia, Finland, France, Germany, Greece, Hungary, Iceland, Ireland, Italy, Latvia, Liechtenstein, Lithuania, Luxembourg, Malta, Netherlands, Norway, Poland, Portugal, Slovak Republic,
C Charging and Docking Accessories Mesa Mobile Dock Mesa Travel Charger
Mesa Mobile Dock The Mesa Mobile Dock is an optional accessory that provides a mounting station for the Mesa Rugged Notepad and additional communication options. Note: The Mesa Mobile Dock is not functional as a stand alone device. It requires the Mesa to be functional. For example, it is not a stand alone powered USB hub. Communication Options The mobile dock provides additional communication ports for use with sensors and other external devices, supplementing the ports on the Mesa.
The following accessories can be used to provide power and charge the Mesa batteries: a. Wall charger provided with the Mesa b. Vehicle charger cable (optional) Note: The USB client port is powered directly from the Mesa or by applying power to the mobile dock. The RS-232 serial ports and USB host ports are only functional if external power is applied to the mobile dock. 2. USB client: This is a through connection to the Mesa USB client port.
Installing the desktop base: 1. On the back of the dock near the bottom there are two screw holes, one on the left and one on the right. Place screws into these holes and screw them in half-way. 2. Slide the desktop base up so the screw slots on the back slide onto the screws and tighten them. 3. On the front of the desktop base near the top, and the front of the dock near the bottom are two small screw holes, one on the left and one on the right.
Installing the vehicle mount: 1. From the front of the dock you see four hex holes. Press a nut into each hole. Use a screwdriver or similar object to press them firmly into place. 2. From the back of the dock, align one of the RAM Mount bases with the screw holes. 3. Insert the four screws into these holes, screw them in all the way, and tighten them.
4. Attach the double socket arm to the balls on the two RAM Mount bases (one on each end). Tighten the arm around the balls as needed by turning the knob in the center of the arm. The mobile dock is now ready to use in a vehicle, on a pole, etc. Vehicle Power Considerations When powering the dock from a vehicle, especially in a permanent situation, be familiar with the power setup.
The mobile dock is connected to a key switched battery port of the vehicle. The vehicle power is not depleted by the Mesa when the vehicle is turned off. Wall Mount You can mount the mobile dock to a wall. Use 2 size 8 wood screws and attach the dock to a wall stud or plywood panel. Attaching the Mesa to the Mobile Dock Follow these instructions to place the Mesa into the mobile dock: 1. Attach the connector protector to the Mesa and close the individual port covers so the Mesa docks properly.
Releasing the Mesa from the Mobile Dock To release the Mesa from the mobile dock, lift up on the top latch. Pull the Mesa forward and remove it. Note: Loosen the security bolt if the mobile dock is being used in a vehicle. Maintenance Environmental Issues The mobile dock sheds water when used in its normal configuration, but is not sealed against water. Avoid using the dock in situations where water can enter the connector ports.
Mesa Travel Charger The Mesa Travel Charger is an optional accessory that allows you to charge Mesa battery packs on the go. One or two battery packs can be charged at once. How to Use the Travel Charger 1. Battery pack(s) should be charged at room temperature (68° F or 20° C) 2. Place the travel charger on a flat surface where it will be undisturbed. 3. The following accessories can be used to provide power to the travel charger: a. Wall charger provided with the Mesa b.
LED Indicators Each battery compartment has a green and red LED. The LED states indicate the following: LED State Indicates Red LED On Battery pack charging Green LED On Battery pack fully charged Red Flashing LED Battery pack or charging fault Battery Pack or Charging Faults and Remedies Possible causes for a flashing red LED: Over-discharged battery: The battery pack is severely depleted. The red LED flashes a few seconds after the battery is inserted.
Index
Index Symbols 3G Data Modem 66 Connection Problems 69 Data Account, Set up With Wireless Provider 66 Gadget Color Indicators 33 Maintenance of Your Modem 70 RF Interference Issues 69 Set up the Cell Modem 68 SIM Card Installation 66 Wireless Safety 69 A ActiveSync Creating a Partnership 41 Anatomy of the Rugged Notepad 6 Audio Features 28 Audio Jack 28 Microphone 28 Speaker 28 B Backlight 19.
Bluetooth Wireless Communication 44 Creating a Partnership 44 Microsoft Bluetooth Control Panel 46 Serial Device (COM) Control Panel 48 Buttons and Functions 21 C Camera 7, 61 Button 21 Embed User Note 64 Emboss Picture Options 63 Geotagging Pictures 63 GPS Intermediate Driver Issues 58 Specifications 86 Videos 63 Care and Maintenance Cleaning 73 Storage 72 Cautions 11, 24, 26, 38, 39, 67, 73, 74, 79, 93 Cell Modem.
Display 6 Alignment of Touchscreen 18 Backlight 19 Buttons 21 Subdued Lighting (Tactical) Mode 39 Disabling 19 Display Settings 18 Orientation 18 E Embed GPS Information Into File 64. See also Camera Emboss Picture Options 63. See also Camera Equipment Warnings 91 F Favorites Bar 33 Application Shortcuts 33 Features 6 G Gadgets 32 Geo Model 56 Camera. See Camera GPS. See GPS Geotagging 63 Embed GPS Information Into File 64 Emboss Picture Options 63 Getting Started Screen 41 GPS 56, 86.
Compass 58 Compass Gadget Functions 59 Navigation Options 60 Navigation Settings 59 Gadgets 32 GPS Intermediate Driver 57, 58 Settings 57 GPS Compass 58 GPS Intermediate Driver 58 H Hand Strap 13 Hardware Features 16 Help.
M Mega Keys 35, 36. See also Keyboard, On-screen Microphone 6, 27, 28, 84 Microsoft® Windows® Embedded Handheld 6.5.3 6, 82 Mobile Dock 96–102 Communication Options 96 Maintenance 102 Mounting Options Desktop Base 97 Vehicle Mount 98 Wall Mount 101 Modem. See 3G Data Modem Mounting Options 97 N Navigating Around the Rugged Notepad Touch Gestures 16 Navigation, GPS.
Power Off 38 Product Warnings 90, 91, 93 R Reassign Button Functions.
Touchscreen 6 Button 21 Disabling and Enabling 19 Display Backlight 19 Protecting the Touchscreen 73 Settings 18 Specifications 83 Travel Charger 103–104 U Updates, Operating System and Documentation 8 USB Client 8, 27, 87, 96, 97 USB Host 27, 96, 97 V Videos 64 W Warnings 90, 91 Warranty 76–79 Exclusions 76 Extended Warranties 78 Limitation of Liability 77 Remedy 77 Repairs 78 Services 78 Warranty Exclusions 76 Warranty Repairs 78 Wi-Fi Wireless Communication 52 Connecting to a Wi-Fi Network 52 Managing