
User Manual


Spike Quick Start Guide 3
1
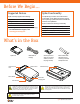
Mounting Your Spike
IMPORTANT TO NOTE...
•
Mount your Spike to your Smartphone case. You may wish to use two cases -
one with Spike attached to it and the other for general day-to-day use.
•
We recommend attaching your Spike to a hard case with a at back. It will not
attach securely to a soft or curved back design.
•
Optimal surfaces to attach Spike to are metal and hard plastic surfaces.
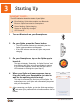
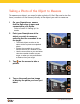
1 Find the best location for your Spike on the
back of your Smartphone case.
• Ensure that Spike does not obstruct the view from
your camera or ash.
• Centrally place Spike on the back of your Smartphone
case.
• To verify, start your Smartphone’s camera app and hold your
Spike against the back to validate the correct placement.
2 Use the Cleaning Tissue provided to thoroughly
clean the area on the back of your Smartphone
case where Spike will be attached.
Important: Do not use the Cleaning Tissue to clean
lenses as it may cause damage.
3 On the back of your Spike, peel off the protective
backing to expose the adhesive tape.
• Use a sharp knife to lift the edge of the backing strip.
• The adhesive tape adheres best at room temperature.
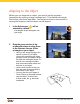
4 Make sure the cleaned area on your Smartphone
case is completely dry, then position Spike onto
your Smartphone case, and press down rmly for
approximately 60 seconds.
• Allow approximately 1 hour for useable bond strength.
• Ultimate bond strength is dependent upon the amount
of adhesive-to-surface contact developed. Be sure to
press rmly to develop this bond strength.
Smartphone case
Smartphone
case
Smartphone
case