Quick Start Guide Welcome to Spike. This Quick Start Guide will guide you through the steps to set up your Spike and begin using it. 1 2 3 4 Spike QSG v1.
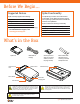
Before We Begin... Supported Devices Spike Functionality Spike currently supports the following: The Spike app contains core measurement functionality. As the Spike app quickly evolves, each Spike app update will introduce additional features and capabilities. Apple iOS iOS 7.1 or later Google Android v4.4 or later Spike contains the following functionality: • Must support Bluetooth Smart (v.4 – low energy) • For detailed device support, visit: www.ikegps.
1 Mounting Your Spike IMPORTANT TO NOTE... • • • 1 2 3 4 Mount your Spike to your Smartphone case. You may wish to use two cases one with Spike attached to it and the other for general day-to-day use. We recommend attaching your Spike to a hard case with a flat back. It will not attach securely to a soft or curved back design. Optimal surfaces to attach Spike to are metal and hard plastic surfaces. Find the best location for your Spike on the back of your Smartphone case.
2 Installing the Spike App The Spike app is available for download from the App Store or Google Play. 1 On your Smartphone, launch the App Store or Google Play. 2 Within the search box, search for ikeGPS. 3 Follow the instructions to download and install the app on your Smartphone. 4 Once installed, the Spike app icon will appear on your Smartphone’s screen. You can launch the Spike app and test it out in Demo mode.
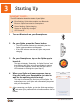
3 Starting Up IMPORTANT TO NOTE... The LED indicator shows the status of your Spike: Blue flashing: Spike discoverable over Bluetooth Blue on: Spike connected to Smartphone Green flashing: Spike charging Green on: Spike fully charged Off: Power off 1 Turn on Bluetooth on your Smartphone. 2 On your Spike, press the Power button. 3 4 • The LED indicator flashes blue indicating that the Spike is discoverable over Bluetooth.
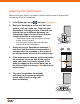
Aligning the Spike Laser Before using your Spike, you need to ensure that the laser is aligned with the camera on your Smartphone. 1 In the Spike app, tap on 2 Rest your Smartphone on top of a flat, hard surface, such as a table top. Then hold your Smartphone vertically and aim it towards two objects that are at different distances, for example the edge of a door. Ensure that the closest object has a vertical edge.
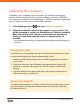
Calibrating Your Compass Calibrating your compass is only required if you intend to capture the location of your target (latitude, longitude, altitude), and export KMZ files. You need to ensure that your Smartphone or Tablet’s compass is calibrated so your target’s location can be accurately captured. , then tap Calibrate Compass. 1 In the Spike app, tap on 2 Follow the calibration steps as they appear on your screen. You will be prompted to rotate your Smartphone or Tablet as indicated.
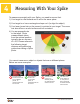
4 Measuring With Your Spike To measure accurately with your Spike, you need to ensure that: 1) Your target is a flat surface and is all on the same plane. 2) Your target is or has a rectangular shape on it (to align the object). 3) Your laser (cross-hair on the screen) is pointed at your target. The crosshair should be on a solid surface and not a window. 4) You are perpendicular to the target. Photo measurements taken from the optimal position typically see an accuracy of ± 2%.
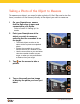
Taking a Photo of the Object to Measure To measure an object, you need to take a photo of it first. Be sure to aim the laser (crosshair on the screen) directly at the object you wish to measure. 1 2 On your Smartphone, ensure that the Spike app is open and connected to your Spike. Refer to Section 2 “Starting Up” for details. Point your Smartphone at the object you wish to measure, ensuring that the crosshair is on the target.
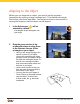
Aligning to the Object Before you can measure an object, you need to set the surface’s perspective by outlining a large rectangle on it. This identifies the angle from which your photo was taken. Your target must be or must contain a rectangular shape so that the object can be aligned. 1 2 In the Edit screen, selected by default. will be A rectangular shape will appear over your target.
Measuring the Area of the Object Once you have aligned your app to the object, you can measure the area of your object. 1 In the Edit screen, tap 2 Drag the outline of the rectangular shape to align precisely to the shape of your object. . • Use the zoom window to help you align the green circles precisely to the corners of your object. • You can add more anchor points and (green circles) by selecting then tapping anywhere on the line of the shape.
Cutting Out a Section of Your Object You can cut out a section of your object that you do not want included in the total measurement of the object area. For example, you may want to measure the surface area of a wall without including the area of windows or doors. . 1 In the Edit screen, tap 2 Drag the green circles of the rectangular shape to align them to the section of the object you want to cut out. A rectangular shape appears.
Measuring a Length 1 In the Edit screen, tap . Then tap the screen, and drag to create a line. 2 Drag the end of the line to the edge of the object you want to measure. Then drag the other end of the line to the other edge of the object. • Use the zoom window to help you align the line precisely to the edges of your object. • The length of your object will display on the screen. • Draw connecting lines by dragging the orange circles. to select • To add another line, tap it.
Saving Your Measurements 1 In the Edit screen, tap Save. Gallery Options You can view a gallery of the photos you have taken with the Spike app and perform various functions on the photos. 1 In the Preview screen, tap 2 Tap on the photo you want to view or edit. A gallery of your photos appears. . • To add or modify measurements on the photo, tap Edit and follow the instructions in Section 3 “Measuring with Your Spike”. • To delete the photo, tap .
Compliance Federal Communication Commission Interference Statement This device complies with Part 15 of the FCC Rules. Operation is subject to the following two conditions: (1) This device may not cause harmful interference, and (2) this device must accept any interference received, including interference that may cause undesired operation. This equipment has been tested and found to comply with the limits for a Class B digital device, pursuant to Part 15 of the FCC Rules.
Industry Canada Statement: This device complies with RSS-210 of the Industry Canada Rules. Operation is subject to the following two conditions: (1) This device may not cause harmful interference, and (2) this device must accept any interference received, including interference that may cause undesired operation. Ce dispositif est conforme à la norme CNR-210 d’Industrie Canada applicable aux appareils radio exempts de licence.