
User's Manual

ADDING YOUR GOOGLE ACCOUNT
1 Tap Settings on the Home screen.
2 Tap Accounts and then tap Add an account.
3 Tap Google on the Add an account screen.
4 Follow the instructions to setup your Google account.
ACCESSING APPLICATIONS
1 Press the Home button.
2 Tap the Application icon at the bottom of the Home screen.
3 The screen shows all applications installed on your device.
4 Tap and hold the icon for any application to create a shortcut on the Home screen.
5 Tap Play Store to find and install new applications.
ACCESSING WIDGETS
1 Press the Home button.
2 Tap and hold a blank spot on the Home screen.
3 Icons for Wallpapers, Widgets, and Settings are shown at the bottom of the screen.
4 Tap Widgets.
5 Tap and hold the icon for any widget to install it on the Home screen.
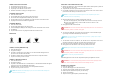
INDICATORS
Bluetooth Full Battery Network Cell Network WiFi
CONNECT TO Wi-Fi (WIRELESS LAN)
1 Press the Menu button.
2 Tap System settings.
3 Tap OFF on the Wi-Fi line to turn Wi-Fi on. The Wi-Fi indicator will appear at the
top of the screen and Wi-Fi will read ON.
4 Tap Wi-Fi to view the list of nearby networks and connect to a specific network.
5 Tap on the network you want to access.
CONNECT A BLUETOOTH DEVICE
1 Press the Menu button.
2 Tap System settings.
3 Tap OFF on the Bluetooth line to turn Bluetooth on. The Bluetooth indicator will appear
at the top of the screen and Bluetooth will read ON.
4 With Bluetooth on, this screen shows a list of nearby Bluetooth devices.
5 Tap on the device you want to access.
NOTE: While the Bluetooth settings page is open, the CT7G is discoverable, allowing other
devices to connect to the CT7G.
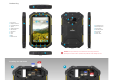
INSTALLING A SIM CARD OR AN SD CARD
1 With the unit powered on, press and hold the power button until the option to power off
the unit appears on the screen.
2 Tap Power Off, and then tap OK. Allow the device to power off.
3 Use a Phillips screwdriver to loosen the three screws that secure the cover over the camera
(on the back of the device), and remove the cover.
NOTE: The CT7G provides a mini SIM slot (right side of the compartment) and a micro
SIM slot2 (center of the compartment).
4 Orient the SIM card so the contacts are facing away from you.
a) For the mini SIM (right side), orient the SIM card so the notch is in the top left corner.
b) For the micro SIM (center), orient the SIM card so the notch is on the
bottom right corner.
5 Gently push the SIM card into the slot.
CAUTION: Do not force the card into the slot as it may damage the device. If the card does not
seat properly, check the orientation and try again.
6 To remove the SIM card, gently press on the flat surface of the card with the pad
of your finger and slide it toward the top of the device.
NOTE: If you cannot remove the card with the pad of your finger, try using a piece of tape to
slide the card out of the device.
7 The microSD card slot is located on the left side of the compartment and can be
inserted by orienting the card with connectors down and away from you.
8 Place the card in the compartment so that you can slide it into the slot.
9 Gently press on the flat surface of the card as you slide it into the slot.
NOTE: Only the narrow portion of the microSD card will slide into the slot.
CAUTION: Do not force the card into the slot as it may damage the device. If the card does not
seat properly, check the orientation and try again.
NOTE: The CT7G only accepts microSD cards.
11 Carefully place the cover over the compartment opening and tighten the screws.
WARNING: The connector must be properly seated and secured before exposing the unit to
water. Failure to perform this step could lead to water damage of the unit.
SENDING A TEXT MESSAGE
1 Press the Home button.
2 Tap on the Messaging icon on the Home screen.
3 Tap on the new message symbol at the top of the screen.
4 Enter the phone number of the person you are texting.
5 Type the text message.
6 Tap the send icon (paper airplane) at the bottom right.