OWNER'S MANUAL Allegro CX Owner’s Manual 1
Manual Part # Release Date: Editor: 2 14601-03 March 2006 J.
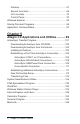
Table of Contents Chapter 1 Introduction....................................................... 7 Welcome...................................................................................9 Allegro CX Overview ..............................................................10 Quick Start Guide ...................................................................12 Chapter 2 Hardware Components .................................. 13 Case Design ...................................................................
Desktop ............................................................................67 Special Functions .............................................................69 On-Line Help ....................................................................70 Control Panel ....................................................................70 Windows Explorer ..................................................................93 Storing Files and Programs ....................................................
Chapter 6 Technical Reference ..................................... 223 Specifications .......................................................................225 Communication Cable Schematic ........................................230 Chapter 7 Software Developer’s Guide for Allegro CE .NET ...................................... 231 CE .NET Software Development Tools .................................233 Software Development Programming Tips ...........................
Allegro CX Owner’s Manual
Chapter 1 Introduction Welcome Allegro CX Overview Quick Start Guide Allegro CX Owner’s Manual 7
Allegro CX Owner’s Manual
Welcome We would like to welcome you as a user of the Allegro CX, a rugged, handheld field PC for data collection. Developed with the input of data collection professionals worldwide, the Allegro CX is adaptable and versatile for use in a wide variety of data collection environments. The Allegro CX continues to utilize our ergonomic, lightweight design that is standard in our line of Allegro Field PCs.
Allegro CX Overview ▲ Features The standard features of the Allegro CX are listed below. These features are described in detail throughout this manual. A complete list of specifications is in the Technical Reference section. Operating System: Microsoft® Windows® CE .NET V4.
Windows Explorer®, InBox® Email, Pocket Internet Explorer®, WordPad®, and Media 9 Series® media player. Sound: Screen taps and key beeps, programmable to associate beeps with events.
Quick Start Guide A Quick Start Guide is included with the Allegro. It offers basic and initial steps to get the Allegro charged and ready to take out into the field. The instructions on the guide should be done first, before you begin using the Allegro. If the Quick Start Guide is discarded or misplaced after setting up the Allegro and you discover you need the guide again, you can access a copy of it from the Allegro Distribution CD.
Chapter 2 Hardware Components Case Design Keyboard Display System Tray Indicators Batteries Communication Ports USB/Power Dock PC Card Expansion Pods Allegro CX Owner’s Manual 13
Allegro CX Owner’s Manual
Case Design ▲ Case Features The case has the following features: The polycarbonate PBT material is rugged, shock resistant, and formulated to resist damage from chemicals. The ergonomic shape and smooth edges make it easy to hold, maximizing comfort and usability in the field. The weight distribution is balanced.
Hand Strap and Shoulder Strap There are four metal cleats, one on each corner of the Allegro CX case. Each cleat has two metal rings that are used to attach the hand strap and shoulder strap onto the Allegro. The straps can be attached for right or left handed operation. The tension on the hand strap is adjustable. The shoulder strap can be used as a neck strap for hands-free operation.
Keyboard ▲ Keyboard Features The keyboard on the Allegro CX is designed to maximize data entry efficiency and to withstand rugged, wet conditions. Careful planning went into the placement, size, and space between keys to increase efficiency and ease of use. The number keys are large and placed in the center of the Allegro for easy access from either side. Some keys have standard functions as well as special functions accessed with the GOLD and BLUE shift keys.
▲ Special Keys and Key Sequences The standard keyboard letters, numbers, and functions are printed in two ways: 1) In dark brown on the off-white keys 2) In off-white on the dark brown keys These standard options are operational unless a GOLD or BLUE shift key is pressed. Blue Blue key key GoldGold key key Blue Shift Key Usage To access a single blue printed keyboard characters: Press and release the BLUE shift key followed by the key with the desired blue-lettered character.
▲ Shifted Options The shifted options and the associated key sequences are listed below.
Contrast (monochrome display only) Gold key + To make the display darker, press the GOLD key and the F5 key. To make the display lighter, press the GOLD key and the F4 key. Backlight On/Off Gold key + The backlight is toggled on and off by pressing the GOLD key and the F3 key. Tab, Forward and Backward The tab keys are used primarily for cursor movement between fields. Touchscreen Disable/Enable Blue key + The touchscreen key allows you to disable and enable the touchscreen.
Right Mouse Click There are two ways to achieve a right mouse click, you can press the Alt key and touch the screen with a stylus, or touch and hold the stylus in one spot on the touchscreen. In many Windows CE programs, when you right click on an item a menu is displayed listing functions and options that pertain to the item. ▲ Cleaning the Keyboard Dirt and debris can get underneath the keyboard bezel.
Display The Allegro CX offers the choice of either a monochrome or color display. Both displays are a 1/4 VGA, 320 wide x 240 high pixels (landscape view), high-contrast liquid crystal displays, shockmounted and sealed, and are equipped with a brightness adjustable backlight. The monochrome display has a 4.1” diagonal viewing area and is equipped with a heater for cold weather operation. The color display has a 3.8” diagonal viewing area.
Allegro in temperatures below freezing. The technology used to create the color display does not require a display heater to use the Allegro in temperatures below freezing. Backlight: The backlight enhances visibility in low-light conditions. The brightness of the backlight is adjustable. Position: The display is slightly tilted up to reduce glare and enhance visibility.
Three styli are provided: two mini styli, one of which snaps into a holding bay built into the top of the case, and a pen-size stylus. For more details on how to use the touchscreen, refer to the Display Touchscreen in Chapter 4, Windows CE Operating System. Touchscreen Disable/Enable Key Blue key + The Allegro offers a touchscreen key option that allows you to disable and/or enable the touchscreen. The function is optimal when cleaning the touchscreen.
System Tray Indicators System tray indicators specify applications that are running on your Allegro. The indicators are located in the bottom right corner system tray. These system tray indicators are active while the Allegro is running specific tasks. These indicators provide you with the following information: System Tray Indicators Indicator Description Remaining Battery Charge Status: shows the percent of charge remaining in the batteries.
▲ Making Space in the System Tray The system tray only has a certain amount of space to display the icons that show which features are currently active on the Allegro. You can remove the clock and the AM/PM icons if you want to make room for the other icons.
The following screen appears: 2) Double tap on the Regional Settings icon: 3) The following screen appears: Allegro CX Owner’s Manual 27
4) Tap on the arrow next to the tabs to get them to scroll over until the Time tab appears and tap on that, the following screen appears: 5) Tap on the down arrow in the Time style in the Appearance box and select the hh:mm:ss or HH:mm:ss option: 6) Tap on OK.
Batteries Batteries are the key power source the Allegro uses while you are in the field collecting data. When collecting data, the Allegro performs with efficient power consumption. The Allegro CX uses an Auto Suspend power management feature to help conserve power. A battery status icon is displayed in the task bar of the Allegro indicating the amount of power (as a percentage) that is left in the battery pack.
▲ Installing the NiMH Battery Pack When you receive the Allegro, you must install and then charge the NiMH battery pack. To do this, complete the following steps: 1) Push up on the sliding latches on the sides of the Allegro to open the battery compartment door. 2) Place the NiMH battery pack in the left side of the battery compartment, push down, and slide it all the way to the right.
8) Check the System Tray for the following icon: This battery icon with the small lightning bolt next to it indicates the Allegro is being charged. 9) Charge the battery pack at room temperature until the charge indicator on the Allegro turns off. This can take three to five hours the first time you charge the battery. ▲ New Battery Detected Screen The charge status of the battery pack is unknown to the Allegro when the pack is first installed. Therefore, you must set the battery charge percentage.
If no percentage is entered in the Enter New Battery Charge Level box, a pop-up screen appears asking you to enter a value in the Specify Battery Charge. Tap on OK to return to the New Battery Detected screen. If the Enter New Battery Charge Level value entered is less than 50% a warning message appears reminding you to charge the battery pack. The capacity of the NiMH battery pack, provided by the factory to use with the Allegro, is 3800 mAh.
The Enter New Battery Charge Level option allows you to set the charge percentage of the battery pack in the Allegro. If you are unsure of the exact charge percentage on your battery pack, we recommend setting it to 10% and charge the battery pack. Note: The NiMH battery is not damaged if it is charged frequently, so setting the charge to 10% and fully charging the battery is recommended when the charge status is unknown.
2) Tap on Start | Programs | Utilities | Set Battery to open the Set Battery Parameters screen. 3) Set the Enter New Battery Charge Level to 10% and tap on Accept. 4) Charge your battery pack to full capacity. Note: We recommend setting the Enter New Battery Charge Level to 10% and charging the battery pack to full capacity anytime your Allegro is left unused for more than a day without being plugged into an external power source and you are unsure to the charge level of the battery pack.
▲ Battery Gauging The purpose of the battery gauging on the Allegro is to provide you with a constant display of the approximate charge status of the battery pack. This tool helps you to effectively maintain and manage the batteries while using them in the field. The gauging works for both NiMH rechargeable batteries and alkaline batteries, although the mechanism is different, as outlined in the section.
▲ How NiMH Battery Gauging Works As batteries discharge, the power available from the battery follows a voltage discharge curve. This means that if you plotted out the power of a battery on a graph there is a discharge curve as batteries lose power. The voltage discharge curve of NiMH batteries differs from the discharge curve of other batteries. When the battery is fully charged, the battery charge registers at 100%.
▲ How Alkaline Battery Gauging Works Alkaline batteries have a more predictable linear slope to the voltage discharge curve than NiMH batteries. Therefore, the voltage can be read directly to gauge the battery charge percent. The gauging may vary depending on the grade and brand of the batteries being used. For best results, we recommend that you use the Duracell Ultra and Energizer Titanium alkaline batteries.
Note: It commonly takes 2.5 to 3 hours to fully charge a battery pack, however in warmer temperatures, or when using accessories for the Allegro, it can take up to 5+ hours. ▲ Power Connector A standard external DC power input connector is located on the top of the Allegro. The connector is 5.5 x 2.1 mm, 12 to 20 V DC. The AC power adapter and optional vehicle power adapter are inserted into this connector.
USB/Power Dock (Optional Hardware) Using the USB/Power Dock, you can charge the battery pack while it sits in the Power Dock (the Power Dock must be connected to the AC wall charger). To charge the battery, complete the following steps: 1) Plug the AC charging adapter into an AC outlet. 2) Insert the connector into the external power input jack located on the back of the Power Dock. 3) Place the Allegro into the Power Dock.
2) Insert the connector into the external power input jack located on the top of the Allegro case. It can take up to five hours to fully charge a pack. You can operate the Allegro with this adapter as well as charge the batteries (see the Using Vehicle Power section of this chapter). ▲ Using Vehicle Power It is important to have the Allegro in Vehicle Mode when it is left connected to vehicle power.
For more information about the Save System utility go to the System Save/Restore Utilities section of Chapter 5. ▲ Power Management Feature To conserve power, the Allegro uses an Auto Suspend feature. When the Allegro is on, it turns itself off if there is no activity after a specified period of time. This feature is on by default and is set at eight minutes when the Allegro is using battery power.
▲ Alkaline Battery Holder The alkaline battery holder enables you to power the Allegro with alkaline batteries. To properly use the alkaline battery holder, complete the following steps: 1) Turn the Allegro off before changing the batteries. 2) The Allegro battery compartment is accessed through a door in the back of the case. To open the compartment door, push up on the release latches on the sides of the case. The door pops open.
Important Alkaline Battery Information The Allegro is designed to be used with the rechargeable NiMH battery pack that came with the unit. The alkaline battery option should be considered as a backup to the NiMH battery pack, not as the main source of power for an extended period of time. Alkaline batteries have a lower capacity and a higher resistance than NiMH batteries. The battery life and performance of the Allegro is reduced when alkaline batteries are used.
Note: After plugging your Allegro into the wall adapter, check the system tray icons and make sure the charge icon appears as a small lightning bolt next to it or a plug icon appears if the battery is already fully charged, verifying that the Allegro is charging. Charging the Allegro when it is not in use helps the Allegro to avoid inaccurate battery monitoring and having the battery discharge to low levels.
Note: After plugging your Allegro into the wall charger, check the system tray icons and make sure the charge icon shows a small lightning bolt next to it, verifying that the Allegro is charging. ▲ Useful Life of a NiMH Battery Pack Battery packs can be recharged approximately 600 times before they need to be replaced. This number is dependent on the temperatures they have been exposed to, operating conditions, and charging and discharging practices.
▲ Real Time Clock The Allegro CX has a real time clock powered by a lithium battery. This battery should last the lifetime of the Allegro CX. The clock continues running regardless of whether or not the Allegro is turned on or off, or if the main battery goes completely dead or is removed.
Communication Ports The Allegro CX has the following communication ports: Two 9 pin serial ports (located on the top of the case) One infrared port (on top of the case) One USB port (available through the optional USB/Power Dock for ActiveSync connections only) ▲ 9 Pin Serial Communication Ports The standard 9 pin serial communication ports (COM1 and COM2) allow for the simultaneous operation of two serial devices such as printers, modems, and bar code wands.
Connecting Sensors to COM1 Pin 4 (DTR) on COM1 supplies up to 200 mA at +5 volts to power bar code scanners, external GPS receivers, and other sensors. This signal (DTR) must be set high by the application to take advantage of this feature. When the DTR signal goes low, the output is -5 volts. Insure that the device connected to the DTR line can accept negative voltages or is protected against them (standard RS-232 signal levels).
USB/Power Dock (Optional Hardware) Using the USB/Power Dock, you can quickly transfer and synchronize files between the Allegro CX and a PC. The Allegro is charged while it is docked, preparing it for tomorrow’s work day. The USB/Power Dock is an optional two function component designed for the Allegro CX. It is a charging base and a communication base. The Power Dock is ordered separately for the Allegro CX.
USB/Power Dock Connector Pins The interaction between the Power Dock and Allegro happens through the connection of the six connectors on the bottom of the Allegro. There are six pins in the Power Dock that touch the Allegro connectors as the Allegro is placed into the Power Dock. The six pins can be replaced if damaged or bent.
PC Cards ▲ Types of PC Cards Accepted The PC card slot accepts Type I or Type II cards. These cards include ATA Flash cards, Compact Flash cards, SRAM (Static Random Access Memory), or Input/Output cards. All types have a 68 pin connector for attachment to the Allegro. The cards must be 5 V or 5 V/3 V (PC cards that are 3 V only are not supported). The PC card slot is a 16 bit card slot. It is not a “card bus” slot. To use a Compact Flash card, a Compact Flash card adapter is required.
3) Insert the card socket-first with the front of the card facing the door. Gently push it in until it stops. Note: Be careful when inserting and removing cards. Excess force could damage the card and the card drive. If the system tray indicator for the PC card activity is on, the computer is writing to the card. Do not turn off the Allegro and remove the card until the indicator stops blinking. Incomplete files can corrupt the data already stored on the card. 4) Close the door to the PC card slot.
Expansion Pods Custom expansion pods allow you to add additional integrated components. Our current available expansion pods include the following: GPS Bar Code 802.11b Bar Code/802.11b Each of these expansion pods replaces the PC card door with an extended expansion pod door which contains the integrated technology. Chapter 9 of this manual describes each expansion pod currently available and the instructions for using each pod.
Allegro CX Owner’s Manual
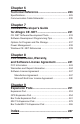
Chapter 3 Memory Configuration and Data Storage Options Internal Memory Program and Data Storage Options Allegro CX Owner’s Manual 55
Allegro CX Owner’s Manual
Internal Memory The internal memory of the Allegro CX is configured much like the memory in laptop computers. It consists of ROM (Read Only Memory) and RAM (Random Access Memory). ▲ Read Only Memory (ROM) ROM is used to store the Operating System and Utility programs. Information in the ROM is electronically “burned” into a chip before the chip is installed at the factory. Information stored in ROM can be read or copied. It can only be altered with a special utility program provided by the factory.
Program and Data Storage Options The Allegro CX has two options for storing programs and data: internal non-volatile data storage and a PC card slot for memory cards. ▲ Storage Labels To view the different storage locations by their name, complete the following steps: 1) Turn on the Allegro. 2) Double-tap on the My Computer icon on the desktop of your Allegro.
PCMCIA stands for the Personal Computer Memory Card International Association. This association has developed standards for PC cards. PC cards are about the size of a credit card and come in three types or thickness. The PC card slot accepts Type I or Type II cards. These cards include ATA Flash Cards, SRAM (Static Random Access Memory), and Compact Flash cards. All types of cards have a 68 pin connector for attachment to the Allegro.
SRAM Card Battery SRAM cards are powered by the Allegro while installed in the PC card slot. An on-board card battery retains data when the card is not being powered by the Allegro. If you have this type, make sure that the battery is installed before attempting to use the card. Other brands have a rechargeable battery that is automatically recharged while it is inside the Allegro. The rechargeable batteries are not replaceable.
Chapter 4 Windows CE Operating System Windows CE Overview Windows Explorer Storing Files and Programs Application Command Bars Allegro CX Owner’s Manual 61
Allegro CX Owner’s Manual
Windows CE Overview This chapter describes the operation of the Allegro CX Microsoft™ Windows™ CE .NET version 4.2. The operating system has a similar look and feel to a desktop PC Windows operating system. Windows CE is designed for small, portable hand-held computers like the Allegro. Windows CE .NET gives the Allegro the ability to communicate and share information with Windows-based computers and the Internet by using ActiveSync. Windows CE .
The Windows CE .NET Desktop appears on the screen: Suspend/Resume Mode If you press the On/Off key, the Allegro goes into suspend mode. When you turn it back on, it resumes in the same place it was at before you turned it off. For example, if a PTab spreadsheet file was on the screen when you turned the Allegro off, the same spreadsheet screen appears when you turn the Allegro back on.
Three styli are provided: two small on-board styli and a full size pen-type stylus. One small on-board stylus snaps into a holding bay built into the top of the Allegro. Other pointed objects can be used, including your finger. Be sure to use a device that does not scratch the screen. Calibration To calibrate the touchscreen and set up the screen-tap sensitivity, refer to the Stylus portion of the Windows CE Control Panel section of this chapter.
Ideally, use a soft, clean cotton cloth to gently wipe off the screen. Do not use anything abrasive that could scratch the screen, including tissues and paper towels. Once the screen has been cleaned, use the same key sequence to enable the touchscreen. Refer to the Chapter 2, Display section for more details.
▲ Desktop When you turn the Allegro CX on, a Desktop similar to the example shown below appears on the screen. The Desktop looks and operates much like the Windows 2000/XP Desktop. Program icons and shortcuts are displayed. Tap on an icon twice to execute it. Desktop Taskbar At the bottom of the screen is the Taskbar, it includes: the Start button, buttons for all the active applications, the system tray, and the Desktop icon.
Start Menu Tap the Start button to view the menu as shown below: From the menu, tap on the category you want to select. You can also use the up and down arrow keys to make a selection and press Enter. A secondary menu or dialog box appears. Application Buttons The Taskbar shows which applications are currently running and can be used to select an active application. Tap an application’s button on the Taskbar to maximize it. Tap it a second time to minimize it.
Data Storage Active: darkens when data are being read from or written to the solid state disk. PC Card: indicates that a PC card is installed in your Allegro. PC Card Activity: darkens to indicate that the application program is accessing the PC card (do not remove the card when this icon is darker). Caps Lock On: appears when the all capital letters option is activated. Touchscreen Disable: appears when the touchscreen is disabled.
Task Manager Press the Start key to view the Task Manager. All of the programs that are currently running are shown. Select which program you want to run by using the up and down arrow keys to highlight the desired program and pressing Enter. You can also close applications from the Task Manager. ▲ On-line Help For on-line help with Windows CE basics or with a specific application, tap the Start button and select Help. Select a topic from the Help Contents list.
Note: You must press the OK button when settings in a Control Panel applet are changed in order for the settings to be saved. Once the Control Panel applets are set up the way you want, run the Save System utility to save all settings (described later in this chapter). Certificates The Certificates applet is used to create secure communication with specific programs you select on your Allegro. This feature allows only the users you have certified the ability to access the program. Note: The CE .
Other Authorities The Other Authorities option is for intermediate certificate authorities that assist with establishing a chain of trust. This option allows you to view all the users who have access to the Allegro and what programs they have access to. With the Certificates applet, you can Import (or add) new certificates to programs on your Allegro. You can view the certificates to see details about them, such as the expanded name or expiration date.
Dialing The Dialing Properties applet is used to create dialing locations and set dialing options to connect to a service provider or remote computer. Display The Display Properties applet has several tabs controlling different display features. Each tab has features allowing you to change different appearance options of your Windows CE desktop. Background The Background tab gives you options for the desktop background image (the default is None).
Appearance Use the Appearance tab to change the color scheme of the display contents (the default is High Contrast White). Windows Standard and High Contrast Black are also recommended. When using a monochrome display, options such as Eggplant appear as various shades of gray. When using a color display you can see the selectable color schemes in their true colors.
Controls The Controls tab allows you to select the Contrast and Brightness of the backlight. If you are using a monochrome screen the heater options appear. The Display Heater options are Auto and Off. Auto is the default setting, which turns on the heater automatically. Adjust the display contrast by moving the slide bar left or right. Note: The display heater cannot be used if you are using alkaline batteries. The Auto option is not available.
Clear History: Removes all the Web addresses that have stored in your Internet Explorer address box. Connection The Connection tab allows you to set up the type of Internet connection you are using on your Allegro. If the Allegro is connected to a Network, those settings are available on this tab.
Security The Security tab allows you to set up Internet security levels that are applied when the Allegro is connected to the Internet. These settings are activated and deactivated by tapping in the small box next to the security option, a checkmark confirms the security setting is active. Advanced The Advanced tab allows you to set up the some additional Internet settings connected to additional Web page options, such as displaying images, playing sounds, enabling scripting and how links are presented.
IrDA The IrDA Settings applet is used when using infrared or Bluetooth on your Allegro CX. The IrDA tab allows you to enable or disable object exchange (OBEX) and/or the IrDA ports. OBEX The OBEX tab offers a setting that allows you to connect or disconnect OBEX and IrDA. The OBEX function is disconnected by default. This default setting permits access to the raw IR, and helps extend the battery life of your Allegro.
If you disable the IrDA Ports option, a pop-up message appears informing you to perform a System Reset on your Allegro to save and activate this option. Note: A System Reset is required to save and activate the selected setting whether you enable or disable the IrDA ports. Keyboard The Keyboard Properties has a Repeat tab used to enable or disable character repeat when you hold down a key on your Allegro keyboard. If the Enable character repeat is selected, you can set the repeat delay and repeat rate.
Owner The Owner Properties applet allows you to set up identifications and networks ID’s on your Allegro. Identification The Identification tab is used to specify personal information, such as your name, address, and phone number. Notes The Notes tab provides a place to add any additional information that is not included in the Identification tab.
Network ID The Network ID tab is used to create a personal, unique identifier you receive for accessing a remote network. In the Network ID tab, enter the same user name, password, and domain name you use to log onto the remote network at the office. This ID allows you to access the remote network with your Allegro. PC Connection The PC Connection Properties applet allows you to change the port and baud rate used for communicating with your Allegro and PC through ActiveSync on the PC Connection tab.
If you are not using a USB/Power Dock to connect your Allegro to your PC, tap on the Change button to access the Change Connection screen. Tapping on the down arrow accesses the drop-down list of available connection options. Tap on the COM type your Allegro is using and tap on OK to save the new setting. If you do not want to change the COM port, tap on X to cancel out of the Change Connection screen and return to the PC Connection Properties screen.
Battery The Battery tab shows the status of the main battery. Schemes The Schemes tab allows you to specify the amount of time that passes before the Allegro turns off the backlight, and the amount of time that passes before the Allegro goes into suspend mode. These times are set twice, once for each power type the Allegro is using. The Power Scheme option allows you to choose one of the following power supplies and set the suspend times: Battery Power: The Allegro is powered by a NiHM battery pack.
The Automatically Suspend option sets the amount of time the Allegro sits idle, after the backlight turns off, before the Allegro goes into suspend mode. Note: Remember that when setting these times the suspend time starts to countdown to suspend after the backlight has turned off.
Numbers The Numbers tab is used to set up numbering on your Allegro, including the measurements (U.S. or Metric) and symbologies, such as the decimal symbol, negative symbol, etc. Currency The Currency tab is used to set up currency symbologies, such as the currency symbol, decimal symbol, etc.
Time The Time tab is used to set up the way the time is displayed in the system tray of the Allegro. Date The Date tab is used to set up the way the date is displayed on the Allegro.
Remove Programs The Remove Programs applet allows you to remove programs that you have installed on the Allegro. You cannot remove programs that were factory installed, such as WordPad. SpeedSwitch The SpeedSwitch applet allows you set the performance of the Allegro CX. There are two settings on this applet, one increases the speed of the Allegro, the other increases the battery life. Note: To enable the performance option once it is changed, the Allegro must be turned off and then back on.
Increase Battery Life The Increase Battery Life setting increases the battery life of the Allegro CX, but results in a reduced performance speed. Stylus The Stylus Properties applet allows you to set up the sensitivity of the touchscreen. You can also recalibrate the touchscreen if needed. Double-Tap The Double-Tap tab is used to set up and test the double-tap sensitivity of the touchscreen for speed and distance between taps. Calibration From the Calibration tab, the touchscreen is recalibrated.
When calibrating the touchscreen, hold the stylus down on the plus mark (+) for two seconds. Complete this procedure for each + mark shown on the touchscreen. Press Enter when prompted. System The System Properties applet displays general information about the hardware and software configurations for your Allegro. General The General tab gives you system information including the processor type, etc.
Memory The Memory tab allows you to adjust the allocation of RAM between program memory and storage memory. The majority of RAM should be allocated to program memory so the applications have plenty of execution space. Define the amount of usable RAM by subtracting the In Use figure from the Allocated figure. Device Name The Device Name tab allows you to view or change the name of your Allegro. In the Device name box, AllegroCX_##### (##### = serial number) is entered automatically.
Copyrights The Copyrights tab contains copyright information for specific programs on your Allegro. Version The Version tab displays the Allegro system version number and release date. Volume and Sounds The Volume & Sounds Properties applet is used to set the volume level, enable or disable the Allegro to make noises when buttons are pressed and set the type of noise that is made.
Volume The Volume tab is used to adjust the speaker volume and turn on and off the sounds associated with different system events. Sounds From the Sounds tab, you can associate a sound with an action. The actions are listed on the left. The actions that have sounds associated with them have a speaker icon next to them (like an Asterisk in the screen shown below). To edit, add, or listen to a sound, make a selection from the list on the left.
Windows Explorer Windows Explorer allows you to browse the files and folders on the Allegro CX. To launch your Allegro’s Windows Explorer, complete the following steps: 1) Turn your Allegro on. 2) Double-tap the My Computer icon on the desktop. When Windows Explorer opens, My Computer folder contents are displayed: The menu options and buttons available on the Allegro are similar to the options in Windows Explorer on the desktop PC.
▲ Opening Two Explorer Screens You can open two Windows Explorer screens. One opens to the source folder or file, and the other opens the destination folder. Both Explorer screens are shown as active application buttons in the Taskbar as shown below: Both of these active application buttons represent Explorer screens Open the Explorer screen with the source file or folder in it. Select the file you wish to move or copy and drag it to the destination folder’s button on the taskbar.
Storing Files and Programs It is important that you understand the difference between storing data on the internal non-volatile storage versus RAM. From the Desktop of your Allegro, double-tap on the My Computer icon. The following folders are standard folder on the Allegro: ▲ C_Drive, Solid State Storage The solid state storage is non-volatile. Information is retained even when no power is supplied to the Allegro. We recommend that you use the internal solid state storage as your primary storage area.
The C_MyDocs and C_Program Files folders were created for you to use in place of the My Documents and Program Files folders that are in the RAM file system. The C reminds you that these files are on the C_Drive, which is a safe area to store data. ▲ RAM File System The storage ability of RAM may be temporary. If the batteries are drained or removed, or a Restore System utility is performed on the Allegro, information stored in RAM can be lost.
Application Command Bars Active applications display a command bar across the top of the screen. The command bar for WordPad is shown below: This command bar contains drop-down menus, a help button [?] and an exit button [X] on the first line and a slider [ll] and a toolbar on the second line. Use the menus and toolbar buttons as you would on the desktop or notebook PC. Refer to the information about a particular program later in this chapter for more specific details.
To view both bars on separate lines again, move the slider down where the toolbar was located originally: Hiding the Taskbar You can hide the Taskbar, freeing up room on the display for applications, to do this, tap the Start button and select Settings | Taskbar. Under Taskbar options tap the box next to Auto hide. Press the stylus along the edge to view the Taskbar When the Taskbar is hidden, you can get it to appear if you press a stylus along the very bottom of the Allegro screen.
Chapter 5 Allegro CX Applications and Utilities ActiveSync File Transfer Program System Utilities PTab Spreadsheet Program WordPad Windows Media 9 Series Player Internet Explorer and InBox Calculator Program Terminal Program Bluetooth Allegro CX Owner’s Manual 99
Allegro CX Owner’s Manual
ActiveSync Transfer Program Instructions on establishing communication between the Allegro and a desktop PC using ActiveSync, and synchronizing files are described in this section.
▲ Downloading ActiveSync from the Allegro CX Distribution CD To download ActiveSync from the distribution CD shipped with your Allegro, complete the following steps: 1) Open the CD-ROM drive on your desktop PC, insert the Allegro CX Distribution CD, and close the drive. The following screen appears: 2) Click on the Install ActiveSync button. 3) Select a language the download instructions appear in. Once you select a language, the Microsoft End-User’s License Agreement is shown.
To download ActiveSync from Microsoft’s Web site, start with the Web address below and complete the following steps: http://www.microsoft.com/mobile/pocketpc/downloads 1) Select ActiveSync from the Microsoft Downloads list. 2) Select a language the download instructions appear in. Once you select a language, the Microsoft End-User’s License Agreement is shown. 3) Click on the I Accept >> button located at the end of the agreement if you agree to the terms of the agreement.
2) Click on the Next button and follow the instructions given to you by the ActiveSync Setup program. When ActiveSync is installed the following screen appears: 3) Click on the Cancel button on the Get Connected screen so you can continue to set up the communication settings. The following screen appears: 4) Click on the OK button. Note: Depending on the operating system you are using on your desktop PC, you may be instructed to restart your desktop PC before completing the connection process.
The Allegro CX has the following communication ports available for establishing an ActiveSync connection between the Allegro and desktop PC. You need to select which communication port to use for the ActiveSync connection between the Allegro and desktop PC and proceed to that section.
5) Tap the Change button to access the Change Connection screen if you are using a different communication port than the Connect using: port lists. 6) Tap on the arrow next to the Connect to desktop using: box to access a drop-down list 7) Tap on the desired communication port and baud rate in the drop-down box, and tap on the OK button. 8) Double-click on the ActiveSync icon on the desktop PC and the Get Connected screen appears.
9) Click on the Next button and the Get Connected: Checking COM Ports screen appears. 10) If using COM 1, the Progress box of the Checking COM Ports screen says Looking for a Mobile device… Checking on COM Port 1, double-tap on the PC Link icon on your Allegro desktop.
After tapping the PC Link icon on the Allegro desktop, a screen that says Connecting to Host is shown. After a connection is made, the following screen briefly shows on the Allegro: If you are unsuccessful in your connection, go to the An Unsuccessful Connection section found later in this chapter.
Complete the installation instructions that came with your IrDA infrared adapter. Depending on your desktop’s Windows operating system you may need to access your desktop PC’s wireless communications setup by selecting Settings | Control Panel and the wireless option (the name varies between operating systems). After the infrared settings are set, follow the same connection process as COM1 or COM2.
3) Place the Allegro into the USB/Power Dock. The Allegro automatically turns on and the Getting Connected screen disappears. The USB is the default port and should already be selected. To double check the setting, complete the following steps: 1) Turn on the Allegro. 2) Tap the Start | Settings | Control Panel | PC Connection. At the bottom of the dialog box under Connect to desktop using: you see the COM port the Allegro is set on for the connection process.
Unsuccessful Connection If the connection was not successful, the following screen appears on the PC: From here, click on the Next button on the Your device was not detected screen and the Getting Connected screen appears again. Repeat the connection instructions for the COM port you are using until a successful connection is made.
3) Press the PC Link icon on the Allegro’s desktop, or if you are using the USB/Power Dock, place your Allegro into the Power Dock to initiate an ActiveSync connection. The following screen is briefly shown on the Allegro display: If you set up a partnership between the Allegro and desktop PC, the connection is made automatically. When the connection is complete the following screen is shown: 4) Press the Explore button to view the contents of the Allegro from the desktop PC.
Troubleshooting If you have any problems establishing communication between the Allegro and the desktop PC, check the communication settings on both computers and make sure the communication cable is firmly connected to the correct ports. Refer to the installation instructions for ideas on settings to review. ▲ New Partnership Setup After you have successfully connected the Allegro to the desktop PC the following screen appears: You can select Yes to set up a partnership or No to connect as a guest.
Setting Up a Partnership To set up a partnership between the Allegro and desktop PC, complete the following steps: 1) Select the Yes option and press the Next button on the Setting up a Partnership screen. The following screen appears: 2) Select Yes if you want the Allegro to share a partnership with the desktop you are connected to, or No if you want to connect to more than one computer. Press the Next button.
The Synchronized Files option is the only synchronization function currently operational with the Allegro. Additional options are not available. 3) Select the Files Synchronized Files option. The following screen appears: 4) Press OK to return to the Select Synchronization Settings screen. The Files | Synchronized Files option is now selected.
5) Press the Next button. The Setup Complete screen appears: 6) Press the Finish button to complete the new partnership setup and begin the synchronization process. A shortcut to a new folder created in the AllegroCX_#### My Documents (#### = serial number) folder appears on the PC’s desktop. This is the file synchronization folder which holds all of the files which are automatically transferred from the Allegro to PC or vice versa.
The Allegro and the desktop PC are connected to each other through ActiveSync. The following screen appears: The synchronization program looks for changes between the folder on the Allegro and desktop PC. The following screen appears: ActiveSync informs you if there are files that are not synchronized with the Allegro and desktop PC.
ActiveSync automatically synchronizes files between the Allegro and the desktop PC. The following screen appears: The Allegro and desktop PC are now connected and the files synchronized. Note: If the connection message on the Allegro does not disappear, press Cancel and double-tap on PCLink again. Unresolved Files through File Synchronization It is very important to note that the synchronize files option always replaces all old files with the most recent file.
The synchronization process stops when both documents, the one on the Allegro and the one on the desktop PC, are altered and ActiveSync is unsure which one is the master document. The following screen appears: To specify which file is the master file, complete the following steps: 1) Click on the Resolve items... option to continue the file synchronization process.
2) Click on the drop-down box next to Skip in the Action section of the Resolve Conflict screen. The following options appear: 3) Select the computer you want to synchronize with the master file. The right arrow synchronizes the file on the desktop PC to the Allegro. The left arrow synchronizes the file on the Allegro to the desktop PC.
4) Click on the Synchronize button. The following appears: The file you select to be synchronized now replaces the existing file with the file chosen as the master file. In this example, the left arrow is selected and the file on the Allegro is transferred to the desktop PC, replacing the file on the desktop PC with the master file on the Allegro. The files are now synchronized.
Renaming Files Renaming the files helps to avoid the unresolved notification. Renaming is also an option available for keeping both altered files when the unresolved file notice appears, to do this complete the following steps: 1) Disconnect the Allegro from the desktop PC. 2) Rename one of the altered files. 3) Reconnect the Allegro to the desktop PC. Both files can now synchronize.
Transferring Files between the Allegro CX and the Desktop PC Once the Allegro and the desktop PC are communicating, files can be transferred between the two computers. On the desktop PC, use My Computer, Windows Explorer, or another file management program to view and navigate through the contents of the desktop PC. To view and navigate through the folders and stored files on the Allegro, complete the following steps: 1) Double-tap on the My Computer icon.
2) Click on the Rules tab on the Options screen. 3) Click on the Conversion Settings... button in the File Conversion box. 4) Select the Convert files when synchronized, copied or moved to enable all file conversions are handled automatically, and click on the OK button.
Remote Allegro File Maintenance You can perform many convenient Allegro file maintenance operations remotely from the desktop PC using ActiveSync. Move, copy, and delete files from the Allegro window simply by dragging and dropping them or by using the cut and paste functions. You cannot start programs remotely. If you double-click on an executable file, the properties of that file are shown.
System Save/Restore Utilities The Utilities Menu has multiple restart/save system options designed for the Allegro. The following are the restart/save options available to you: Save System Reset System Restore System Set Factory Defaults ▲ Save System The Save System option creates a copy of RAM and saves it to a location on the C_Drive.
When Save System utility is selected, the following message is shown: ▲ Reset System Reset System causes all running applications to close when selected. If programs are not close and files are not saved, data may be lost. After Reset System is selected, the system reloads data drivers and programs that run at start-up time. A reset leaves all stored in RAM intact.
Make sure you save all valuable data to the internal non-volatile storage before executing this menu option. You can execute a Restore System by selecting Start | Programs | Utilities | Restore System. You receive the following Warning screen, explaining what happens if you proceed with this function you have the option of completing or canceling the process. If you tap on yes to proceed but have not previously performed a Save System, the following screen pops up.
Before this selection is executed, the following message pops up describing what is about to happen with the function and asks if you wish to continue with or cancel the operation. After performing this option, you need to recalibrate the Allegro’s touchscreen. After recalibrating the touchscreen the following screen is a system notification that the Allegro is loading from the factory defaults.
PTab Spreadsheet Program PTab™ is a fully functional spreadsheet program designed to run on Microsoft CE devices. It has the key features of common desktop spreadsheet programs. It is fully compatible with Microsoft Excel on the PC. You can easily create spreadsheets on the field computer or download an existing Excel® spreadsheet from the desktop PC.
If the Excel file has graphics incorporated into it, the spreadsheet cannot be converted to a PTab file. We recommend that you make a copy of the Excel spreadsheet, remove the graphics, and then convert the modified copy. Items Converted to / from Excel PTab 3.0 can load/save MS Excel files (this includes Excel version 5.0/95/97/200/XP/2003). The following are the items that are converted to and from Excel files when opened in PTab: Cell values: numbers (incl.
Cut, Copy, Paste, Paste Special, Clear (All, Content, Formats), Fill (Right, Down, Series) cells, Insert/Delete Rows/Columns Set row height and column width, hide/unhide rows and columns, autofit row heights and column widths.
Max.
Adjusting the Viewing Area on the Display A standard PTab screen is shown above with the menu bar, toolbar, formula bar, and taskbar showing. You can view seven lines of the spreadsheet on the screen. When the menu bar, toolbar, formula bar, and taskbar are hidden, as shown below, you can view eight lines of the spreadsheet. Refer to the Application Command Bars section found earlier in this chapter for details on how to adjust the viewing area.
- Boolean: True or false - Formula: Formulas begin with an equal sign (=). PTab evaluates the value. (Example: =A5+2, =Sum(B2:C7)).
File Menu Options The following functions are available from the File menu option. New The New option creates a new workbook. Open The Open option opens an existing workbook. You can open a PTab file (.pt), a Microsoft Pocket Excel file (.pxl) or a CSV file (.csv). Microsoft Excel files (.xls) are converted to PTab files during the desktop PC to Allegro file transfer. CSV files are ASCII text files containing values separated by a separator taken from the Allegro’s regional settings.
Password The Password option sets or changes the password. Close The Close option closes the current workbook. Edit Menu Options The following functions are available from the Edit menu option. Undo The Undo option undoes the last action. Redo The Redo option redoes the last action. Cut The Cut option cuts the selected cells to the clipboard. Copy The Copy option copies the selected cells to the clipboard.
Clear > All/Contents Del/Format/Validation The Clear option clears contents+format/contents/format of selected cells. Fill > Right/Down/Series The Fill option fills the selected cells by the leftmost/topmost cell contents or fill series: linear, growth, date (date unit: day, weekday, month, year) or autofill (e.g. January, February, March). Delete Cells The Delete option removes the selected rows/columns. Insert Menu Options The following functions are available from the Insert menu option.
Chart The Chart option creates a simple chart (bar, line, pie, Y) from selected cells. Select the cells that contain the data and labels you want in the chart. Then tap Insert | Chart. Tap on the Options button for additional chart setup options. Name The Name option inserts a name in a formula. Define Name The Define Name option defines a name.
Format Menu Options The following functions are available from the Format Menu option. Cells The Cells option opens the follow screen: Format Tab The Format tab lets you select the numeric format or date & time format for a cell(s).
Alignment Tab The Alignment tab sets the horizontal and vertical cell alignment. Font Tab The Font tab allows you to select the font, size, color, background color, and style. Border Tab The Border tab formats the borders in PTab documents.
Protect Tab The Protect tab protects locked or hidden cells. Row > Height/AutoFit/Hide/Unhide The Row option sets row height and hides or unhides rows. Column > Width/AutoFit/Hide/Unhide The Column option sets column width and hides or unhides columns. Sheets The Sheets options allows you to add, rename, or delete sheets. Zoom > 70%/80%/90%/100%/150%/Custom The Zoom option allows you to change the magnification of the sheet. You can specify between 25 - 200 percent.
Tools Menu Options The following functions are available from the Tools menu option. Go to The Go to option selects specified cell or range. Find The Find option finds a cell in the current sheet containing the specified text. You can search by rows or columns, look in values or formulas, search case sensitive/insensitive, and search entire cells. Replace The Replace option finds a cell as outlined above and replaces the text as specified.
Outline > Group/Ungroup/Clear/Auto The Outline option displays only the rows or columns with headings and summaries or to display detail data adjacent to a summary row or column. Data Validation The Data Validation option is used to restrict cell entries within specified limits or to the data from a list. Goal Seek The Goal Seek option is used when you know the result of a formula but not the input value. Task Menu Options The following functions are available from the Task Menu option.
Options The Options option opens the following screen: View Tab The View tab enables/disables the following: Formula Bar Column and row titles (showing them) Gridlines Zero values General Tab The General tab allows you to set the following options: Move after Enter (none/right/down) Full screen zoom Auto save Allegro CX Owner’s Manual 145
Custom Tab The Custom tab allows you to set lists from the following: Import from selection Delete list About The About option displays the following information about the Z4Soft PTab spreadsheet program: Version number of the program Copyright information Web site address ▲ Converting Microsoft Excel Files (.
▲ Spreadsheet Functions The following sections are the available spreadsheet functions available in PTab. Math & Trig Functions Abs(number) Returns the absolute value of a number. Example: Abs(-3) equals 3. Acos(number) Returns the arccosine of a number. The number must be from -1 to 1. Example: Acos(-0.5) equals 2.094395. Acosh(number) Returns the inverse hyperbolic cosine of a number. The number must be greater or equal to 1. Example: Acosh(1) equals 0.04613.
Ceiling(number, significance) Returns the number rounded up to the nearest multiple of the significance. Example: Ceiling(10.43, 0.1) equals 10.5. Combin(number, numberChosen) Returns the number of combinations. Number is the number of items, numberChosen is the number of items in each combination. Example: Combin(10, 2) equals 45. Cos(number) Returns the cosine of the given angle. Example: Cos(0.5) equals 0.87758. Cosh(number) Returns the hyperbolic cosine of a number. Example: Cosh(5) equals 74.20995.
Int(number) Rounds a number down to the nearest integer. Example: Int(1.7) equals 1. Ln(number) Returns the natural logarithm of a number. Example: Ln(Exp(2)) equals 2. Log(number, base) Returns the logarithm of a number to the base you specify. If the base is omitted, it is assumed to be 10. Example: Log(100, 10) equals 2. Log10(number) Returns the logarithm (base 10) of a number. Example: Log10(100) equals 2. Mod(number, divisor) Returns the remainder after the number is divided by the divisor.
Rand() Returns a random number greater than or equal to 0 and less than 1. A new number is returned every time the workbook is recalculated. Round(number, number) Rounds a number to the specified number of digits. Example: Round(5.46, 1) equals 5.5. RoundDown(number, numDigits) Rounds the number down, toward zero, to the specified number of digits. Example: RoundDown(40.8, 0) equals 40. RoundUp(number, numDigits) Rounds the number up, away from zero, to the specified number of digits.
Sum(number, number, ...) Return the sum of all the numbers in the list of arguments. Example: Sum(10, 20) equals 30. SumIf(range, criteria, sumRange) It sums up the values of only those cells from the sumRange for which the corresponding cells in the range satisfy the criteria. Example: Sumif(A1:A5,”>100000”,B1:B5). Sumproduct(reference1, reference2, ...) Multiplies corresponding numeric components in given ranges and returns the sum of those products. Sumsq(number, number, ...
Statistical Functions Avedev(number, number, ...) Returns the average of the absolute deviations of data points from their mean. Average(number, number, ...) Returns the average of the arguments. Example: Average(1, 2, 3) equals 2 AverageA(number, number, ...) Returns the average of all values in a set of values (TRUE is 1, FALSE and texts are 0). Betadist(x, alfa, beta, A, B) Returns the cumulative beta probability density function.
Covar(reference1, reference2) Returns covariance. Critbinom(trials, probability, alfa) Returns the smallest value for which the cumulative binomial distribution is greater than or equal to a criterion value. Devsq(number, number, ...) Returns the sum of squares of deviations of data points from their sample mean. Expondist(x, lambda, cumulative) Returns the exponential distribution value. Fdist(x, degOfFreedom1, degOfFreedom2) Returns the F probability distribution for two data sets.
Hypgeomdist(numSuccInSample, size, numSuccInPop, popSize) Returns the hypergeometric distribution. Chidist(x, degOfFreedom) Returns the one-tailed probability of the chi-squared distribution. Chiinv(x, degOfFreedom) Returns the inverse of the one-tailed probability of the chi-squared distribution. Chitest(reference1, reference2) Returns the test for independence (the value from the chi-squared distribution for the statistic and the appropriate degrees of freedom).
Min(number, number, ...) Returns the minimum value in the list of arguments. Example: Min(1, 2, 3) equals 1 MinA(number, number, ...) Returns the smallest value in a set of values (TRUE is 1, FALSE and texts are 0). Mode(number, number, ...) Returns the most frequently occurring, or repetitive, value in a range of data. Negbinomdist(numOfSuccess, numOfFailure, probability) Returns the negative binomial distribution.
Poisson(x, mean, cumulative) Returns the Poisson distribution. Prob(values, probabilities, lowLimit, upLimit) Returns the probability that values in a range are between two limits [lowerLimit..upperLimit]. Rank(number, reference, order) Returns the rank of a number in a list of numbers. Its size relative to other values in the list. Rsq(seriesY, seriesX) Returns the square of the Pearson product moment correlation coefficient through the given data points. Skew(number, number, ...
Tdist(x, degOfFreedom, type) Returns the Student’s t-distribution. Tinv(probability, degOfFreedom) Returns the inverse of the Student’s t-distribution. Trimmean(reference, percentage) Returns the mean of the interior portion of a set of data values. Var(number, number, ...) Estimates the variance based on a sample. VarA(number, number, ...) Estimates variance based on a sample (TRUE is 1, FALSE and texts are 0). VarP(number, number, ...) Calculates variance of the entire population.
Fv(rate, nper, pmt, pv, type) Returns the future value of an investment. Rate is the interest rate per period. Nper is the total number of payment periods in an annuity. Pmt is the payment made each period. Pv is the present value. Type can be 0 or 1 (0 - payments at the end of the period, 1 - at the beginning). If type is omitted, it is assumed to be 0. Example: Fv(0.01, 12, -500) equals 6341.25. IPmt(rate, per, nper, pv, fv, type) Returns the interest payment for an investment.
PPmt(rate, per, nper, pv, fv, type) Returns the payment on the principal for a given period of an investment. For more information see Pmt. Example: Ppmt(0.01, 1, 36, 1000) equals -23.21. Pv(rate, nper, pmt, fv, type) Returns the present value of an investment. For more information see Pmt. Example: Pv(0.01, 5*12, 1000, 0) equals -44955.04. Rate(nper, pmt, pv, fv, type, guess) Returns the interest rate per period of an annuity. For more information see Pmt. Guess is your guess for what the rate will be.
Hour(time) Returns the hour of a time. Example: Hour(2:45) equals 2. Minute(time) Returns the minutes of a time. Example: Minute(2:45) equals 45. Month(date) Returns the month of a date. Example: Month(1/1/03) equals 1. Now() Returns the current date and time. Second(time) Returns the seconds of a time. Example: Second(Time(1, 45, 20)) equals 20. Time(hour, min, sec) Returns a particular time. Time(1,45,0) equals 1:45. TimeValue(timeText) Converts a time in the form of text to a serial number.
False() Returns the logical value FALSE. If(condition, trueValue, falseValue) Returns trueValue if condition evaluates to TRUE or falseValue if condition evaluates to FALSE. Example: If(A1>A2, “OK”, “Cancel”). Not(logical) Reverses logical value. Example: Not(TRUE) equals FALSE. Or(logical1, logical2, ...) Returns TRUE if any argument is TRUE, otherwise return FALSE. Example: Or(FALSE, TRUE) equals TRUE. True() Returns the logical value TRUE.
Fixed(number, numDecPlaces, unDelimiter1000) Rounds a number to the specified number of decimals and returns the result as text with or without commas. Left(text, num_chars) Returns the leftmost characters from a text string. Example: Left(“Allegro”, 2) equals “Al”. Len(text) Returns the number of characters in a text string. Example: Len(“Allegro”) equals 7. Lower(text) Converts text to lowercase. Example: Lower(“Allegro FPC”) equals “allegro fpc”.
T(value) Returns the text referred to by value. Example: A1 contains “AAA” then T(A1) equals “AAA”. Trim(text) Removes all spaces from a text string except for single spaces between words. Upper(text) Converts text to uppercase. Example: Upper(“Allegro FPC”) equals ALLEGRO FPC. Value(text) Converts a text that represents a number to the number. Example: Value(“1000”) equals 1000.
IsErr(value) Returns TRUE if the value is any error value except !!NA. IsError(value) Returns TRUE if the value is any error value. IsLogical(value) Returns TRUE if the value is a logical value. IsNA(value) Returns TRUE if the value is error value !!NA. IsNonText(value) Returns TRUE if value is any value that is not text. IsNumber(value) Returns TRUE if the value is a number. IsRef(value) Returns TRUE if the value refers to a reference. IsText(value) Returns TRUE if the value is text.
Rows(range) Returns the number of rows in a reference or array. Example: Rows(A1:A5) equals 5. Type(value) Returns a number indicating the data type of a value (number = 1, text = 2, logical value = 4, error valu = 16). VLookup(lookupValue, data, column) Searches for a value in the leftmost column of a data table, and then returns a value in the same row from a column you specify. LookupValue is the value to be found in the first column of the data table. Data is the table of data.
Dstdev(database, field, criteria) Estimates the standard deviation based on a sample, using the numbers in the specified database column matching the conditions. Dstdevp(database, field, criteria) Calculates the standard deviation of a population based on the entire population, using the numbers in the specified database column matching the conditions. Dsum(database, field, criteria) Adds the numbers in the specified database column matching the conditions.
Edit: Edits or renames the selected task Delete: Permanently deletes the selected task Run on To start a task, select one of the following events: (no event): Selecting this option runs the task only from this dialog using the Run button. Menu Item: Selecting this option adds a new item to the menu task. In the following edit line, enter the label of the menu item you are using. Tap On Cell: Selecting this option executes a task by tapping on a cell or cell range.
9) Select Hello so it is highlighted. 10) Tap on the Run button and a dialog box pops up displaying Hello World. 11) Tap on the OK button to close the pop-up dialog box and return you to the PTab spreadsheet. Cell Task Dialog Box Use Cell Task option found at Task | Cell Task is used to define or modify automating tasks stored in a cell. Cell Text Text to display in a cell. Task Icon Choose an icon you want to display in a cell. You can run the task by tapping on this icon.
Variables You can use variables in tasks. Example: ok = YesNoBox(“Finish task?”) if ok then Return() end There are no global variables. Use a workbook to store global data. How to Set and Get Cell Values Use Set(reference, value) function to set cell value. Example: Set(A1,1000) If you need to create a cell reference using row and column numbers (column A has number 1), use function CellRef(col, row [, sheetIndex]). Parameter sheetIndex is optional.
Examples: if a1<>0 then Set(c1, b1/a1) end if a1=0 then Set(c1, “Sorry...”) else Set(c1, b1/a1) end While Statement while condition commands end Executes commands as long as a condition is True. Example: while a1>0 Set(CellRef(2, a1), a1*100) Set(a1, a1-1) end For Statement for counterVariable = startValue to endValue [step stepValue] commands end Repeats commands a specified number of times.
Calling a Procedure You can structure your code into more simple tasks and then you can call previously defined task from within a task using its name. Example: Set(a1,100) while a1>0 Hello Set(a1, a1-1) end Comments Set(a1,100) ‘Note: set cell A1 to value 100 Automating Tasks Functions Reference Parameters in [ ] are optional. ActiveCell() Returns the active (highlighted) cell.
CellRefR(dcol , drow, [, sheetIndex ]) Returns the cell reference relative to the current cell. Example: Sel(a1) Sel(CellRefR(1,0)) MsgBox(“the current cell is now B1”) Sel(CellRefR(0,5)) MsgBox(“the current cell is now B6”) CellTask(text, task [, icon]) Creates cell task in the current cell. Text is cell label visible in sheet, task is task source and icon is number of icon (see Cell Task dialog for more info). If icon=0 (or if this parameter is omitted) cell task is executed by tapping on cell.
Chart(“Type:XY”, “Title:Sin(x)”, “Xgrid”, “Ygrid”) Sel(b2:f5) Chart(“Series:Columns”, “AutoScale:No”) Clear() Clears contents in the current selection. Example: Clear() ClearFormat() Clears format in the current selection. Example: ClearFormat() ClearValidation() Clears validation settings in the current selection.
ComboBox(“list”) Creates combo box in the current cell. See also Tools | Data Validation menu item for more info. Use function ClearValidation() to clear combo boxes in the current selection. Use Run on “New value in” workbook task event to run a task every time value in a cell is changed. Example: Sel(A1) ComboBox(“BMW,Jaguar,Volvo”) Copy() Copies the current selection to the clipboard. Example: Sel(A1:A5) Copy() Sel(B1) Paste() DeleteCells(colsRows) Deletes cells (true - columns, false - rows).
FindDialog() Shows Find dialog box. Example: FindDialog() FormatPainter(cellRef) Formats the current selection using the format from the specified cell (cellRef). Example: FormatPainter(f2) FreezeTitles(onOff) Freeze/unfreeze titles. Example: Sel(a2) FreezeTitles(true) FullScreen(onOff) Returns the current screen mode and sets it if onOff is specified (true = full screen, false = normal). Example: FullScreen(true) GoalSeek(setCell, toValue, chngCell) Runs a goal seek.
InsertCells(colsRows) Inserts cells (true - columns, false - rows). Example: InsertCells(false) InsertSheet( worksheet) Inserts new worksheet. Example: InsertSheet(“Cars”) LastCol([rowNumber] ) Returns the last nonblank cell in the whole sheet (if rowNumber is not specified) or in the specified row. Example: last = LastCol() last = LastCol(15) LastRow([columnNumber]) Returns the last nonblank cell in the whole sheet (if columnNumber is not specified) or in the specified column.
Modified([onOff]) Returns true if the Modified flag is true (workbook was modified) and sets the Modified flag to onOff (true or false). Example: Modified(false) MsgBox(text) Shows the Message Box with the text. Example: MsgBox(“Hello”) Paste([contents, format, skipBlanks, onlyResults]) Pastes the clipboard to the current selection. Example: Sel(A1:A5) Copy() Sel(B1) Paste() All arguments are optional. Paste() function without arguments works as Edit|Paste menu command.
Return() Stops task execution. Example: if a1=0 MsgBox(“A1 must not be 0”) Return() end RowHeight([height]) Returns row height of the first row of current selection and sets height of selected rows if height is specified. Example: Sel(A2:A7) RowHeight(10) RowHide([hideUnhide]) Returns whether the first row of current selection is hidden and hides (true) or unhides (false) selected rows if hideUnhide is specified.
Set(reference, value) Sets cell specified by reference to the value. Example: Set(a1, 12.34) SheetName(sheetNum) Returns name of the specified sheet. Example: name = SheetName(1) SheetsCount() Returns a number of sheets in workbook. Example: MsgBox(“Sheets count is “&SheetsCount()) ShowPicture(pictureFile [,Time]) Shows a picture (file of types: *.jpg, *.gif, *.bmp, *.2bp, *.xbm). Use the second (optional) parameter to close a picture window after time seconds.
TopLeftCell(reference) Returns the top left cell on the screen and sets it if reference is specified. Example: TopLeftCell(A1) WorkbookName() Returns name of the opened workbook. Example: Save(WorkbookName()) YesNoBox(text) Shows the box giving the choice yes or no and returns true if user selects Yes. Example: if YesNoBox(“Stop”) then Return() end Zoom([magnification]) Returns current value of zoom magnification and sets it to magnification if specified.
Get current selection coordinates: c = Column(Sel()) r = Row(Sel()) numCols = Cols(Sel()) numRows = Rows(Sel()) ▲ PTab Keyboard Shortcuts Format Cells Ctrl+1 Fill Right Ctrl+R Select All Ctrl+A File Save Ctrl+S Copy Ctrl+C Paste Ctrl+V Fill Down Ctrl+D Close Ctrl+W Find Ctrl+F Cut Ctrl+X Goto Ctrl+G Redo Ctrl+Y Replace Ctrl+H Undo Ctrl+Z File New Ctrl+N Clear Contents Del File Open Ctrl+O Allegro CX Owner’s Manual 181
WordPad Microsoft WordPad allows you to create and edit documents similar to the way you do using Microsoft Word on the desktop PC. To open WordPad, double-tap the Microsoft WordPad icon on the desktop or go to Start | Programs and tap on WordPad. A new document is automatically opened. To open existing documents, choose File | Open and specify the files location. WordPad allows you to open WordPad documents (.pwd) and ASCII text files (.txt).
Windows Media 9 Series Player Windows Media 9 Series player comes installed on your Allegro CX. This program runs movie and audio files. These files can be located on the Internet or on the Allegro. Note: Running the Windows Media player increases the rate the battery is drained. Playing video files on the media player drains the battery faster than playing audio only files. To access the Windows Media 9 Series player, complete the following steps: 1) Turn on your Allegro.
▲ File The File option is used to locate audio or video files on your Allegro or the Internet.
The Open URL screen allows you to type in the location of a movie or audio file on the Internet or the Allegro that you want the media player to open, or use the Browse button to navigate through your Allegro to locate the files. The text box on the Open URL screen displays the location of the selected audio/video or the location of the last file that was played in the media player.
Close The Close option is only available when a file is open in the media player. When a file is being played or has ended, it is still loaded in the media player and will begin playing again when the Play button is tapped. Selecting the Close option closes that file so it is no longer able to be played by tapping on the Play button. The file must be reopened to be played.
Full Screen The Full Screen option is only available while a video file is loaded into the media player. Selecting this option fills the entire screen with the video file. Tapping on the screen will pause and play the file. To resize the file you are viewing to fit into the file player and so you have access to the media player options, press the Esc key on your Allegro.
Audio Frequency Stereo Protected Options Selecting the Options option opens to the Options screen. This screen allows you to set the following media player options: Windows Media Buffering (time): Allows you to set the buffering time for the media player from 1 – 5 seconds. Playback: Allows you to set the file to Play once or to Repeat forever (or until you close the file). You can also set the Zoom default. ▲ Playback The Playback option shows the player controls of the media player.
Internet Explorer and Inbox Allegro CX includes Microsoft Pocket Internet Explorer for accessing the World Wide Web and Microsoft Inbox for sending and receiving e-mail. ▲ Setting up an Internet Connection The procedure for accessing the Internet depends on your specific requirements and network environment. For example, you may wish to use a phone line to dial into an Internet Service Provider (ISP). In this case, you need a PC card modem and an established ISP account.
6) Select the modem you are using in the drop-down box. In most cases, you do not need to make changes under the Configure or TCP/IP Settings dialogs. Consult with your network administrator if you need to change these settings. 7) Tap the Next button and enter the dialing information. Tap the Finish button. 8) Double-tap the connection icon, enter your user name and password, and tap the Connect button. Once the connection is established, you have complete access to the Internet.
▲ Using Inbox Inbox allows you to send and receive e-mail as well as compose outgoing messages and view incoming messages. Set up a service first so that Inbox knows how you are accessing the Internet by following these steps: 1) Start Inbox from the desktop icon or from the Start menu. 2) Go to Services | Options on the main menu. On the Services tab, tap Add. Choose IMAP4 Mail or POP3 Mail and enter a service name. Tap the OK button. 3) The Mail Service Definition dialog is displayed.
Sending E-mail To send an e-mail, complete the following steps: 1) Tap Compose | New Message. 2) Enter the address, subject, and message. 3) Tap the Send button on the toolbar. Receiving E-mail To read your incoming e-mail, complete the following steps: 1) Tap on Inbox in the tree view at the left of the screen to display a list of your messages in the list view on the right. 2) Double-tap on a message in this list to open it, allowing you to view its content.
Calculator Program The six-function Calculator program functions like a desktop calculator. Open the Calculator by tapping on Start | Programs |Utilities | Calculator. Tap on the numbers and mathematical functions required to perform the desired calculation. The numbers appear in the horizontal box at the top of the screen as you type them in. The answer to the calculation also appears in this box. You can enter the numbers from the keyboard if you wish.
Terminal Program The Terminal® Emulation program is used to connect the Allegro to an on-line service. ▲ Creating a New Session 1) Double-tap on the Make New Session icon shown above. A screen called Session Properties is shown. 2) Enter a name in the Session Name box. 3) Select the name of your modem from the pull-down list. 4) Enter the telephone number for the remote computer.
5) Select OK to connect. 6) An icon for the new session appears in the Terminal folder. 7) To disconnect, select File | Close. ▲ Adjusting the Properties To adjust the properties, follow these steps: 1) Select the icon for the session you want to adjust. 2) Tap on File | Properties to bring up the Session Properties screen.
3) Make any necessary adjustments on the Communications tab. Call options and port settings are adjusted by pressing the Configure... button. 4) Press the Dialing Properties button to make dialing property adjustments. Press OK when you are finished.
5) Select the Emulation tab to modify the emulation settings. Press OK when you are finished. ▲ Help Use the on-line Help [?] for more details about the Terminal program.
Bluetooth Bluetooth is a technology that wirelessly connects electronic devices to each other or to the Internet within short distances using very low power. Laptop computers, handheld computers, cell phones, and GPS receivers equipped with Bluetooth technology can communicate within a range of approximately 30 feet. If you order an Allegro with the integrated Bluetooth option, it is factory installed on your Allegro CX prior to shipment.
Get Connected! The Get Connected! option enables you to connect your Allegro to another Bluetooth device through the phone port. To connect to a Bluetooth device, complete the following steps: 1) Tap on the Get Connected! option. 2) Follow the instructions presented in the Get Connected! Wizard. 3) Highlight the Bluetooth device you want to connect to in the Device Name box on the Available Bluetooth Devices screen by single tapping on it.
Refresh: Enables the Bluetooth Device Search to locate and display all available Bluetooth devices that can connect to your Allegro. Cancel: Closes the Available Bluetooth Devices screen and returns you to the Get Connected! Wizard displaying that the Bluetooth connection is Unsuccessful! After tapping on the Select button, the Passkey Required screen appears requesting the Bluetooth passkey: for the Bluetooth device. The passkey is like a PIN number that only the two Bluetooth devices know.
5) Enter the passkey, located on your Bluetooth device, and tap on the Reply button. 6) Tap on the Finish button. ▲ Advanced Features Bluetooth offers the following Advanced Features: My Bluetooth Device Bluetooth Devices My Bluetooth Device The My Bluetooth Device option accesses additional settings for your Bluetooth connection. To access the My Bluetooth Device option, tap on the Bluetooth icon in the system tray, then tap on Advanced Features | My Bluetooth Device.
General The General tab displays the following My Bluetooth Device Manager settings: Friendly Name: The name that is made available to other devices, such as My CX. Bluetooth Address: The unique 48-bit electronic address of your Allegro CX. Discoverable: Makes your Allegro CX visible to other Bluetooth devices. Connectable: Toggles whether or not your Allegro is able to accept incoming connections. Use Authentication: Requires a passkey from the remote device trying to bond (pair) with the Allegro.
COM Ports The COM Ports tab displays the available Bluetooth COM ports. On the COM Ports tab you can enable, disable, and check the assignments of the Bluetooth COM ports of your Allegro. Note: Make sure that you set COM port assignments for the various connection types that are available on the Allegro. If you disable the infrared ports, you have more ports available to use for Bluetooth devices. The infrared uses COM ports 4 and 5.
Bluetooth Devices The Bluetooth Device Manager manages all Bluetooth devices that are within range of the Allegro after performing a device discovery. The Device Manager also controls the device pairing or bonding, so that a program on the Allegro using a communication (COM) port automatically knows what Bluetooth device is connected to that specific COM port. The Bluetooth Device screen accesses multiple Bluetooth options.
Note: The Bond, Properties, and Delete options are only accessible when a Bluetooth device is highlighted. To highlight a Bluetooth device, single tap on the device icon on the Bluetooth Devices screen. Bond The Bond option activates a Wizard that helps you bond Bluetooth devices. Bonding is the process of setting up a permanent recognition between two Bluetooth devices that lets you automatically create secure connections between your Allegro and the remote device.
Note: To set up a bond between the Allegro and another Bluetooth device, the device must appear in the Bluetooth device manager screen. If it does not, a device discovery must be performed to locate the device you want to bond to. The Bonding Wizard requires a Bluetooth passkey to establish verification and security features embedded within the Bluetooth protocol. Some devices allow you to choose your own passkey.
General The General tab displays the following screen and properties: Icon Selection -> Device name: The friendly name of the remote device. Icon selection buttons: Allows you to select the icon displayed for the remote device. Major: Lists the major class of the remote device, such as phone device. Minor: Lists the minor class of the remote device, such as modem. Service class: Lists the service class of the remote device, such as telephony.
Tap on the up or down arrow, located next to the Services box to view the active services available on the remote device. Tap on the Update button to enable a search for any new Bluetooth services that have been activated on the remote device. When the search ends, your Allegro returns to the services screen and displays all available Bluetooth services in the Services box. Tapping on OK saves any changes made. Tapping on the X closes the Properties screen and returns to the Bluetooth Devices screen.
3) Tap on Yes to proceed with the deletion process, or tap on No to cancel. My Bluetooth Device… Selecting the My Bluetooth Device… option opens the My Bluetooth Device Manager as discussed previously in this chapter. View The View option offers you two ways that icons are presented in the Bluetooth Devices screen. To change the way a device is viewed in the Device Manager, complete the following steps: 1) Tap on View. 2) Tap on Large Icons or Details. Large Icons: Shows the icons in a large format.
Details: Displays the Device Name, Device Class and if the device is Bonded or not. Tools The Tools option offers the following options: Device Discovery My Favorites… Device Discovery Before any device can be used, the Allegro must search for and identify all Bluetooth devices. This process is called Device Discovery.
To add Bluetooth devices through the Device Discovery program, complete the following steps: 1) Tap on Tools | Device Discovery or tap on the eyes icon in the tool bar of the Bluetooth Devices screen to access the Device Discovery Wizard. 2) Tap on the Next Button, the following screen appears: This screen enables you to limit the type of Bluetooth devices that the discovery process searches for. You can also specify the length of time the Allegro searches for devices.
Tap on the up or down arrows next to the second(s) box to set the Search duration. This duration is the length of time the Allegro searches for Bluetooth devices. 3) Tap on the Next button to begin the Device Discovery search function. Once the Allegro is finished searching, it displays all of the located devices. 4) Select each Bluetooth connectable device you want to save to your Allegro by tapping in the checkbox to the left of each device and tap on the Next button.
The Allegro queries each of the selected devices to determine the services that are available on each device. When the process is complete, the following screen appears. Note: If no Bluetooth devices are available, the Bluetooth Device Discovery screen does not appear and you automatically advance to the Finish screen of the Device Discovery Wizard with a note that no devices were located. 5) Tap on the Finish button to complete and close the Device Discovery Wizard application.
Phone The Phone tab enables you to select the phone port device that is automatically connected to when the Bluetooth communication program uses a Bluetooth phone port device. Tap on the down arrow next to the My favorite phone: box to access a drop-down box of all available phone port options. Tap on the phone port device you are using as your favorite. Select one of the following two options that work best for your Bluetooth phone port needs: Use the favorite selected above.
Printer The Printer tab enables you to select the printer that is automatically used when print software sends output to the Bluetooth printer port. Tap on the down arrow next to the My favorite printer: box to access a drop-down box of all available printers. Tap on the printer you are using as your favorite. Select one of the following two options that work best for your printer needs: Use the favorite selected above. This option automatically uses the My favorite printer: that you selected.
COM Port The COM Port tab enables you to select the COM port device that is automatically used when the a program opens the Bluetooth COM port. Tap on the down arrow next to the My favorite COM port device: box to access a drop-down box of all available COM port options. Tap on the COM port device you are using as your favorite. Select one of the following two options that work best for your Bluetooth COM port device needs: Use the favorite selected above.
To establish an ActiveSync connection through Bluetooth, you must first refer to the setup instructions for the Bluetooth adapter for your desktop PC that is required for a Bluetooth connection between your Allegro and desktop PC. Once the Bluetooth adapter is enabled, complete the following steps: 1) Tap on the Bluetooth icon in the system tray to access the Bluetooth option screen. 2) Tap on Bluetooth ActiveSync option.
For more information of transferring files using Bluetooth, go to the Bluetooth File Transfer section found later in this chapter. ▲ About… The About option opens the About Device Manager screen that displays the version, Copyright, and Internet information of the Bluetooth card installed in your Allegro. ▲ Bluetooth File Transfer There are two procedures for transferring files between Bluetooth devices.
OBEX for Allegro CX If you are using the Allegro CX, download the OBEX add-on program from Socket Communication’s Web site at: ftp://ftp.socketcom.com/bluetooth/BTCEobexENG120H.exe. OBEX for Allegro CE using Windows CE .NET 4.1 If you are using an Allegro CE with Windows CE .NET 4.1, the OBEX add-on program is included with the custom Bluetooth drivers. These drivers are available for download from Juniper System’s Web site at: http://www.junipersys.com/files/AllegroBluetoothCE41.exe.
▲ Transferring Files using Browse Remote Device The Browse Remote Device utility is the first transfer method discussed. This utility uses Local and Remote to define each Allegro. To transfer files between two Allegros using the Browse Remote Device utility, please complete the following steps: 1) Tap once on the Bluetooth icon in the system tray of the Allegro (Local Allegro) that you would like to browse (explore). A popup menu appears. 2) Tap on Transfer via Bluetooth | Enable File Sharing.
In the example above the SC Info folder is highlighted and the lightning bolt button with the arrow pointing to the left is selectable. Tapping on that lightning bolt button transfers the SC Info folder and its contents to the Bluetooth Shared Folder on the Allegro (Local Device). ▲ Transferring Files using Sending and Receiving a File The second method for transferring files between two Bluetooth devices, such as two Allegros, is to use the Send a File and Receive a Contact or File utilities.
Allegro CX Owner’s Manual
Chapter 6 Technical Reference Specifications Communication Cable Schematic Allegro CX Owner’s Manual 223
Allegro CX Owner’s Manual
Specifications ▲ Processor Intel® XScale® processor, 400 MHz ▲ Operating System Microsoft® Windows CE® .NET V4.2, loaded into RAM for the highest execution speed possible ▲ Utility Programs Included on Allegro CX PTab™ Spreadsheet, Calculator, Microsoft Windows Explorer® File Manager, Microsoft InBox® E-mail, Microsoft Pocket Internet Explorer®, Microsoft WordPad®. ▲ Physical Specifications Size: 10” high x 5.25” wide at display x 3.1” wide at narrowest point x 1.
Transceiver: Class 2 Bluetooth Range: 30 foot (10 meter) radius Integrated: Built into the Allegro; does not occupy the PC Card slot ▲ Internal Expansion Ports COM 3: Internal expansion bus connections, full modem control signals, signal levels 0 to 3.
Automatic contrast adjustment with temperature compensation Display heater for operation in cold environments; can be set to turn on automatically when temperature is less than -3° C Active viewing area: 3.3” wide x 2.5” high (4.
▲ Case Design Ergonomic with balanced weight distribution Rugged, 100% sealed against water and dust Designed for one-handed operation (right or left) Rings at all four corners of the case for straps Adjustable hand strap and shoulder strap Multiple strap orientations possible ▲ Memory/Storage 128 M SDRAM Internal Solid State Storage 256 M, 512 M, or 1 G ▲ PC Card Slot User-accessible 16 bit PC Card, user removable (32 bit Card Bus type cards not supported) Accepts Type I or II 3V
Sounds can be customized and associated with events Volume is adjustable Audio/Video playing capabilities with Windows Media 9 Series player ▲ Clock Internal real time clock with lithium backup battery, restores correct time and date after a system reset or restore +/- three minutes per month accuracy ▲ Certifications FCC Class A European CE Mark Class B ▲ Expandability Expansion Pods: Allow you to integrate additional components with the Allegro CX; Pods replace the PC card door and re
Communication Cable Schematic A wiring diagram for the serial communication cable is shown below.
Chapter 7 Software Developer’s Guide CE .
Allegro CX Owner’s Manual
CE .NET Software Development Tools This section discusses the available software development tools for Allegro CX’s that are running CE .NET. Windows CE .NET gives developers the option to use the following software development tools: Visual Studio .NET 2003 Visual Basic .NET (VB .NET) 2003 C# (C sharp) Microsoft eMbedded Visual C++ 4.0 ▲ Visual Studio .NET 2003 Visual Studio .NET is a purchased software development program available through Microsoft, Inc. It comes with both Visual Basic .
You have the option of upgrading your 2002 Visual Studio .NET to 2003 or purchasing the 2003 Visual Studio .NET. ▲ Microsoft eMbedded Visual C++ 4.0 Microsoft eMbedded Visual C++ 4.0 is a developer program available from Microsoft. The following are some of the options available through eMbedded Visual C++: C++ Exception Handling Run Time Type Information (RTTI).
Software Development Programming Tips To help programmers developing software for the Allegro CX, we have included the following programming tips. We recommend that you refer to Windows CE .NET programming reference books to assist you in your software development. ▲ Allegro CX Identification When installing your applications, you need to determine if certain peripherals are available.
If you create an installation package (cab file), you need to consider the build number. In general, you should use as wide a range as practical when specifying installation constraints, or consider imposing no limitations at all. Internal Storage Device Name Allegro CX’s internal (non-removable) non-volatile storage is named C_Drive. PC Card Storage Device Name In the English version of the Allegro CX operation system, the PC Card Storage area is named Storage Card.
Options for Program and File Storage For program and data storage, the Allegro CX has the following options: RAM Internal storage device PC Card storage The internal storage is referred to as C_Drive. The PC card is referred to as Storage Card. The data and programs stored on these two devices are secure without battery backup. When designing a program for the Allegro CX, give the user a choice of where to store the application, and where to store the application program’s old data.
Power Management Windows CE .NET was designed for efficient battery operation. Windows CE .NET puts the processor to sleep when there are no active threads using the processor. When writing applications, be careful not to use any functions that keep the threads active when not in use.
Windows CE .NET References ▲ Windows CE .NET Reference Books The following books about program development for Microsoft CE .NET are available: Mastering Visual Studio .Net, Ian Griffiths, Jon Flanders, and Chris Sells, O’Reilly & Associates, Incorporated, 2003 Microsoft® Visual C# .NET Step by Step, Version 2003, John Sharp and Jon Jagger, Microsoft Press, 2003 Microsoft® Visual Basic .NET Step by Step Version 2003, Michael Halvorson, Microsoft Press, 2003 Programming Microsoft Windows CE .
Allegro CX Owner’s Manual
Chapter 8 FCC Information, Warranty, and Software License Agreement FCC Information Warranty and Repair Information Software License Agreement Allegro CX Owner’s Manual 241
Allegro CX Owner’s Manual
FCC Information The Allegro CX is a Class A device. The FCC defines a Class A device as a device that may be operated in business or industrial environments only. ▲ FCC Class A Statement Class A equipment has been tested and found to comply with the limits for a Class A digital device, pursuant to part 15 of the FCC Rules. These limits are designed to provide reasonable protection against harmful interference when the equipment is operated in a commercial environment.
Warranty and Repair Information ▲ Limited Product Warranties Juniper Systems, Inc. (“Juniper”) warrants that this Allegro CX Field PC shall be free from defects in materials and workmanship, under normal intended use, for a period of 12 months from the date of shipment, excepting that this warranty shall not apply to battery packs, media containing Allegro CX and desktop PC programs and the Owner’s Manual, and any accessories.
stored on, or integrated with any products returned to Juniper for repair, whether under warranty or not. ▲ Remedy In the event a defect in materials or workmanship is discovered and reported to Juniper within the specified warranty period, Juniper will, at its option, repair the defect or replace the defective product. Replacement products may be new or reconditioned.
Please have this information ready when you contact us: Allegro CX serial number Your name Name and shipping address of company/university/agency Phone and fax number Clear description of the problem encountered Purchase order number and billing address (for equipment that is not under standard or extended warranty) The customer has the responsibility to ship the equipment to Juniper Systems, Inc. with all shipping costs prepaid. After repairing or replacing the equipment, Juniper Systems, Inc.
Software License Agreements ▲ Manufacturer Agreement This Software License Agreement is between the end-user and the manufacture (Juniper Systems, Inc.) Please read the following terms and conditions before using the Allegro CX Field PC and the software created by Juniper Systems, Inc. for use with the Allegro. This agreement supersedes any prior agreement, written or oral.
Acceptance or Disagreement Use of the software in any manner indicates your acceptance and acknowledgment of the terms and conditions of this agreement. If you do not agree with any of the terms and conditions, do not use the software. Return the disk and documentation to the manufacture. If the software was installed on the Field PCs at the factory, you must delete it.
Note on Java Support. The SOFTWARE may contain support for programs written in Java.
NOTICE REGARDING THE MPEG-4 VISUAL STANDARD. The software installed on this device may include MPEG-4 visual decoding technology. MPEG LA, L.L.C.
Chapter 9 Expansion Pods Expansion Pods GPS Expansion Pod Bar Code Expansion Pod 802.11b Expansion Pod Bar Code/ 802.
Allegro CX Owner’s Manual
Expansion Pods (Optional Accessory) An Allegro CX Expansion Pod adds capability to the field computer while maintaining the waterproof and dustproof integrity of the rugged unit. Expansion pod capabilities include: 1) Automatically logging the identification of an inventoried asset using the integrated bar code scanner. 2) Wirelessly sending or receiving information from the action point to your local area network via the Allegro with the Wi-Fi 802.11b receiver.
GPS Expansion Pod The GPS expansion pod integrates the Trimble Lassen LP GPS receiver with the Allegro. A compact 3.3 V active micropatch antenna is mounted to the top of the Allegro. The Lassen LP module is a high-performance, low power, micro GPS receiver that supports both TSIP and NMEA protocols with autonomous accuracy of 5 –10 meters, or 2 – 5 meters after differential correction.
3) Insert the stylus that is attached to the antenna mount in place of the stylus you removed. As you place the stylus in its slot on the Allegro, slide the metal cover up into the stylus slot so that the stylus fits into place. 4) Use two fingers, one on each prong of the stylus, and press it securely into place. 5) Make sure the rubber stylus holders are not pressed inward or they may pop the antenna out of the stylus holder. Removing the rubber covers to the COM ports can help make this step easier.
Specifying GPS Receiver Port Settings To set up the parameters on the GPS Receiver Port Settings, complete the following steps: 1) Go to Start | Programs | Utilities | GPS Pod Setup, and the GPS Receiver Port Settings screen pops up. At the bottom of the screen, there are three function buttons: Get Settings Apply Settings Reset Receiver Get Settings The Get Settings button is used to see the receiver’s current settings without changing the settings.
3) Record the settings for the following: COM Port: COM3 – not changeable Protocol: Baud: Parity: Data Bit: (Note: Data Bit is always set at 8 and is not shown in the set up) Stop Bit: The following are the default GPS pod settings: COM Port: COM3 – not changeable Protocol: TSIP Baud: 9600 Data Bit: 8 – not changeable Parity: None Stop Bit: 1 4) Access the setup or configuration menu in the GPS program.
▲ GPS Data Formats In the GPS Pod Setup program, you can set up the receiver in either the TSIP or NMEA GPS data format. TSIP Format The TSIP is the default setting for the GPS pod. The settings are COM Port: COM3, Protocol: TSIP, Baud: 9600, Parity: None, Data Bit: 8, Stop Bit: 1. NMEA Format The NMEA format does not have any default settings and must be selected manually. When NMEA is selected, you have the ability to enable or disable certain NMEA packet types.
Reviewing and Editing the Receiver Parameters Once you determine which data format you are going to use, follow these steps to review and edit the parameters as needed: 1) Click on the Get Settings button to reset the parameters to their default setting. 2) Change the parameters, if necessary, by clicking on the down arrow on the right of the Baud, Parity, Stop Bits, and/or GPS Data Format box to bring up a list of setting options, and click on the setting you want. 3) Click on the Apply Settings button.
▲ For More Information Your GPS is now configured correctly to use the GPS pod. If you have any questions or still cannot connect, please contact your reseller or our customer service department at (435) 753-1881, or by email at techsupport@junipersys.com. ▲ GPS Antenna Removal The GPS antenna can be removed and reattached depending on your needs. To remove the GPS antenna from your Allegro, complete the following steps: 1) Unscrew the antenna cable from the Allegro expansion pod.
Bar Code Expansion Pod Using the bar code expansion pod with an Allegro offers the convenience of scanning bar codes and receiving the scanned data, all in a single handheld unit. With the Bar Code Expansion Pod there are no extra cables that could get in the way. The bar code pod is factory installed to the Allegro and includes the COM port connection, the power supply, and the software. The software is used to set up the scanner and to transfer the scanned data to a data collection program.
The Bar Code Reader has the following four options available: Help Begin Scan Bar Code Setup Exit The Help option on the Bar Code Reader title bar opens a drop down menu with an About option. Tapping on the About option accesses a pop up screen showing the Bar Code Reader version number and copyright. The Begin Scan button enables the expansion pod to begin scanning bar codes. It takes scanned data and enters it into an opened data collection program on your Allegro.
An Initializing Bar Code Scanner message box pops up, as the Bar Code Reader program loads and the Bar Code Reader program opens. 3) Tap on the Bar Code Setup button. ▲ Bar Code Setup Before you begin scanning, use the Bar Code Setup program to configure the bar code scanner according to your needs. The Bar Code Setup options are described throughout this section.
These sections describe the functions in the Bar Code Setup program informing you of the options that best suit your bar code scanning needs. 2) Select the options you want to use for scanning bar codes. 3) Tap on the Exit Setup button to save your bar code settings and return you to the Bar Code Reader screen. 4) Go to the Begin Scan section of this chapter and follow the directions there to begin scanning bar codes.
Only one Allegro key is used to both target and scan a bar code. Pressing on the scan key initiates the target beam first. The target beam stays on for a set time ranging from 0.0 to 9.9 seconds. You have the ability to set the target time, see later in this section. As soon as the target beam turns off, the scan beam turns on. The scan beam remains on until a valid scan is completed or until the maximum scan time is reached.
No Read Message The bar code scanner program provides visual feedback when a scan is unsuccessful. To activate this visual feedback, tap in the No Read in the Visual On: section so a checkmark appears. A Scan Failed! pop-up message displays on the screen approximately 1.5 seconds after each unsuccessful scan. Scanner Setup The Scanner tab is used to configure the operation of the scan engine.
Scan Time The Scan Time option allows you to set up the amount of time the scan beam remains on to perform a bar code scan. The Scan Time window shows the time, in seconds, that the scan beam is on. The scroll buttons allow the user to set the amount of time the scan beam is on. The Scan Time can vary from 0.0 to 9.9 seconds, in 0.1 seconds increments. A scan terminates as soon as it successfully reads a bar code or when the scan time has reached the maximum scan time specified in Scan Time window.
Data Format Setup The Data Format tab allows the user to specify the format of the data that is returned by the scanner. Format The Format drop-down box allows you to select if a prefix and/or suffix character are added to the bar code data. The prefix character is added before the bar code data. The Suffix 1 character is appended to the end bar code data and the Suffix 2 character is appended after the Suffix 1 character. If Suffix 1 is not selected, Suffix 2 is appended to the end of the bar code.
Code ID The scanner is capable of returning a Code ID character(s) for the bar code that is scanned. If a Code ID is selected, the Code ID character(s) is placed before the bar code data and the prefix character (if enabled). There are two types of Bar Code ID’s: Symbol and AIM. The Symbol Code ID is a single character code. The AIM Code ID contains three characters, a bracket (“]”) is followed by a code character and a modifier character.
# Adds a # sign before or after the scanned bar code (depending on suffix or prefix). Tab Performs a Tab key function, which moves the cursor over to the next column. Code Type Setup The Code Type tab lists the bar code types that the scanner can read. You can enable (box checked) and disable (box not checked) each of these bar code types. The Setup button at the bottom right corner of the screen is used to set up more detailed parameters for the bar code types in the Setup section below.
To access one of these options, select the tab with the bar code type you want to enhance. The tabs are located along the top of the setup window. The additional tabs can be accessed using the scroll buttons on the upper right of the screen. For more information about each of the accessible bar code types, go to the following Web site and read the Symbologies (Bar Code Fonts) section: http://www.systemid.com/education/autoid_symbologies.
Code39 MSIPlessey 272 Allegro CX Owner’s Manual
Interleaved RSS/Code93/Discrete Allegro CX Owner’s Manual 273
Codabar Defaults Setup The Defaults tab is used to load either user-defined configuration parameters or factory-default parameters. The users can save and reload four different user configuration files. The defaults are the settings that come installed on your Allegro when it is shipped. Exit Setup The Exit Setup button is available on every Bar Code Setup tab, allowing you to close the Bar Code Setup program at any time.
Tap on Begin Scan to start the bar code scanning program. Tapping on the Exit or X button, in the top right corner, exits out of the Bar Code Setup program. ▲ Begin Scanning The bar code scanning program allows bar code data to be directly entered into an application program. The bar code data is entered into the data collection program as electronic data, as if it were typed on the keyboard.
Sample Bar Codes The following bar codes are samples for you to test your bar code scanner before taking it into the field. Under each bar code is the datum that should appear on your Allegro after a successful scan.
▲ Bar Code Installation Program The Bar Code Setup program is installed on your Allegro before it is shipped. In the event that the Bar Code Setup program gets removed from your Allegro and needs to be reinstalled, complete the following steps: 1) Open your CD-ROM drive on your PC. 2) Insert the Allegro CX Distribution CD, which is shipped with your Allegro, into your CD-ROM drive, close the CD-ROM drive, and wait for the installation screen to load.
802.11b Expansion Pod An Allegro using the 802.11b expansion pod offers the flexibility and benefits of being connected to a Wireless Local Area Network (WLAN). The 802.11b (also referred to Wi-Fi) is a variant to the 802.11 series that applies to WLAN. A WLAN is a data communication system used to replace or extend a wired LAN system.
following Cisco items: Cisco Aironet 350 802.11b PC card (installed in your Allegro) Rubber duck antenna with a 90-degree pivoting joint Read Me First – EAP Authentication Requires Matching 802.1x Protocol Drafts Release Notes for Cisco Aironet Wireless LAN Adapters Cisco Aironet Wireless LAN Client Adapter Quick Start Guide Cisco Aironet Wireless LAN Client Adapter CD-ROM ▲ Getting Started To start using 802.11b on your Allegro, do the following: 1) Attach the rubber duck antenna.
Accessing the Cisco 802.11b Manual All of the setup and installation instructions for the Windows CE operating system are addressed in the Cisco Aironet Wireless LAN Client Adapters Installation and Configuration Guide for Windows CE. This guide is located on the Cisco Aironet Wireless LAN Client Adapters Drivers and Utilities CD-ROM.
Setting up an Aironet Access Point An access point is similar to a base station. It is used as a link from the wireless LAN to the wired network and the Internet. To connect your Allegro to the network via wireless LAN, an access point needs to be installed and configured. For best connectivity and range between your Allegro and the access point, we recommend Cisco access points. However, you can use other established access points compatible with 802.11b.
Notice that the screens are formatted for a screen that is wider than your Allegro’s screen. To view all options on a screen, drag the Aironet Client Utility to the left or right, as needed. To perform this drag function, place the stylus on the Allegro screen in the Aironet Client Utility title bar. While holding the stylus down, slide it left or right to move the program on the screen.
▲ Connecting to WLAN Connecting to WLAN is a very involved process with a number of factors to consider. Because there are so many different access point types, profile set ups, and security setting considerations, seek the assistance of your IT department or WLAN technician.
Warning 1 Do not operate your wireless network device near unshielded blasting caps or in an explosive environment unless the device has been modified to be especially qualified for such use. Warning 2 In order to comply with RF exposure limits established in the ANSI C95.
▲ Cisco 802.11b Drivers The drivers for the Cisco 802.11b card are installed to your Allegro before it is shipped. In the event that the drivers get removed from your Allegro and need to be reinstalled, please contact your reseller or the technical support department for the Allegro at (435) 753-1881, or by email at techsupport@junipersys.com.
Bar Code/802.11b Expansion Pod The Bar Code/802.11b Expansion Pod integrates the wireless networking technology and the laser bar code scanning technology with the Allegro CX.
Bar codes can be scanned in a variety of weather conditions and that data are stored on your Allegro. Using the Bar Code/802.11b expansion pod, the efficiency of the bar code data collection is increased. Now you can scan the bar codes on the logs while outside, and in real time that data is transferred by radio waves directly to the computer in the mill’s office and stored there. Index The Bar Code/802.
Allegro CX Owner’s Manual
Index ▲ Symbols 802.11b Expansion Pod 278 802.11b Installation Program 284 Accessing the Cisco 802.11b Manual 280 Antenna Attachment 279 Cisco 802.11b Drivers 285 Cisco Systems Documentation 279 Connecting to WLAN 283 Getting Started 279 Safety Information 283 Setting Up 802.
AC Power Adapter 38 Alkaline Battery Holder 42 Important Alkaline Battery Information 43 Allegro CX Overview 10 Features 10 Optional Accessories 11 Standard Accessories 11 Application Command Bars 97 Gaining More Viewing Area on the Screen 97 Hiding the Taskbar 98 Moving the Menu Bar and Toolbar 97 ATA Flash Cards 59 ▲ B Backlight 23 Bar Code/802.
Batteries (continued) Spare NiMH Battery Packs 45 Storing the Allegro CX During Inactive Periods 43 Useful Life of a NiMH Battery Pack 45 Vehicle Power Using Vehicle Power 40 Vehicle Power Adapter 39 When the Battery Voltage Drops 35 Battery Capacity 33 Battery Gauging 35 Battery Life 34 Battery Status Icons 35 Bluetooth 198 About… 218 Advanced Features 201 Bluetooth Devices 204 Bluetooth Options 198 Bonding Bluetooth Devices 219 Device 204 File Transfer 218 Get Connected! 199 Installing the OBEX Add-On Pro
CE .NET Software Development Tools 233 Allegro CE .NET SDK Installation 234 Allegro Software Development Kits of eMbedded Visual C++ 234 Microsoft eMbedded Visual C++ 4.0 234 Visual Studio .NET 2003 233 Visual Studio .
Control Panel (continued) Owner 80 Identification 80 Network ID 81 Notes 80 PC Connection 81 Power 82 Battery 83 Schemes 83 Regional Settings 84 Currency 85 Date 86 Numbers 85 Regional Settings 84 Time 86 Remove Programs 87 SpeedSwitch 87 Stylus 88 Calibration 88 Double-Tap 87 System 89 Copyrights 91 Device Name 90 General 89 Memory 90 Version 91 Volume and Sounds 92 Sounds 92 Volume 92 ▲ D Desktop 67 Application Buttons 68 Desktop Icon 69 Desktop Taskbar 67 Special Functions 69 Start Menu 68, 69 System Tr
Display (continued) Display Features 22 Touchscreen 23 Touchscreen Disable/Enable Key 24 Display Features Backlight 23 Contrast 22 Heater 22 Position 23 Touchscreen 23 Video Quality 22 Downloading ActiveSync from the Allegro CX Distribution CD 102 Downloading ActiveSync from the Internet 102 ▲ E Enter New Battery Charge Level 32 Expandability Specifications 229 Expansion Pods 53, 253 802.11b Pod 253, 278 Bar Code/802.
▲ H Hand Strap 16 Hiding the Taskbar 98 ▲ I Infrared Communication Port 48 Internal Bluetooth Transceiver Specifications 225 Internal Memory 57 Random Access Memory (RAM) 57 Read Only Memory (ROM) 57 Internal Non-Volatile Data Storage 58 Internet Explorer and Inbox 189 Setting up an Internet Connection 189 Using Inbox 191 ▲ K Keyboard 17 Cleaning 21 Keyboard Features 17 Shifted Options 19 Keyboard Options 19 Special Keys and Key Sequences 18 Specifications 227 Keyboard Options 19 Backlight On/Off 20 Co
▲ N New Battery Detected Screen 31 New Battery Detected Options 32 Accept Button 33 Battery Capacity 33 Enter New Battery Charge Level 32 Help Button 33 Understanding the New Battery Detected Screen 32 NiMH Battery Pack Life 45 ▲ O On-line Help 70 Operating System Specifications 225 Optional Accessory Expansion Pods 253 USB/Power Dock 39 Options for Program and File Storage 237 ▲ P PC Cards 51, 58 ATA Flash Cards 59 Changing Cards 52 Compact Flash Adapter Cards 59 Displaying Information about the PC Ca
Program and Data Storage Options 58 Internal Non-Volatile Data Storage 58 PC Cards 58 Storage Labels 58 PTab Spreadsheet Program 130 Adjusting the Viewing Area on the Display 134 Automating Tasks 166 Calling a Procedure 171 Cell Task Dialog Box 168 Comments 171 For Statement 170 How to Set and Get Cell Values 169 If Command 169 Variables 169 While Statement 170 Workbook Task Dialog Box 166 Automating Tasks Functions Reference 171 Automating Task Examples 180 Converting Microsoft Excel Files (.
▲ Q Quick Start Guide 12 ▲ R RAM 57 RAM File System 96 Recharging the NiMH Battery Pack 37 Recycling the NiMH Batteries 45 Repair Information 244 Repairs 245 Reset System 127 Restore System 127 Right Mouse Click 21 ROM 57 ▲ S Save System 126 Set Factory Defaults 128 Shoulder Strap 16 Software Development Programming Tips 235 Allegro CX Identification 235 Allegro Specific APIs 236 Internal Storage Device Name 236 PC Card Storage Device Name 236 Platform Name 235 Selecting the Platform 236 Windows CE Ver
Specifications 225 Case Design 228 Certifications 229 Clock 229 Color Display 226 Communication Ports 225 Expandability 229 Internal Bluetooth Transceiver 225 Internal Expansion Ports 226 Keyboard 227 Memory/Storage 228 Monochrome Display 226 Operating System 225 PC Card Slot 228 Physical Specifications 225 Power 228 Processor 225 Sound 228 System Tray Indicators 227 Utility Programs Included on Allegro CX 225 SpeedSwitch 87 SRAM Cards 59 Replacing SRAM Card Batteries 60 SRAM Card Battery 60 Start Menu 68, 69
Help 197 Touchscreen 23 Touchscreen Disable/Enable Key 24 Touchscreen Disable/Enable 20 Touchscreen Operation 65 Transferring Files between the Allegro CX and the Desktop PC 123 Transferring Files using Browse Remote Device Bluetooth 220 Transferring Files using Sending and Receiving a File Bluetooth 221 ▲ U USB/Power Dock 39, 49 Charging 49 LED Color 49 Power Supply 49 USB/Power Dock Connector Pins 50 USB Communication 49 USB Connection 50 USB Communication 49 USB Communication Port 48 Utility Programs I
Windows CE Overview 63 Display Touchscreen 64 Calibration 65 Touchscreen Operation 65 Wiping Off the Touchscreen 65 Starting Windows CE .NET 63 Suspend/Resume Mode 64 Windows CE Programs 66 Desktop PC Programs 66 Software Suite 66 Windows Explorer 93 Help 94 Moving and Copying Files 93 Using the Edit Menu Options 93 Opening Two Explorer Screens 94 Windows Media 9 Series Player 183 File 184 Playback 188 View 186 Web 188 Wiping Off the Touchscreen 65 WLAN 802.
Allegro CX Owner’s Manual
Allegro CX Owner’s Manual 303
Allegro CX Owner’s Manual