
User Manual


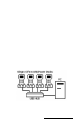

Table Of Contents
- Allegro CE™ Owner's Manual
- Table of Contents
- Chapter 1 Introduction
- Chapter 2 Hardware Components
- Chapter 3 Memory Configuration and Data Storage Options
- Chapter 4 Windows CE Operating System
- Chapter 5 Technical Reference
- Chapter 6 Software Developer’s Guide for Allegro CE 3.0 and CE .NET
- Chapter 7 FCC Information, Warranty, and Software License Agreement
- Chapter 8 Expansion Pods
- Index
- Table of Contents
- Chapter 1 Introduction
- Chapter 2 Hardware Components
- Case Design
- Keyboard
- Display
- System Tray Indicators
- Batteries
- Main Power Source
- Setting Battery Charge
- Battery Life
- Recharging the NiMH Battery Pack
- Battery Gauging Explained
- Battery Status Icons
- When the Battery Voltage Drops
- Power Management Feature
- Changing NiMH Battery Pack
- Alkaline Battery Holder: Inserting Batteries and Usage Information
- Storing the Allegro CE During Inactive Periods
- NiMH Battery Pack's Useful Life
- Spare NiMH Battery Packs
- Short-Term Backup Supply
- Real Time Clock
- Main Power Source
- Communication Ports
- USB/Power Dock
- PC Cards
- Expansion Pods
- Chapter 3 Memory Configuration and Data Storage Options
- Chapter 4 Windows CE Operating System
- Windows CE Overview
- CE .NET Viewers
- ActiveSync Transfer
- Downloading ActiveSync from the Internet
- Installing ActiveSync
- Establishing a First Time ActiveSync Connection
- Establishing Additional ActiveSync Connections
- New Partnership Set Up
- USB MultiSync
- USB MultiSync Connections
- Transferring Files Between the Allegro CE and the Desktop PC
- Windows Explorer
- Storing Files and Programs
- System Save/Restore Utilities
- Application Command Bars
- PTab Spreadsheet Program
- Pocket Word/WordPad
- Internet Explorer and Inbox
- Calculator Program
- Terminal Program
- Chapter 5 Technical Reference
- Chapter 6 Software Developer’s Guide for Allegro CE 3.0 and CE .NET
- Chapter 7 FCC Information, Warranty, and Software License Agreement
- Chapter 8 Expansion Pods
- Index

Hardware Features Page 2-35
Connecting Sensors to COM1
Pin 4 (DTR) on COM1 supplies up to 200 mA at +5 volts to power bar
code scanners and other sensors. This signal (DTR) must be set high
by the application to take advantage of this feature. When the DTR
signal goes low, the output is -5 volts. Insure that the device
connected to the DTR line can accept negative voltages or is protected
against them (standard RS-232 signal levels).
▲▲
▲▲
▲ Infrared Communication Port
The infrared wireless communication port (IrDA) located on the top of
the Allegro case allows you to send data to a printer or another
computer with an IrDA port without the need for a cable. The IrDA
port adheres to the Infrared Data Association Standards. The infrared
COM port runs at the speed of 115 kbps.
< IrDA Port
The IrDA port is used to connect the Allegro and a desktop or laptop
computer together to run ActiveSync, which allows you to transfer
and copy files between the computers and manage the Allegro files
remotely. Files can be sent from the Allegro directly to a printer with
an IrDA port from programs that have printing capabilities built-in,
such as Pocket Word.
The Allegro and the other device communicating with it via an IrDA
port need to be placed less than one meter apart with their infrared
ports aimed right at each other (within 15 degrees in any direction).
▲▲
▲▲
▲ USB Communication Port
The USB communication port located on the base of the Allegro case
allows you to send data to a desktop PC with a USB connection. The
USB COM port runs at standard USB speed (12 mbps).
The USB port connection is to be used with USB/Power Dock
, and is
discussed in detail in the USB/Power Dock section of this manual.