
User Manual


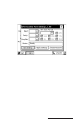

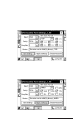


Table Of Contents
- Allegro CE™ Owner's Manual
- Table of Contents
- Chapter 1 Introduction
- Chapter 2 Hardware Components
- Chapter 3 Memory Configuration and Data Storage Options
- Chapter 4 Windows CE Operating System
- Chapter 5 Technical Reference
- Chapter 6 Software Developer’s Guide for Allegro CE 3.0 and CE .NET
- Chapter 7 FCC Information, Warranty, and Software License Agreement
- Chapter 8 Expansion Pods
- Index
- Table of Contents
- Chapter 1 Introduction
- Chapter 2 Hardware Components
- Case Design
- Keyboard
- Display
- System Tray Indicators
- Batteries
- Main Power Source
- Setting Battery Charge
- Battery Life
- Recharging the NiMH Battery Pack
- Battery Gauging Explained
- Battery Status Icons
- When the Battery Voltage Drops
- Power Management Feature
- Changing NiMH Battery Pack
- Alkaline Battery Holder: Inserting Batteries and Usage Information
- Storing the Allegro CE During Inactive Periods
- NiMH Battery Pack's Useful Life
- Spare NiMH Battery Packs
- Short-Term Backup Supply
- Real Time Clock
- Main Power Source
- Communication Ports
- USB/Power Dock
- PC Cards
- Expansion Pods
- Chapter 3 Memory Configuration and Data Storage Options
- Chapter 4 Windows CE Operating System
- Windows CE Overview
- CE .NET Viewers
- ActiveSync Transfer
- Downloading ActiveSync from the Internet
- Installing ActiveSync
- Establishing a First Time ActiveSync Connection
- Establishing Additional ActiveSync Connections
- New Partnership Set Up
- USB MultiSync
- USB MultiSync Connections
- Transferring Files Between the Allegro CE and the Desktop PC
- Windows Explorer
- Storing Files and Programs
- System Save/Restore Utilities
- Application Command Bars
- PTab Spreadsheet Program
- Pocket Word/WordPad
- Internet Explorer and Inbox
- Calculator Program
- Terminal Program
- Chapter 5 Technical Reference
- Chapter 6 Software Developer’s Guide for Allegro CE 3.0 and CE .NET
- Chapter 7 FCC Information, Warranty, and Software License Agreement
- Chapter 8 Expansion Pods
- Index

Page 8-8 Expansion Pods
After the settings have been selected, tap on the Apply Settings button
to save the new settings. Tap on the Get Settings button to bring up
the GPS pods current settings to double check them.
Reviewing and Editing the Receiver Parameters
Once you determine which data format you are going to use, follow
these steps to review and edit the parameters as needed:
1. Click on the Get Settings button to reset the parameters to their
default setting.
2. Change the parameters, if necessary, by clicking on the down
arrow on the right of the Baud, Parity, Stop Bits, and/or GPS Data
Format box to bring up a list of setting options, and click on the
setting you want.
3. Click on the Apply Settings button.
4. Click on the X in the top right corner to Exit out of the program.
▲▲
▲▲
▲ Tips for Using the GPS Expansion Pod
Keep the following tips in mind while using the Allegro with the GPS
expansion pod:
1. When attempting to receive GPS signals, get the clearest view of
the sky as possible. Obstructions such as buildings, trees,
mountains, and your body can keep signals fr om reaching the
receiver.
2. Do not cover the antenna with anything while you are using the
system.
3. The antenna can be mounted on a vehicle or a pole, a longer cable
is required to do this. Contact our Sales Department for details.
4. Using the GPS expansion pod, and GPS or GIS software running
on the Allegro may cause the Allegro battery to drain at a faster
rate. This rate depends on the software and how much processing
is taking place.