
User Manual


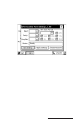

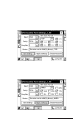


Table Of Contents
- Allegro CE™ Owner's Manual
- Table of Contents
- Chapter 1 Introduction
- Chapter 2 Hardware Components
- Chapter 3 Memory Configuration and Data Storage Options
- Chapter 4 Windows CE Operating System
- Chapter 5 Technical Reference
- Chapter 6 Software Developer’s Guide for Allegro CE 3.0 and CE .NET
- Chapter 7 FCC Information, Warranty, and Software License Agreement
- Chapter 8 Expansion Pods
- Index
- Table of Contents
- Chapter 1 Introduction
- Chapter 2 Hardware Components
- Case Design
- Keyboard
- Display
- System Tray Indicators
- Batteries
- Main Power Source
- Setting Battery Charge
- Battery Life
- Recharging the NiMH Battery Pack
- Battery Gauging Explained
- Battery Status Icons
- When the Battery Voltage Drops
- Power Management Feature
- Changing NiMH Battery Pack
- Alkaline Battery Holder: Inserting Batteries and Usage Information
- Storing the Allegro CE During Inactive Periods
- NiMH Battery Pack's Useful Life
- Spare NiMH Battery Packs
- Short-Term Backup Supply
- Real Time Clock
- Main Power Source
- Communication Ports
- USB/Power Dock
- PC Cards
- Expansion Pods
- Chapter 3 Memory Configuration and Data Storage Options
- Chapter 4 Windows CE Operating System
- Windows CE Overview
- CE .NET Viewers
- ActiveSync Transfer
- Downloading ActiveSync from the Internet
- Installing ActiveSync
- Establishing a First Time ActiveSync Connection
- Establishing Additional ActiveSync Connections
- New Partnership Set Up
- USB MultiSync
- USB MultiSync Connections
- Transferring Files Between the Allegro CE and the Desktop PC
- Windows Explorer
- Storing Files and Programs
- System Save/Restore Utilities
- Application Command Bars
- PTab Spreadsheet Program
- Pocket Word/WordPad
- Internet Explorer and Inbox
- Calculator Program
- Terminal Program
- Chapter 5 Technical Reference
- Chapter 6 Software Developer’s Guide for Allegro CE 3.0 and CE .NET
- Chapter 7 FCC Information, Warranty, and Software License Agreement
- Chapter 8 Expansion Pods
- Index

Page 8-6 Expansion Pods
5. Change the parameters on the GPS/GIS program’s configuration
menu to match the default GPS pod settings or change the
parameters on your Allegro to match your pr ogram. If you
change the settings on your Allegro, tap on Apply Settings.
The Com Port and Data Bit are set and not changable on the
Allegro. All GPS programs that offer these settings to be changed
must be set to the following Allegro settings:
Com Port: 3
Data Bits: 8
6. Connect the GPS. The Allegro must be outside in clear sky
conditions (this means free from tree foliage, buildings, power
lines, etc.) to receive a new GPS almanac. The receiver can take
up to 20 minutes to establish and receive the almanac.
❖ Note: If your parameters do not match, some GPS programs (i.e.
ArcPad, TerraSync) produce an error message when attempting to activate
the GPS pod. This error means the communication parameters in the GPS
program are not set to match the GPS pod. Go back to the GPS programs
setup page and check to make sure those settings are the same settings as as
the settings on your Allegro’s GPS Receiver Port Settings screen.
At the bottom of the screen, there are three function buttons: Get
Settings, Apply Settings, and Reset Receiver.
Get Settings
The Get Settings button is used to see the receiver’s current settings
without changing the settings. Pressing Get Settings does a search for
the GPS receiver, which can take up to one minute to find the settings.
Once the search is complete, the current settings for the GPS receiver
are shown.
Apply Setting
Tap on the Apply Settings button to save and apply new settings. To
make sure that your settings are applied correctly, press Get Settings to
check the parameters.
Reset Receiver
The Reset Receiver button returns the settings to their default setting.
This function enables you to start over in the event that an error was
made.