
Internet Router Hardware Guide


Replacing Hardware Components
NOTE: Wait until a message appears on the console confirming that the operating
system has halted.
For more information about the command, see the JUNOS Protocols, Class of
Service, and System Basics Command Reference.
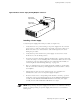
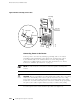
2. For each power supply, press the power switch on the circuit breaker box to
the
OFF (O) position.
NOTE: If you are power cycling the power supply rather than shutting it off for a
time, wait at least 60 seconds after turning it off before turning it back on. If you
needtopoweritoffagain,waitforatleast60secondsafterpoweringiton.
3. Shut off the power flowing from both external power sources, so that the
voltage across the leads of the power cables is 0 V. Ensure that there is no
chance that the cable leads might become active during the procedure.
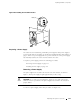
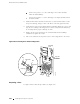
4. Using a Phillips screwdriver, loosen and remove the screws securing the
protective shield over the terminal studs on the circuit breaker box. Remove
the cover.
5. Using a 7/16-in. nut driver or wrench, loosen the outer nut securing the cable
lug to each terminal stud. Remove the outer nuts and washers, leaving the
innernutandwasheroneachstud.
CAUTION: Do not substitute a metric nut driver or wrench. A tool that does not fit
thenutsexactlycandamagethem.Ifa7/16-in.toolisnotavailable,usepliersor
an adjustable wrench.
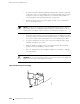
6. Slidethecablelugoffofeachterminalstud.Leavetheinnerwasherandnut
on each stud.
7. If you are decommissioning the router, loosen and r emove the screws that
secure the grounding lug to the chassis and remove the grounding lug.
8. If not immediately attaching replacement cables, replace the protective shield
on the circuit breaker box and tighten the screws that secure it to the box.
9. Verify that the removed cables are not touching or blocking access to any
router components.
Replacing Power System Components 201