
Internet Router Hardware Guide


Replacing Hardware Components
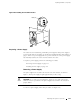
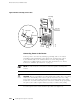
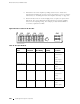
Figure 102: Rear of Power Supply Showing Midplane Connectors
Power supply
input connectors
1224
Power supply
output connectors
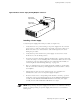
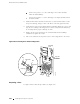
Installing a Power Supply
To install a power supply, follow this procedure (see Figure 103):
1. Verify that there is no power flowing to the power supply from the external
power source, so that the voltage across the leads of the power cables is 0 V.
Ensure that there is no chance that the cable leads might become active
during the procedure.
2. Verify that the power switch for the power supply (located on the circuit
breaker box) is in the
OFF (O) position.
3. A tt ach an electrostatic discharge (ESD) grounding strap to your bare wrist and
connect the strap to one of the ESD points on the chassis. Make sure t he router
is attached to a proper earth ground. For more information about ESD, see
“Preventing Electrostatic Discharge Damage” on page 226.
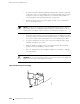
4. Place one hand under the power supply and grasp a handle on the faceplate
with the other hand. Slide the power supply into the chassis until it contacts
the midplane.
5. Starting with the bottom screws, tighten ( but do not overtighten) the
thumbscrew at each corner of the power supply faceplate.
6. Press the switch on the corresponding circuit breaker to the ON ( | )position.
Verify that on the power supply faceplate the green LED labeled
CB ON lights
steadily, the blue LED labeled
OUTPUT OK blinks momentarily, then lights
steadily, and the amber LED labeled
CB OFF does not light.
NOTE: After powering off a power supply, wait at least 60 seconds before turning
it back on. After powering on a power supply, wait at least 60 seconds before
turning it off.
Replacing Power System Components 199