
Internet Router Hardware Guide

M160 Internet Router Hardware Guide
Connect the positive (+) source cable lugs to the r eturn terminals on the
circuit breaker box, which are labeled
RTN(+).
Connect the negative (–) source cable lugs to the input terminals on t he
circuit breaker box, which are labeled
–48V.
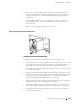
7. Slide a washer and then screw a nut onto each terminal stud (if the washers
and nuts were not installed on the studs, they should be in the accessory box).
Using a 7/16-in. nut driver or wrench, tighten the nuts .
CAUTION: Do not substitute a metric nut driver or wrench. A tool that does not fit
thenutsexactlycandamagethem.Ifa7/16-in.toolisnotavailable,usepliersor
an adjustable wrench.
8. Replace the protective shield on the circuit breaker box and tighten the screws
that secure it to the box.
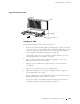
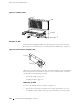
9. Replace the rear lower impeller assembly by lining up the rails with the
guides inside the chassis, pushing the impeller straight in, and tightening the
thumbscrew at each corner of the impeller cover. For complete instructions,
see “Installing the Rear Lower Impeller Assembly” on page 155.
10. Apply voltage from the DC power sources to the power c ables so the router
receives power.
11 . Press the switches on the circuit breaker box to the ON ( | ) position.
12. Confirm that the LEDs on the po wer supply faceplates indicate correct
operation: the green
CB ON LED lights steadily, the blue OUTPUT OK LE D blinks
briefly, then lights steadily, and the amber
CB OFF LED does not light.
NOTE: After powering off a power supply, wait at least 60 seconds before turning
it back on. After powering on a power supply, wait at least 60 seconds before
turning it off.
If the router is completely powered down when you power on the power supply,
the Routing Engine boots as the power supply completes its startup sequence. If
the Routing Engine finishes booting and you need to power down the router
again, first issue the CLI
request system halt command. For more information, see
“Disconnecting Power from the Router” on page 200.
After a power supply is powered on, it can take up to 60 seconds for status
indicators—such as LEDs on the power supply,
show chassis commands, and
messages on the craft interface LCD—to indicate that the power supply is
functioning normally. Ignore error indicators that appear during the first 60 seconds.
196 R eplacing Power System Components