
Internet Router Hardware Guide

Replacing Hardware Components
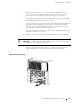
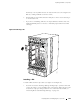
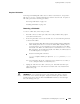
Figure 91: Installing a PCG
1930
PCG 0
SFM 0
SFM 1
MCS 0
RE 0
RE 1
MCS 1
PCG 1
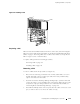
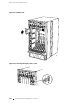
Replacing a PIC
PICs are housed in the FPCs installed in the front of the router, as shown in Figure 1.
PICs are hot-removable and hot-insertable, as described in Field-Replaceable Units
(FRUs) on page 4. Removing a PIC does not affect router function, except that t he
PIC no longer receives or transmits data.
To replace a PIC, perform the following procedures:
Removing a PIC on page 179
Installing a PIC on page 181
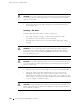
Removing a PIC
To remove a PIC, follow this procedure (see Figure 92):
1. Place an electrostatic bag or antistatic mat on a flat, stable surface to receive
the PIC. If the PIC connects to fiber-optic cable, have r eady a rubber safety
cap for each transceiver and cable.
2. A tt ach an electrostatic discharge (ESD) grounding strap to your bare wrist and
connect the strap to one of the ESD points on the chassis. Make sure t he router
is attached to a proper earth ground. For more information about ESD, see
“Preventing Electrostatic Discharge Damage” on page 226.
3. If the PIC has multiple cable connector ports, label the cable connected to each
port, to make it easier to reconnect the cables correctly.
Replacing Packet Forwarding Engine Components 179