
Internet Router Hardware Guide

M160 Internet Router Hardware Guide
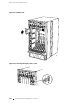
Installing a PCG
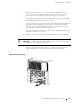
To install a PCG, follow this procedure (see Figure 91):
1. A tt ach an electrostatic discharge (ESD) grounding strap to your bare wrist and
connect the strap to one of the ESD points on the chassis. Make sure t he router
is attached to a proper earth ground. For more information about ESD, see
“Preventing Electrostatic Discharge Damage” on page 226.
2. Place one hand under the PCG to support it and grasp the thumbscrew on
the faceplate with the other hand.
3. AligntherearofthePCGwiththeguidesinsidethechassisandslideit
in completely.
4. Tighten the thumbscrew on the faceplate to seat the PCG firmly in the chassis.
5. Verify that the green LED labeled OK lights steadily, which takes about
3seconds.
You can also verify correct PCG functioning by issuing the
show chassis environment pcg command, as described in “Maintaining the PCGs”
on page 135.
6. Reinstall the rear component cover and tighten the thumbscrew at each corner
to secure it to the chassis. For complete instructions, see “Reinstalling the Rear
Component Cover” on page 109.
CAUTION: To maintain proper airflow and provide electromagnetic shielding, do
not operate the router without the rear component cover in place.
178 R eplacing Packet Forwarding Engine Components