
Internet Router Hardware Guide


Replacing Hardware Components
Installing the Craft Interface on the Front Impeller Assembly on page 153
Installing the Front Impeller Assembly on page 154
If the replacement front impeller assembly already has a craft interface on it,
perform only the procedures in “Removing the Front Impeller A ssembly” on
page 151 and “Installing the Front Impeller Assembly” on page 154.
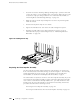
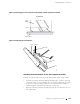
Removing the Front Impeller Assembly
To remove the front impeller assembly, follow this procedure (see Figure 71):
1. Place an electrostatic bag or antistatic mat on a flat, stable surface.
2. A tt ach an electrostatic discharge (ESD) grounding strap to your bare wrist and
connect the strap to one of the ESD points on the chassis. Make sure t he router
is attached to a proper earth ground. For more information about ESD, see
“Preventing Electrostatic Discharge Damage” on page 226.
3. Using a Phillips screwdriver, loosen the captive screw at e ach corner of the
craft interface.
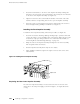
4. Insert a flat-blade screwdriver into the gap around the craft interface and
gently pry the impeller assembly forward until you can grasp the sides of the
assembly and slide it halfway out of the chassis.
CAUTION: To avoid injury, as you slide the assembly out of the chassis do not touch
any part of the impeller behind the front panel—the impeller might still be spinning.
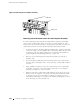
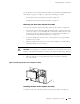
5. Place one hand under the assembly to support it. When the impeller is no
longer spinning, slide the assembly completely out of the chassis and place it
on the antistatic mat or in the electrostatic bag.
6. If you are replacing the front impeller assembly and the replacement assembly
hasacraftinterfacepanelinstalledonit,proceedto“InstallingtheFront
Impeller Assembly” on page 154. Otherwise, proceed to “Removing the Craft
Interface from the Front Impeller Assembly” on page 152.
Replacing Cooling S ystem Components 151